对自定义view还不是很了解的码友可以先看自定义View入门这篇文章,本文主要对自定义ViewGroup的过程的梳理,废话不多说。
1.View 绘制流程
ViewGroup也是继承于View,下面看看绘制过程中依次会调用哪些函数。
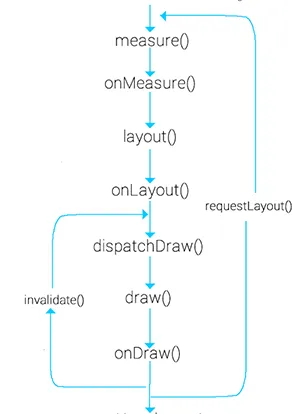
说明:
measure()和onMeasure()
在View.Java源码中:
public final void measure(int widthMeasureSpec,int heightMeasureSpec){
  ···
onMeasure
  ···
}
protected void onMeasure(int widthMeasureSpec,int heightMeasureSpec) {
        setMeasuredDimension(getDefaultSize(getSuggestedMinimumWidth(), widthMeasureSpec),
        getDefaultSize(getSuggestedMinimumHeight(), heightMeasureSpec));
}
可以看出measure()是被final修饰的,这是不可被重写。onMeasure在measure方法中调用的,当我们继承View的时候通过重写onMeasure方法来测量控件大小。
layout()和onLayout(),draw()和onDraw()类似。
dispatchDraw()
View 中这个函数是一个空函数,ViewGroup 复写了dispatchDraw()来对其子视图进行绘制。自定义的 ViewGroup 一般不对dispatchDraw()进行复写。
requestLayout()
当布局变化的时候,比如方向变化,尺寸的变化,会调用该方法,在自定义的视图中,如果某些情况下希望重新测量尺寸大小,应该手动去调用该方法,它会触发measure()和layout()过程,但不会进行 draw。
自定义ViewGroup的时候一般复写
onMeasure()方法:
计算childView的测量值以及模式,以及设置自己的宽和高
onLayout()方法,
对其所有childView的位置进行定位
View树:
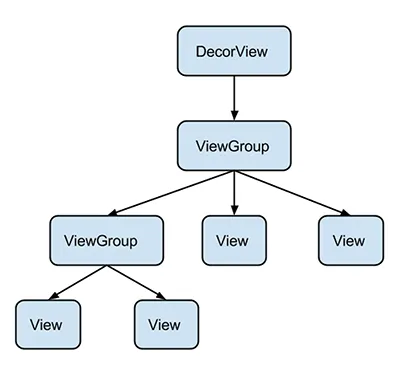
树的遍历是有序的,由父视图到子视图,每一个 ViewGroup 负责测绘它所有的子视图,而最底层的 View 会负责测绘自身。
- measure:
自上而下进行遍历,根据父视图对子视图的MeasureSpec以及ChildView自身的参数,通过
getChildMeasureSpec(parentHeightMeasure,mPaddingTop+mPaddingBottom,lp.height)
获取ChildView的MeasureSpec,回调ChildView.measure最终调用setMeasuredDimension得到ChildView的尺寸:
mMeasuredWidth 和 mMeasuredHeight
Layout :
也是自上而下进行遍历的,该方法计算每个ChildView的ChildLeft,ChildTop;与measure中得到的每个ChildView的mMeasuredWidth 和 mMeasuredHeight,来对ChildView进行布局。
child.layout(left,top,left+width,top+height)
2.onMeasure过程
measure过程会为一个View及所有子节点的mMeasuredWidth
和mMeasuredHeight变量赋值,该值可以通过getMeasuredWidth()和getMeasuredHeight()方法获得。
onMeasure过程传递尺寸的两个类:
ViewGroup.LayoutParams (ViewGroup 自身的布局参数)
用来指定视图的高度和宽度等参数,使用 view.getLayoutParams() 方法获取一个视图LayoutParams,该方法得到的就是其所在父视图类型的LayoutParams,比如View的父控件为RelativeLayout,那么得到的 LayoutParams 类型就为RelativeLayoutParams。
①具体值
②MATCH_PARENT 表示子视图希望和父视图一样大(不包含 padding 值)
③WRAP_CONTENT 表示视图为正好能包裹其内容大小(包含 padding 值)
MeasureSpecs
测量规格,包含测量要求和尺寸的信息,有三种模式:
①UNSPECIFIED
父视图不对子视图有任何约束,它可以达到所期望的任意尺寸。比如 ListView、ScrollView,一般自定义 View 中用不到
②EXACTLY
父视图为子视图指定一个确切的尺寸,而且无论子视图期望多大,它都必须在该指定大小的边界内,对应的属性为 match_parent 或具体值,比如 100dp,父控件可以通过MeasureSpec.getSize(measureSpec)直接得到子控件的尺寸。
③AT_MOST
父视图为子视图指定一个最大尺寸。子视图必须确保它自己所有子视图可以适应在该尺寸范围内,对应的属性为 wrap_content,这种模式下,父控件无法确定子 View 的尺寸,只能由子控件自己根据需求去计算自己的尺寸,这种模式就是我们自定义视图需要实现测量逻辑的情况。
3.onLayout 过程
子视图的具体位置都是相对于父视图而言的。View 的 onLayout 方法为空实现,而 ViewGroup 的 onLayout 为 abstract 的,因此,如果自定义的自定义ViewGroup 时,必须实现 onLayout 函数。
在 layout 过程中,子视图会调用getMeasuredWidth()和getMeasuredHeight()方法获取到 measure 过程得到的 mMeasuredWidth 和 mMeasuredHeight,作为自己的 width 和 height。然后调用每一个子视图的layout(l, t, r, b)函数,来确定每个子视图在父视图中的位置。
4.示例程序
先上效果图:
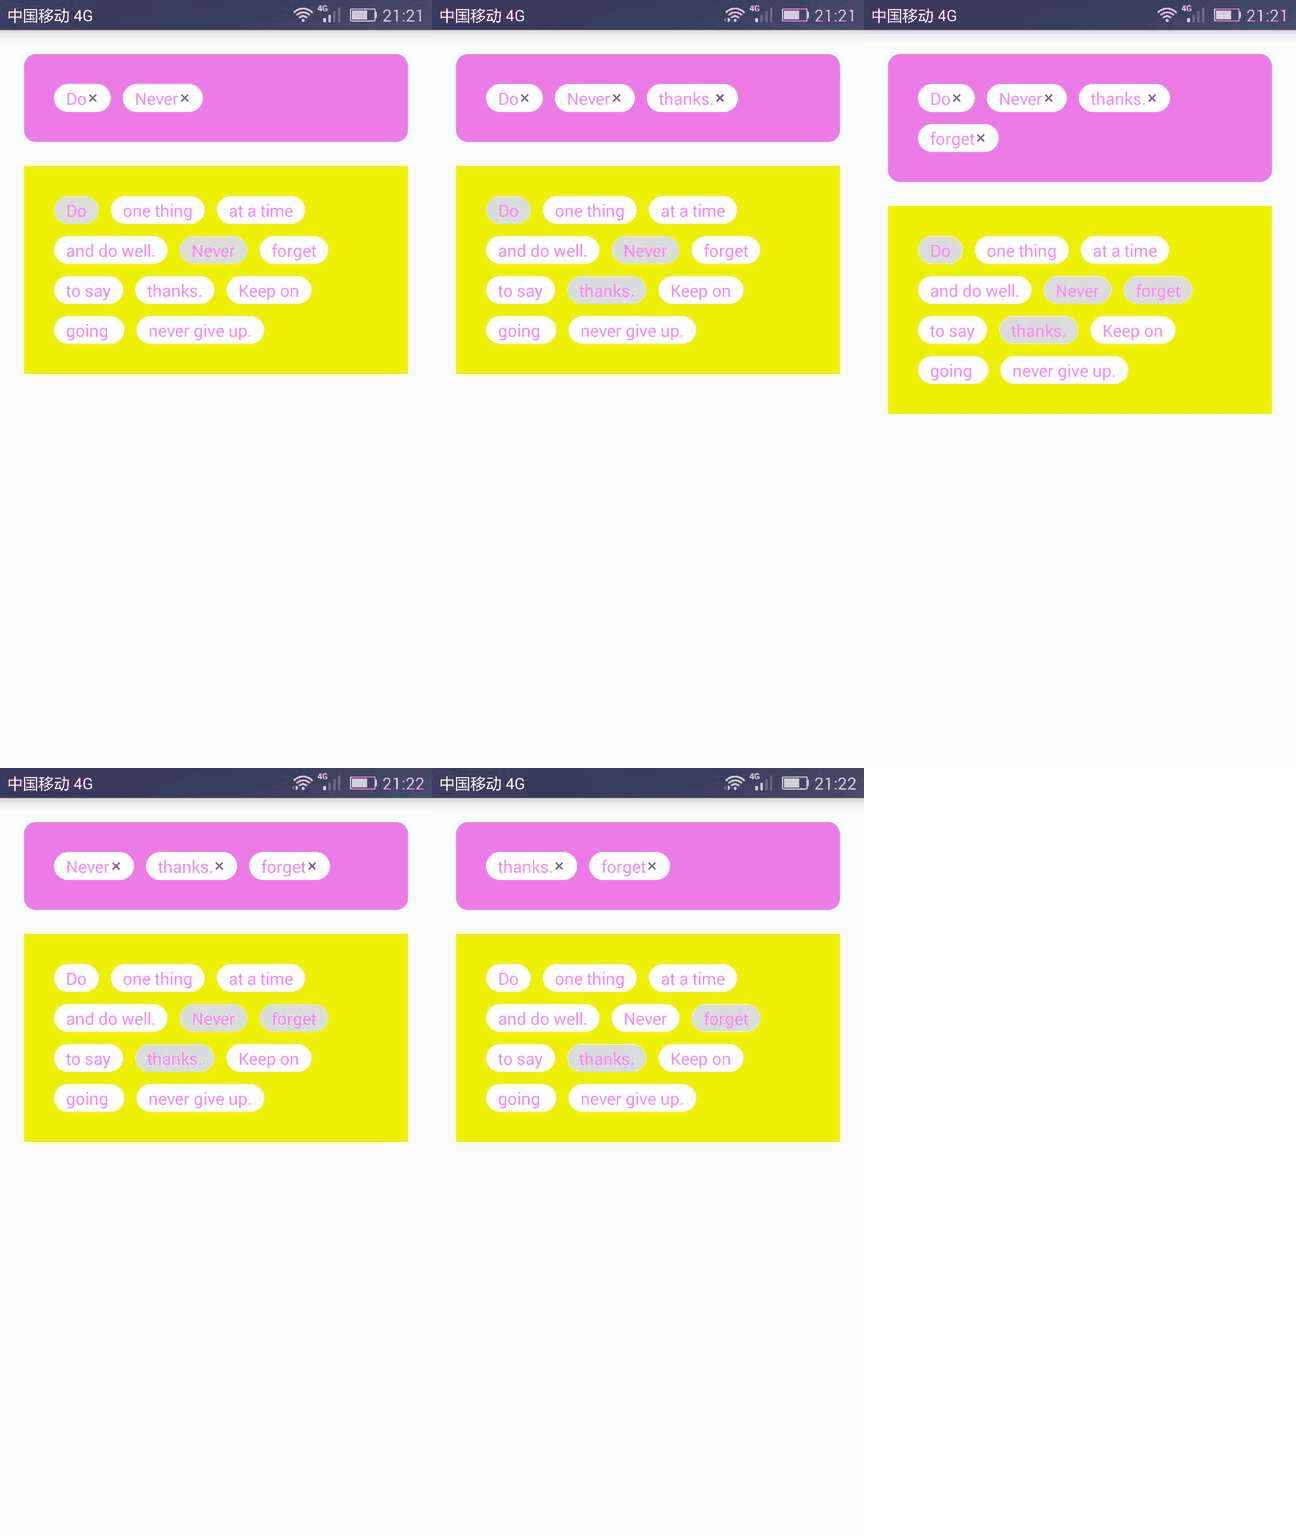
代码中有详细的注释,结合上文中的说明,理解应该没有问题。这里主要贴出核心代码。
FlowLayout.java中(参照阳神的慕课课程)
onMeasure方法
 @Override
    protected void onMeasure(int widthMeasureSpec, int heightMeasureSpec)
    {
        // 获得它的父容器为它设置的测量模式和大小
        int sizeWidth = MeasureSpec.getSize(widthMeasureSpec);
        int modeWidth = MeasureSpec.getMode(widthMeasureSpec);
        int sizeHeight = MeasureSpec.getSize(heightMeasureSpec);
        int modeHeight = MeasureSpec.getMode(heightMeasureSpec);
        // 用于warp_content情况下,来记录父view宽和高
        int width = 0;
        int height = 0;
        // 取每一行宽度的最大值
        int lineWidth = 0;
        // 每一行的高度累加
        int lineHeight = 0;
        // 获得子view的个数
        int cCount = getChildCount();
        for (int i = 0; i < cCount; i++)
        {
            View child = getChildAt(i);
            // 测量子View的宽和高(子view在布局文件中是wrap_content)
            measureChild(child, widthMeasureSpec, heightMeasureSpec);
            // 得到LayoutParams
            MarginLayoutParams lp = (MarginLayoutParams) child.getLayoutParams();
            // 根据测量宽度加上Margin值算出子view的实际宽度(上文中有说明)
            int childWidth = child.getMeasuredWidth() + lp.leftMargin + lp.rightMargin;
            // 根据测量高度加上Margin值算出子view的实际高度
            int childHeight = child.getMeasuredHeight() + lp.topMargin+ lp.bottomMargin;
            // 这里的父view是有padding值的,如果再添加一个元素就超出最大宽度就换行
            if (lineWidth + childWidth > sizeWidth - getPaddingLeft() - getPaddingRight())
            {
                // 父view宽度=以前父view宽度、当前行宽的最大值
                width = Math.max(width, lineWidth);
                // 换行了,当前行宽=第一个view的宽度
                lineWidth = childWidth;
                // 父view的高度=各行高度之和
                height += lineHeight;
                //换行了,当前行高=第一个view的高度
                lineHeight = childHeight;
            } else{
                // 叠加行宽
                lineWidth += childWidth;
                // 得到当前行最大的高度
                lineHeight = Math.max(lineHeight, childHeight);
            }
            // 最后一个控件
            if (i == cCount - 1)
            {
                width = Math.max(lineWidth, width);
                height += lineHeight;
            }
        }
        /**
         * EXACTLY对应match_parent 或具体值
         * AT_MOST对应wrap_content
         * 在FlowLayout布局文件中
         * android:layout_width="fill_parent"
         * android:layout_height="wrap_content"
         *
         * 如果是MeasureSpec.EXACTLY则直接使用父ViewGroup传入的宽和高,否则设置为自己计算的宽和高。
         */
        setMeasuredDimension(
                modeWidth == MeasureSpec.EXACTLY ? sizeWidth : width + getPaddingLeft() + getPaddingRight(),
                modeHeight == MeasureSpec.EXACTLY ? sizeHeight : height + getPaddingTop()+ getPaddingBottom()
        );
    }
onLayout方法
 //存储所有的View
    private List<List<View>> mAllViews = new ArrayList<List<View>>();
    //存储每一行的高度
    private List<Integer> mLineHeight = new ArrayList<Integer>();
    @Override
    protected void onLayout(boolean changed, int l, int t, int r, int b)
    {
        mAllViews.clear();
        mLineHeight.clear();
        // 当前ViewGroup的宽度
        int width = getWidth();
        int lineWidth = 0;
        int lineHeight = 0;
        // 存储每一行所有的childView
        List<View> lineViews = new ArrayList<View>();
        int cCount = getChildCount();
        for (int i = 0; i < cCount; i++)
        {
            View child = getChildAt(i);
            MarginLayoutParams lp = (MarginLayoutParams) child.getLayoutParams();
            int childWidth = child.getMeasuredWidth();
            int childHeight = child.getMeasuredHeight();
            lineWidth += childWidth + lp.leftMargin + lp.rightMargin;
            lineHeight = Math.max(lineHeight, childHeight + lp.topMargin+ lp.bottomMargin);
            lineViews.add(child);
            // 换行,在onMeasure中childWidth是加上Margin值的
            if (childWidth + lineWidth + lp.leftMargin + lp.rightMargin > width - getPaddingLeft() - getPaddingRight())
            {
                // 记录行高
                mLineHeight.add(lineHeight);
                // 记录当前行的Views
                mAllViews.add(lineViews);
                // 新行的行宽和行高
                lineWidth = 0;
                lineHeight = childHeight + lp.topMargin + lp.bottomMargin;
                // 新行的View集合
                lineViews = new ArrayList<View>();
            }
        }
        // 处理最后一行
        mLineHeight.add(lineHeight);
        mAllViews.add(lineViews);
        // 设置子View的位置
        int left = getPaddingLeft();
        int top = getPaddingTop();
        // 行数
        int lineNum = mAllViews.size();
        for (int i = 0; i < lineNum; i++)
        {
            // 当前行的所有的View
            lineViews = mAllViews.get(i);
            lineHeight = mLineHeight.get(i);
            for (int j = 0; j < lineViews.size(); j++)
            {
                View child = lineViews.get(j);
                // 判断child的状态
                if (child.getVisibility() == View.GONE)
                {
                    continue;
                }
                MarginLayoutParams lp = (MarginLayoutParams) child.getLayoutParams();
                int lc = left + lp.leftMargin;
                int tc = top + lp.topMargin;
                int rc = lc + child.getMeasuredWidth();
                int bc = tc + child.getMeasuredHeight();
                // 为子View进行布局
                child.layout(lc, tc, rc, bc);
                left += child.getMeasuredWidth() + lp.leftMargin+ lp.rightMargin;
            }
            left = getPaddingLeft() ;
            top += lineHeight ;
        }
    }
    /**
     * 因为我们只需要支持margin,所以直接使用系统的MarginLayoutParams
     */
    @Override
    public LayoutParams generateLayoutParams(AttributeSet attrs)
    {
        return new MarginLayoutParams(getContext(), attrs);
    }
以及MainActivity.java
public class MainActivity extends Activity {
    LayoutInflater mInflater;
    @InjectView(R.id.id_flowlayout1)
    FlowLayout idFlowlayout1;
    @InjectView(R.id.id_flowlayout2)
    FlowLayout idFlowlayout2;
    private String[] mVals = new String[]
            {"Do", "one thing", "at a time", "and do well.", "Never", "forget",
                    "to say", "thanks.", "Keep on", "going ", "never give up."};
    @Override
    protected void onCreate(Bundle savedInstanceState) {
        super.onCreate(savedInstanceState);
        setContentView(R.layout.activity_main);
        ButterKnife.inject(this);
        mInflater = LayoutInflater.from(this);
        initFlowlayout2();
    }
    public void initFlowlayout2() {
        for (int i = 0; i < mVals.length; i++) {
            final RelativeLayout rl2 = (RelativeLayout) mInflater.inflate(R.layout.flow_layout, idFlowlayout2, false);
            TextView tv2 = (TextView) rl2.findViewById(R.id.tv);
            tv2.setText(mVals[i]);
            rl2.setTag(i);
            idFlowlayout2.addView(rl2);
            rl2.setOnClickListener(new View.OnClickListener() {
                @Override
                public void onClick(View v) {
                    int i = (int) v.getTag();
                    addViewToFlowlayout1(i);
                    rl2.setBackgroundResource(R.drawable.flow_layout_disable_bg);
                    rl2.setClickable(false);
                }
            });
        }
    }
    public void addViewToFlowlayout1(int i){
        RelativeLayout rl1 = (RelativeLayout) mInflater.inflate(R.layout.flow_layout, idFlowlayout1, false);
        ImageView iv = (ImageView) rl1.findViewById(R.id.iv);
        iv.setVisibility(View.VISIBLE);
        TextView tv1 = (TextView) rl1.findViewById(R.id.tv);
        tv1.setText(mVals[i]);
        rl1.setTag(i);
        idFlowlayout1.addView(rl1);
        rl1.setOnClickListener(new View.OnClickListener() {
            @Override
            public void onClick(View v) {
                int i = (int) v.getTag();
                idFlowlayout1.removeView(v);
                View view = idFlowlayout2.getChildAt(i);
                view.setClickable(true);
                view.setBackgroundResource(R.drawable.flow_layout_bg);
            }
        });
    }
这个项目源码已经上传,想要看源码的朋友可以
点击 FlowLayout
如果有什么疑问可以给我留言,不足之处欢迎在github上指出,谢谢!