
2.5.2 引入到 container 中
在 container/webpack.config.js 中增加:
const HtmlWebpackPlugin = require("html-webpack-plugin");
const ModuleFederationPlugin = require("webpack/lib/container/ModuleFederationPlugin");
module.exports = {
  mode: "development",
  devServer: {
    port: 8080,
  },
  plugins: [
    new ModuleFederationPlugin({
      name: "container",
      remotes: {
        microFrontEnd1: "microFrontEnd1@http://localhost:8081/remoteEntry.js",
        microFrontEnd2: "microFrontEnd2@http://localhost:8082/remoteEntry.js",
      },
    }),
    new HtmlWebpackPlugin({
      template: "./public/index.html",
    }),
  ],
};
在 container/src/bootstrab.js 中添加以下导入:
import "microFrontEnd1/MicroFrontEnd1Index";
import "microFrontEnd2/MicroFrontEnd2Index";
console.log("Container!");
在 container/public/index.html 中,添加一个 id 为 micro-front-end-2 的 div:
<!DOCTYPE html> <html lang="en"> <head> </head> <body> <div id="root"></div> <h1>** The second Micro Frontend **</h1> <div id="microFrontend2"></div> </body> 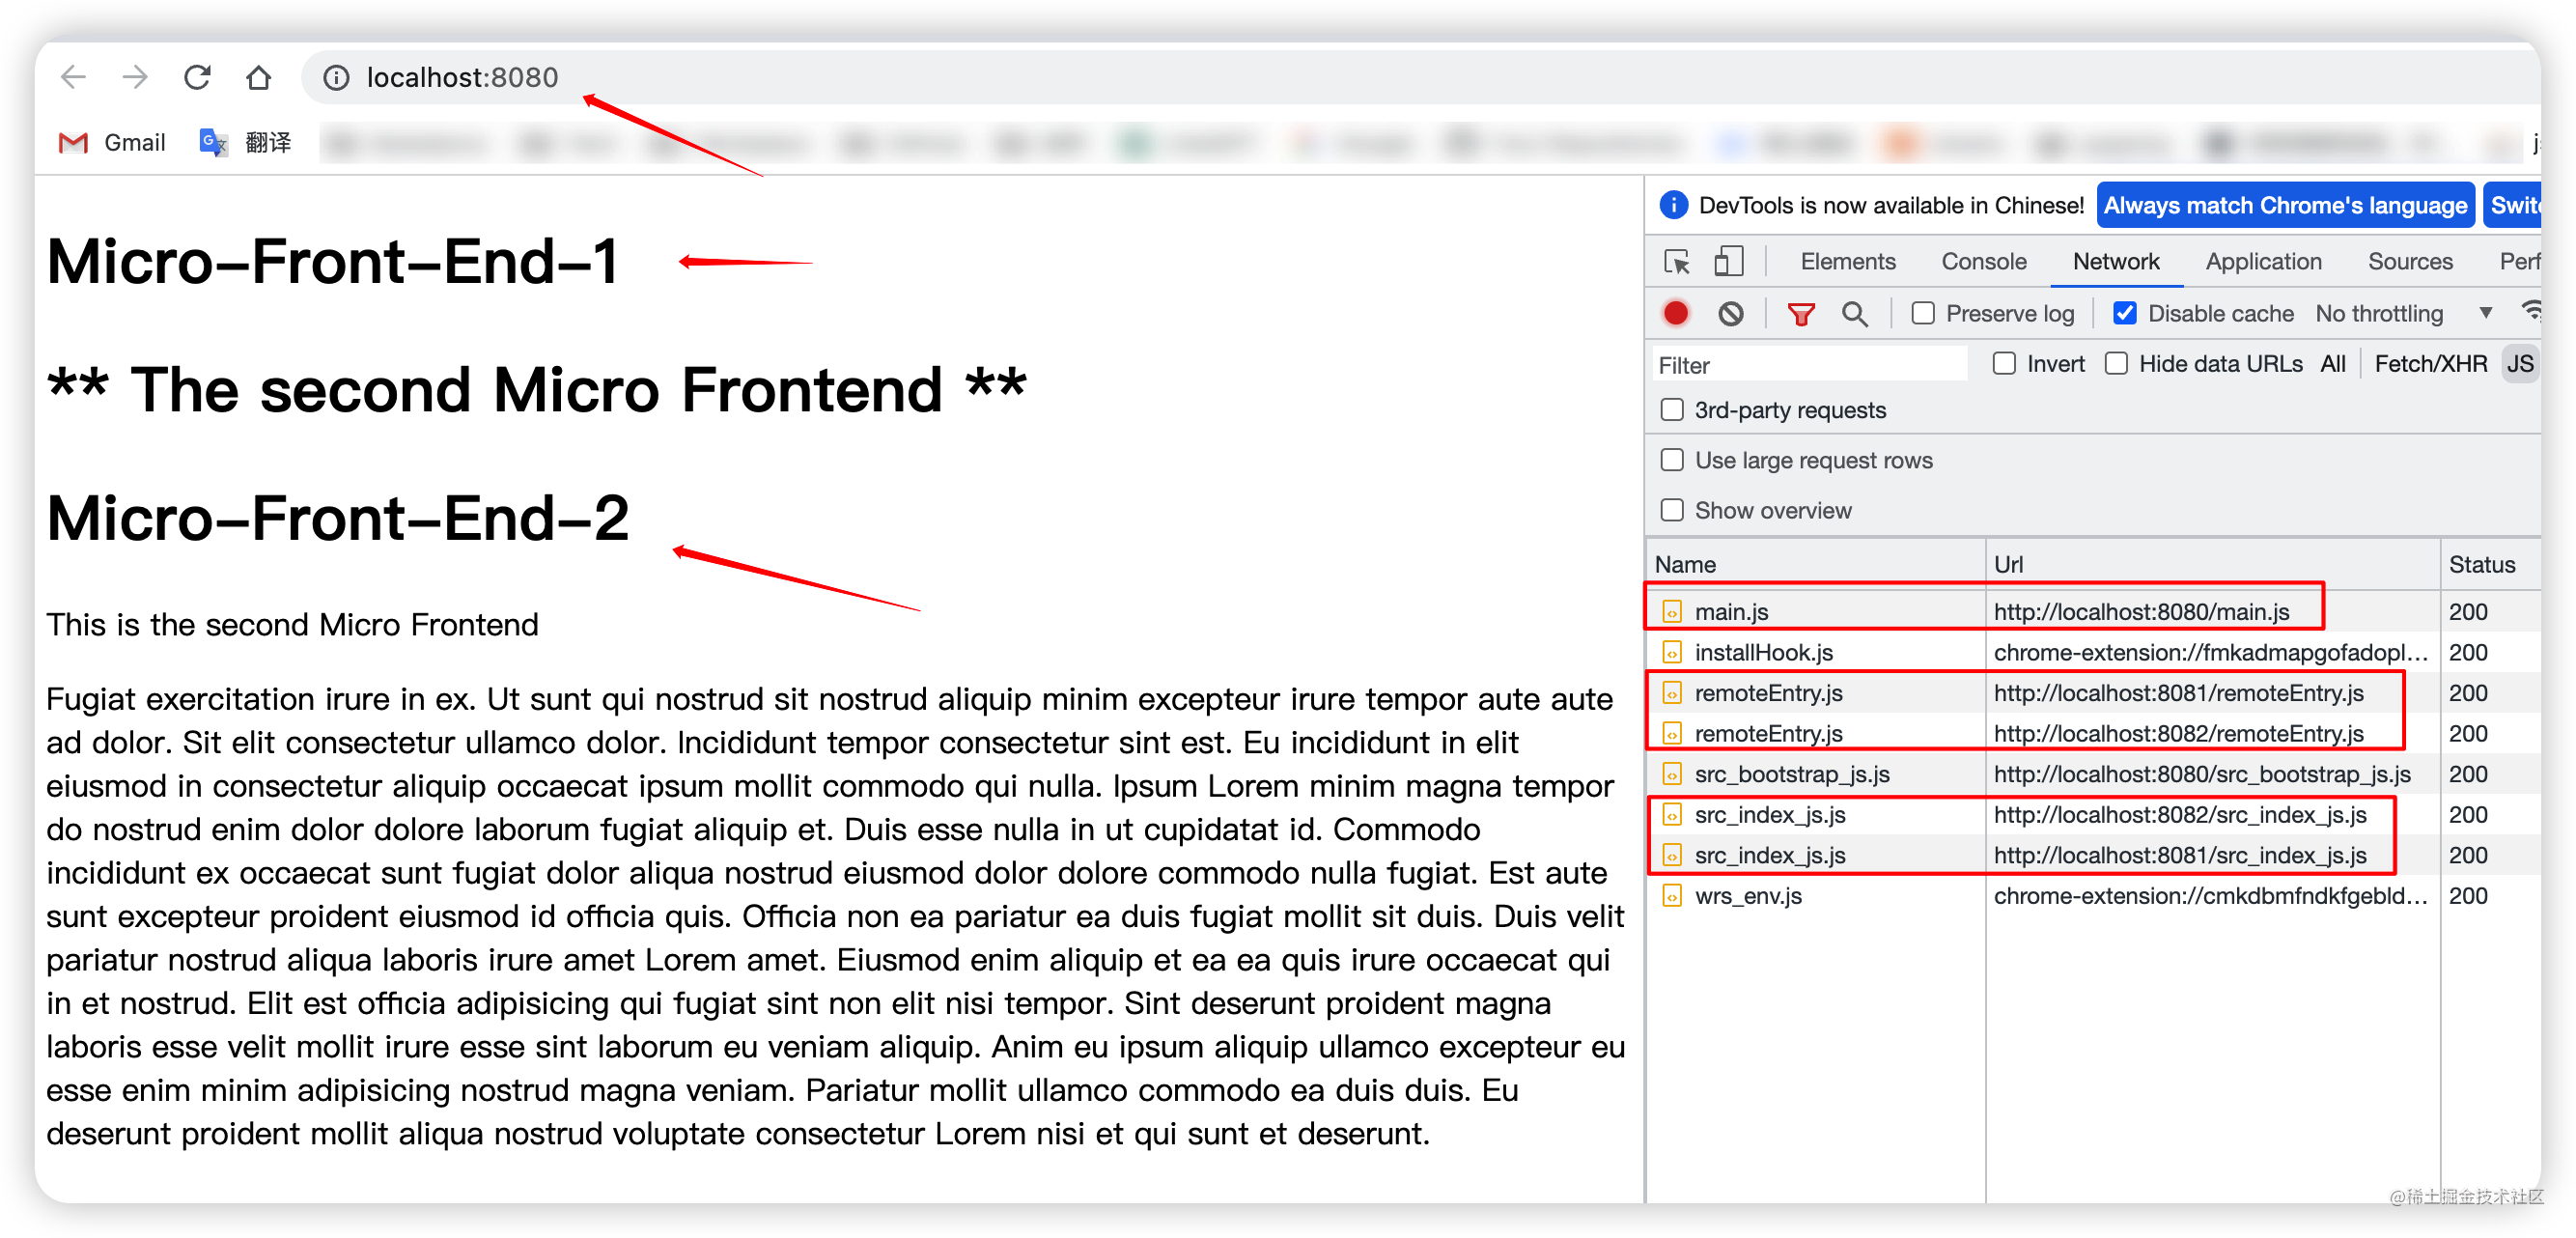 </html>
重新启动 container 项目,并打开 http://localhost:8080/:
搞定~
2.6 集成 React 微前端
2.6.1 新建并改造 react-microfrontend-3
到目前为止,虽然我们使用 create-react-app 创建了三个项目,但是实际上我们还没有真正使用过 React。接下来,我们添加第三个微前端:react-microfrontend-3:
npx create-react-app react-microfrontend-3
安装必要的依赖:
yarn add webpack webpack-cli webpack-server html-webpack-plugin webpack-dev-server -D
在 package.json 中增加 webpack script:
"scripts": {
    "webpack": "webpack serve",
    // ...
  },
我们需要一些规则才能将 JSX 转换为任何浏览器都可以理解的 JavaScript ES5。我们不必在前两个组件中执行此操作,因为它们都是纯 JavaScript。在 react-microfrontend-3 根目录下添加 webpack.config.js:
const HtmlWebpackPlugin = require("html-webpack-plugin");
const ModuleFederationPlugin = require("webpack/lib/container/ModuleFederationPlugin");
module.exports = {
  mode: "development",
  devServer: {
    port: 8083,
  },
  module: {
    rules: [
      {
        test: /\.js?$/,
        exclude: /node_modules/,
        loader: "babel-loader",
        options: {
          presets: [
            "@babel/preset-env", // 将高级语法转译至 ES5
            "@babel/preset-react", // 编译react语法至 ES5
          ],
        },
      },
    ],
  },
  plugins: [
    new ModuleFederationPlugin({
      name: "microFrontEnd3",
      filename: "remoteEntry.js",
      exposes: {
        "./MicroFrontEnd3Index": "./src/index",
      },
    }),
    new HtmlWebpackPlugin({
      template: "./public/index.html",
    }),
  ],
};
改造一下 src 文件:
- 增加
bootstrap.js文件:
import React from "react";
import ReactDOM from "react-dom";
import App from "./App";
ReactDOM.render(<App />, document.getElementById("react-microfrontend-3"));
- 重写
App.js:
import React from "react";
const App = () => {
  return (
    <main>
      <h1>This is the react-microfrontend-3 app</h1>
    </main>
  );
};
export default App;
- 重写
index.js:
import("./bootstrap");
记得也改造一下 public/index.html:
<!DOCTYPE html>
<html>
    <head></head>
    <body>
      <h1>react-microfrontend-3</h1>
        <div id="react-microfrontend-3"></div>
    </body>
</html>
然后执行 yarn webpack,打开 http://localhost:8083/:

2.6.2 引入到 container
跟上面两个项目引入的方式是一样的,在 container/src/bootstrap.js 中导入:
import "microFrontEnd1/MicroFrontEnd1Index";
import "microFrontEnd2/MicroFrontEnd2Index";
import "microFrontEnd3/MicroFrontEnd3Index";
console.log("Container!");
在 public/index.html 中增加一个 id 为 react-microfrontend-3 的 div:
<!DOCTYPE html>
<html lang="en">
<head>
</head>
<body>
  <div id="root"></div>
  <h1>** The second Micro Frontend **</h1>
  <div id="microFrontend2"></div>
  <div id="react-microfrontend-3"></div>
</body>
</html>
最后在 container/webpack.config.js 中引入:
const HtmlWebpackPlugin = require("html-webpack-plugin");
const ModuleFederationPlugin = require("webpack/lib/container/ModuleFederationPlugin");
module.exports = {
  mode: "development",
  devServer: {
    port: 8080,
  },
  plugins: [
    new ModuleFederationPlugin({
      name: "container",
      remotes: {
        microFrontEnd1: "microFrontEnd1@http://localhost:8081/remoteEntry.js",
        microFrontEnd2: "microFrontEnd2@http://localhost:8082/remoteEntry.js",
        microFrontEnd3: "microFrontEnd3@http://localhost:8083/remoteEntry.js",
      },
    }),
    new HtmlWebpackPlugin({
      template: "./public/index.html",
    }),
  ],
};
重启所有项目,你就可以在 http://localhost:8080/ 中看到我们引入了第三个 react 微前端了: 至此,我们便完成了一个基本的基于
 webpack 模块联邦 的微前端项目了,code 请看这里 ~
2.7 集成 Vue 微前端
集成方式跟 react项目 几乎相同,这里就不赘述了,可看 源码 ~
最终效果图:

