原文:http://www.appcoda.com/uipageviewcontroller-storyboard-tutorial/
在上一篇文章(http://blog.csdn.net/u011156012/article/details/37592445)中介绍了利用ScrollView实现引导页,那种方法虽然简单,但是有一个缺点就是没法实现引导页页数的现实,就如下面图中所思的4个小灰点。曾经想过在引导页显示的图片上PS上不同的点表示页数,但是这样做的bug是当用户划屏时,其实那个点也被划走了。所以,研究下利用iOS自带的PageViewController来实现引导页。
下面是原文,因为整片文章还是比较容易理解的,所以只把重点的地方翻译出来,然后最后贴上完整的代码。
A Glance at the Demo App
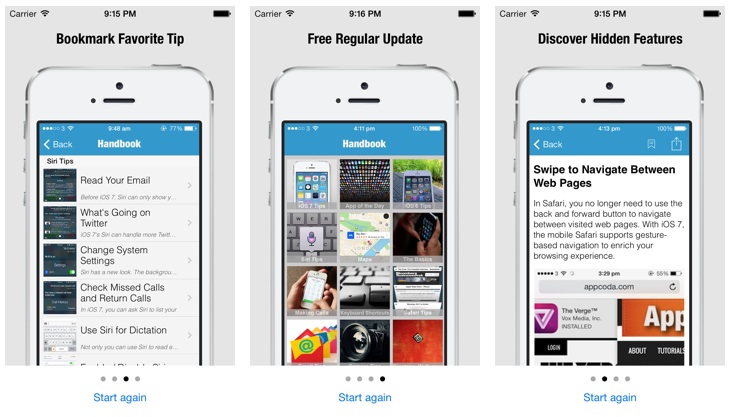
The demo app we are going to create is very simple. It displays 4 pages of screens to give users a brief introduction to the user interface. User can navigate between pages by swiping through the screen. Whenever user taps the “Start again” button to go back to the first page of tutorial. This type of walkthrough/tutorial screens shouldn’t be new to you as they are commonly found in apps such as Snapguide and Airbnb.
我的代码里面没有把Start Again功能加进去,因为个人感觉引导页是能够左右滑动的,所以稍微改动了下,而不是只能向后划屏。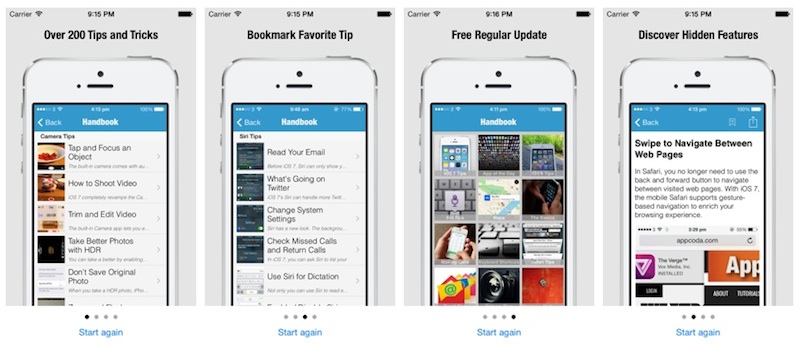
Creating the Project
Launch Xcode and create a new Project by using the Single View Application template. It might seem a little bit strange to select the Single View Application template as Xcode already comes with a Page-Based Application template, which contains a fully functional app based on the UIPageViewController. However, this template is a little bit complex and it will take us more time to clean-up the code of the template than to start from scratch. Needless to say, we can better grasp the concept behind the UIPageViewController when we start from scratch.
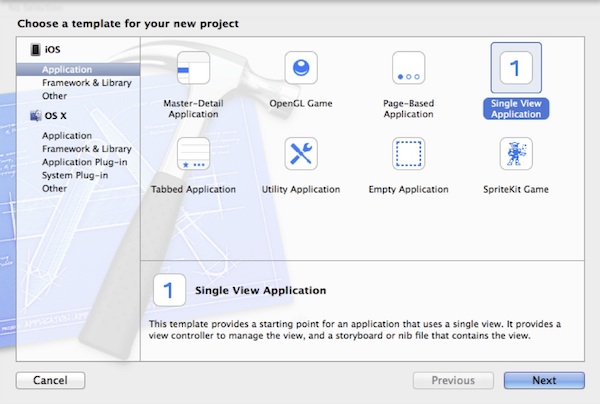
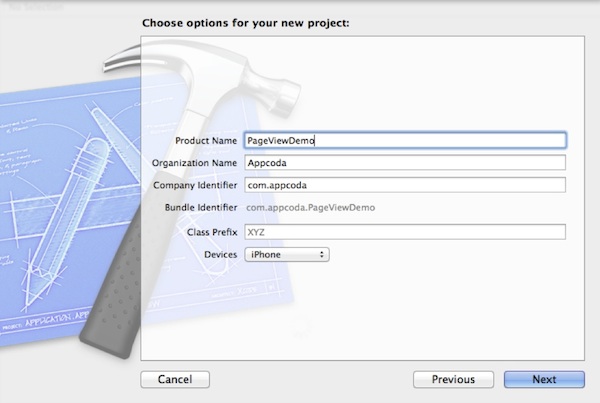
Okay, let’s move on. In the next screen enter PageViewDemo as the product name and set com.appcoda in the company identifier field. Select iPhone for the Devices option. Press next and create the project.
建立程序没啥好说的,很简单。
Creating Page View Controller in Storyboard
Next, select the Main.storyboard. As usual, you should find a default view controller generated by Xcode. Leave it as it is. Drag a Page View Controller from the Object Library into the storyboard. Then add another View Controller and put it in the same storyboard.
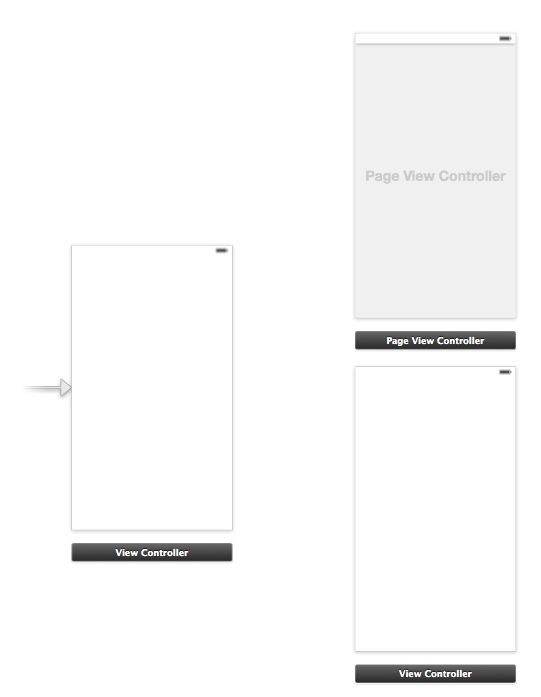
For this project, the original view controller(最左面的view controller) is used as the root view controller for holding the page view controller. The view controller you’ve just added(右下角的view controller) will be used for displaying the page content. Throughout the article, we refer the original view controller as the root view controller and the other view controller as page content controller.
说白了就是原始的view controller是用来显示PageViewController的视图,而后添加的view controller是用来承载PageViewController的内容的。这在后面会有进一步的介绍。
You may wonder why we just add a single view controller for 4 pages of content. Shouldn’t we use four view controllers instead of one? As you can see from the final deliverable, the walkthrough screens are very similar. It’s better to share the same view controller for different screens.
因为4个引导页长的非常类似,基本上引导页的布局都是一样的,很少有不同风格的引导页布局,所以,我们仅仅用1个view controller来承载,这样也由利于节省内存。
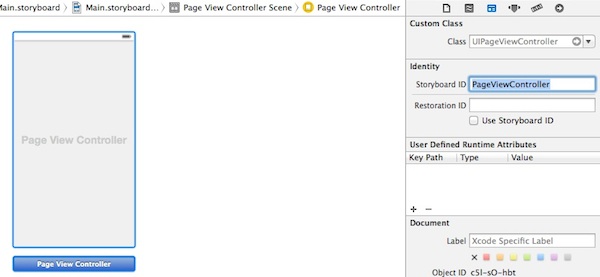
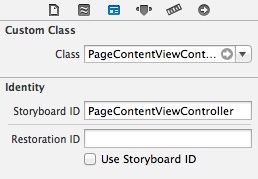
Next, assign a Storyboard ID for the page view controller and the page content controller. You can simply select the controller and set the ID under Identity Inspector. Set the Storyboard ID of the page view controller as “PageViewController” and name the ID of the page content controller as “PageContentController”. Later we’ll refer to these IDs in our code.
和我在上篇博文中提到的,要在IB中把view controller的storyBoard ID指定一下,因为我们在手动写代码时需要生成view controller的实例。这里我们把page view controller的storyBoard名字命名为PageViewController, 而把后建立的用户承载内容的view controller的storyBoard ID命名为 PageContentController
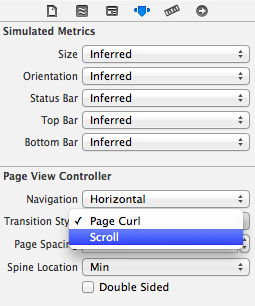
By default, the transition style of the page view controller is set as Page Curl. The page curl style is perfect for book apps. For walkthrough screens, we prefer to use scrolling style. So change the transition style to Scroll under Attribute Inspector.
把transition style修改为Scroll,这样就是用户习惯的滑动了;刚试了一下,默认的Page Curl是类似与翻书页的方式,而且如果你选择了Page Curl方式,就会默认把图片下方的4个小点点去掉了。如果你愿意,还可以修改划屏的方向,Navigation默认的是水平的。
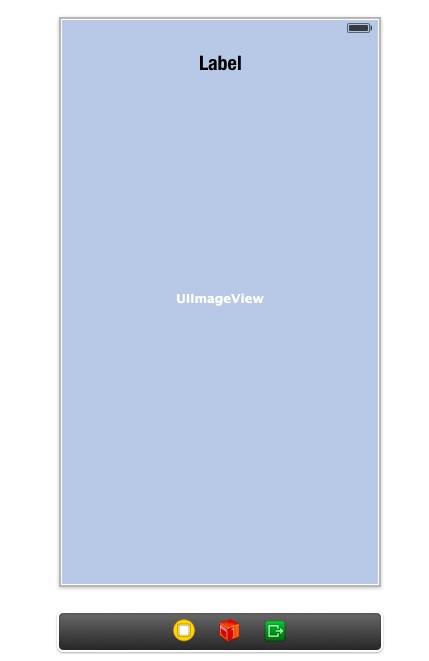
We’ll design the user interface of page content view controller. Drag an image view and a label into the controller. You’re free to change the font type and size. But your view controller should be similar to the below screenshot.
在page content view controller页面添加进来image view和label,这基本上也就是我们的引导页需要的大部分内容了吧。
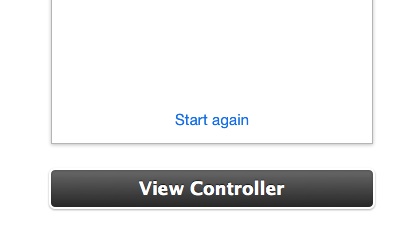
For the default view controller, add a “Start again” button and put it at the below of the screen.
注意我的代码里面没有添加进这个功能,因为这个功能没什么难点,很简单的按钮功能。
Creating View Controller Class
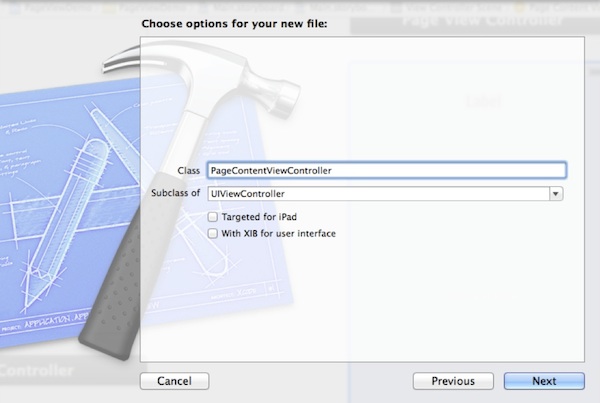
The next step is to create view controller class and associate it with the corresponding view controller. From the menu, select File -> New -> File … and choose the “Objective-C class” template. Name the class as PageContentViewController and make it a subclass of UIViewController.
为我们新添加的view controller(注意不是PageViewController)添加类,很简单,新建一个objective-c的类,然后把类名修改为PageContentViewController
Go back to Storyboard. Select the page content view controller and set the custom class to PageContentViewController under Identify Inspector.
返回到IB中,把右下角的view controller的custom class修改为我们新添加的类。
Next, we’ll create outlets for the image view and label. Switch to the Assistant Editor and make sure the PageContentViewController.h is opened. Control and drag from the image view to the PageContentViewController.h and create an IBOutlet. Set the name as backgroundImageView for the image view. For the label, set the name of the outlet as titleLabel.
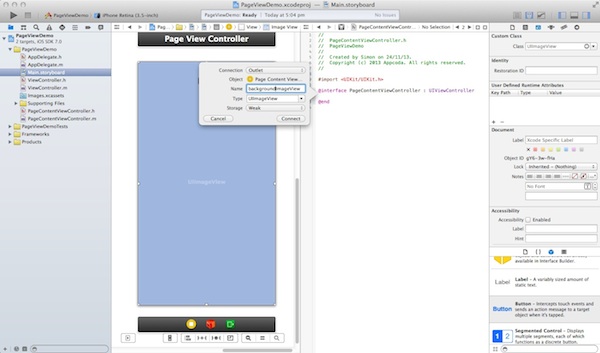
After the change, the PageContentViewController.h should look like this:
然后打开助手模式,然后修改.h文件成如下的样子,怎样修改我就不多说了,按着control然后拖拽就好了。
|
1
2 3 4 5 6 7 |
#import <UIKit/UIKit.h>
@interface PageContentViewController : UIViewController @property (weak, nonatomic ) IBOutlet UIImageView *backgroundImageView; @property (weak, nonatomic ) IBOutlet UILabel *titleLabel; @end |
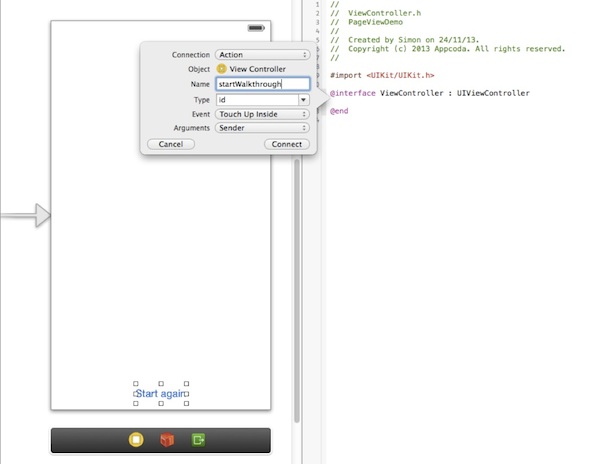
Next, select the root view controller and make sure the ViewController.h is opened. Create an action for the “Start again” button and name the action as “startWalkthrough”.
给start again 按钮添加操作,注意我的实例代码中没有这个。
Okay, we’ve completed the design of user interface and created all the outlets. Let’s move onto the implementation of the view controller classes.
Implementing the Page Content View Controller
It’s very straightforward to implement the page content view controller. First, add the following properties in PageContentViewController.h:
打开.h文件,添加3个property。
The pageIndex stores the current page index (or page number). The view controller is designed to display an image and a title. So we create two parameters for passing the title text and image file. Next, open PageContentViewController.m and change the viewDidLoad: method:
pageIndex是当前页面的页码,剩下的两个NSString都可以从字面上理解它们的含义和作用了。接下来修改.m文件的viweDidLoat函数成如下形式:
|
1
2 3 4 5 6 7 |
-
(
void
)viewDidLoad
{ [super viewDidLoad ]; self.backgroundImageView.image = [UIImage imageNamed :self.imageFile ]; self.titleLabel.text = self.titleText; } |
Implementing the Page View Controller
接下来介绍了PageViewController的相关属性。
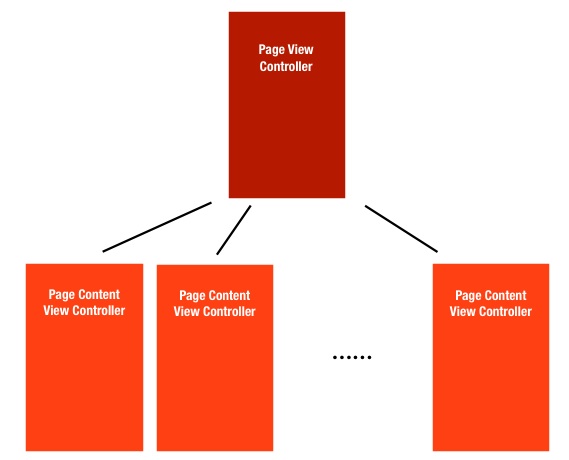
The UIPageViewController class is classified as a container controller. The container controller is used to contain and manage multiple view controllers shown in the app, as well as, controlling the way one view controller switches to another. Here the UIPageViewController is the container controller that lets the user navigate from page to page, where each page is managed by its own view controller object. The following illustration depicts the relationship between the page view controller and the page content view controller.
其实PageViewController就是一个容器,他里面有很多不同的Page Content View Controller,PageViewController用来控制这些不同page content的切换方式等等。因为我们的引导页都是同样的布局,所以我们仅用1个PageContent ViewController(IB中右下角的view controller)来完成。
In order to make UIPageViewController work, we must adopt the UIPageViewControllerDataSource protocol. The data source for a page view controller is responsible for providing the content view controllers on demand. By implementing the data source protocol, we tell the page view controller what to display for each page.
我们同时还要指定PageViewControllerDataSource的代理,这样才能通过修改代理的方法告诉PageViewController展示那些页面以及展示的方法等。
In this case, we use the ViewController class as the data source for the UIPageViewController instance. Therefore it is necessary to declare the ViewController class as implementing the UIPageViewControllerDataSource protocol.
The ViewController class is also responsible to provide the data of the page content (i.e. images and titles). Open the ViewController.h. Modify the @interface declaration, add a new property to hold the UIPageViewController, as well as, properties for both images and titles:
因为我们用viewcontroller来提供数据,包括标题和图片,所以我们打开ViewController.h文件添加UIPageViewControllerDataSource代理
|
1
2 3 4 5 6 7 8 9 10 11 |
#import <UIKit/UIKit.h>
#import "PageContentViewController.h" @interface ViewController : UIViewController <UIPageViewControllerDataSource> - (IBAction )startWalkthrough : ( id )sender; @property (strong, nonatomic ) UIPageViewController *pageViewController; @property (strong, nonatomic ) NSArray *pageTitles; @property (strong, nonatomic ) NSArray *pageImages; @end |
In the ViewController.m, initialize the pageTitles and pageImages in the viewDidLoad method:
在ViewController.m文件中,先初始化标题和图片的数据。我们可以自己手动拖4个图片进来,也可以去下面提供的链接里面下载图片。
|
1
2 3 4 5 6 7 |
-
(
void
)viewDidLoad
{ [super viewDidLoad ]; _pageTitles = @ [ @ "Over 200 Tips and Tricks", @ "Discover Hidden Features", @ "Bookmark Favorite Tip", @ "Free Regular Update" ]; _pageImages = @ [ @ "page1.png", @ "page2.png", @ "page3.png", @ "page4.png" ]; } |
We have created the data model for the page content. Next, we have to implement at least two methods of the UIPageViewControllerDataSource protocol:
- viewControllerAfterViewController – provides the view controller after the current view controller. In other words, we tell the app what to display for the next screen.
- viewControllerBeforeViewController – provides the view controller before the current view controller. In other words, we tell the app what to display when user switches back to the previous screen.
接下来需要修改我们的代理中的5个最重要的函数了,先说其中的2个 viewControllerAfterViewController和viewControllerBeforeViewController,从字面上不难理解,这两个函数告诉PageViewController用户向左向右(向上向下)划屏之后需要显示的页面。在这两个函数中,我们需要返回的是UIViewController的一个指针,所以我们看到返回的是 viewControllerAtInder:index,所以,我们需要实现一个这个函数。
Add the following lines of code before the end of the ViewController.m file:
|
1
2 3 4 5 6 7 8 9 10 11 12 13 14 15 16 17 18 19 20 21 22 23 24 25 26 27 28 |
#pragma mark - Page View Controller Data Source
- (UIViewController * )pageViewController : (UIPageViewController * )pageViewController viewControllerBeforeViewController : (UIViewController * )viewController { NSUInteger index = ( (PageContentViewController * ) viewController ).pageIndex; if ( (index == 0 ) || (index == NSNotFound ) ) { return nil; } index --; return [self viewControllerAtIndex :index ]; } - (UIViewController * )pageViewController : (UIPageViewController * )pageViewController viewControllerAfterViewController : (UIViewController * )viewController { NSUInteger index = ( (PageContentViewController * ) viewController ).pageIndex; if (index == NSNotFound ) { return nil; } index ++; if (index == [self.pageTitles count ] ) { return nil; } return [self viewControllerAtIndex :index ]; } |
The above methods are very straightforward. First, we get the current page index. Depending the method, we simply increase/decrease the index number and return the view controller to display. Of course, we have to verify if we have reached the boundaries of the pages and return nil in that case.
As you may notice, we haven’t created the viewControllerAtIndex: method. It is a helper method that is designed to create the page content view controller on demand. It takes in the index parameter and creates the corresponding page content controller.
In the ViewController.m, add the helper method:
viewControllerAtIndex函数,这里面我们需要生成一个PageContentViewController(右下角viewcontroller)的实例,需要用到之前在IB中添加的stroyBoard 的ID了。
|
1
2 3 4 5 6 7 8 9 10 11 12 13 14 |
-
(PageContentViewController
*
)viewControllerAtIndex
:
(NSUInteger
)index
{ if ( ( [self.pageTitles count ] == 0 ) || (index > = [self.pageTitles count ] ) ) { return nil; } // Create a new view controller and pass suitable data. PageContentViewController *pageContentViewController = [self.storyboard instantiateViewControllerWithIdentifier : @ "PageContentViewController" ]; pageContentViewController.imageFile = self.pageImages [index ]; pageContentViewController.titleText = self.pageTitles [index ]; pageContentViewController.pageIndex = index; return pageContentViewController; } |
Recalled that we have set a storyboard ID for the view controllers when designing the user interface. The ID is used as reference for creating the view controller instance. To instantiate a view controller in storyboard, you can use the instantiateViewControllerWithIdentifier: method with a specific storyboard ID.
|
1
|
PageContentViewController
*pageContentViewController
=
[self.storyboard instantiateViewControllerWithIdentifier
:
@
"PageContentViewController"
];
|
To display a page indicator, you have to tell iOS the number of pages (i.e. dots) to display in the page view controller and which page must be selected at the beginning. Add the following two methods at the end of the ViewController.m file:
接下来还需要另外2个PageViewControllerDataSource的代理中的函数来告诉iOS pageview的页数以及首次展示的图片是哪一张。
|
1
2 3 4 5 6 7 8 9 |
-
(NSInteger
)presentationCountForPageViewController
:
(UIPageViewController
*
)pageViewController
{ return [self.pageTitles count ]; } - (NSInteger )presentationIndexForPageViewController : (UIPageViewController * )pageViewController { return 0; } |
Again the above code is very straightforward. We simply tell iOS that we have the total number of pages to display in the page view controller and the first page should be selected by default.
Initializing the UIPageViewController
The final step is to create and initialize the UIPageViewController. The best place to do that is in the viewDidLoad method. Open the ViewController.m file and change the method to:
最后一步就是初始化PageViewController了,初始化的最佳地点当然就是viewDidLoad了,修改ViewController.m 的相关函数如下:
|
1
2 3 4 5 6 7 8 9 10 11 12 13 14 15 16 17 18 19 20 21 22 23 |
-
(
void
)viewDidLoad
{ [super viewDidLoad ]; // Create the data model _pageTitles = @ [ @ "Over 200 Tips and Tricks", @ "Discover Hidden Features", @ "Bookmark Favorite Tip", @ "Free Regular Update" ]; _pageImages = @ [ @ "page1.png", @ "page2.png", @ "page3.png", @ "page4.png" ]; // Create page view controller self.pageViewController = [self.storyboard instantiateViewControllerWithIdentifier : @ "PageViewController" ]; self.pageViewController.dataSource = self; PageContentViewController *startingViewController = [self viewControllerAtIndex : 0 ]; NSArray *viewControllers = @ [startingViewController ]; [self.pageViewController setViewControllers :viewControllers direction :UIPageViewControllerNavigationDirectionForward animated : NO completion : nil ]; // Change the size of page view controller self.pageViewController.view.frame = CGRectMake ( 0, 0, self.view.frame.size.width, self.view.frame.size.height - 30 ); [self addChildViewController :_pageViewController ]; [self.view addSubview :_pageViewController.view ]; [self.pageViewController didMoveToParentViewController :self ]; } |
Let’s see what the method does. We first create the PageViewController instance. Next we specify the data source, in this case it is the class itself. We then create the first page content controller, add it to an array of controllers and assign it to the page view controller for display.
我们先创建一个pageviewcontroller的实例,当然方法和前面的方法一样,利用早前我们在IB中定义的storyBoard ID。然后赋予它 data source
Lastly, we change the size of the page view controller and add the page controller view to the current view.
到这里我们引导页程序就完成了,但是运行后我们会发现没有图片下方的4个点点表示页数,在添加下面的内容就大功告成了!
Customize the Page Indicator
If you compile and run the app now, your app should run properly but you may find the page indicator missing. Actually the page indicator is there but the color of the dots is the same as the color of the view. So let’s change its color.
In the AppDelegate.m, add the following lines of code in the didFinishLaunchingWithOptions: method:
|
1
2 3 4 |
UIPageControl
*pageControl
=
[UIPageControl appearance
];
pageControl.pageIndicatorTintColor = [UIColor lightGrayColor ]; pageControl.currentPageIndicatorTintColor = [UIColor blackColor ]; pageControl.backgroundColor = [UIColor whiteColor ]; |
Compile and Run the App
And there we go, start the application and see how the UIPageViewController works. You should be able to load the page view controller by using the iPhone Simulator. Try to swipe through the screen to navigate between pages.
Back to the First Page
There is still one thing left. The “Start again” is not yet implemented. When tapped, we expect the page view controller will scroll back to the first page. You can use the setViewControllers: method of the UIPageViewController to switch page. To go back to the first page of the page view controller, change the startWalkthrough: method of ViewController.m:
这是我没有添加进来的按钮功能,很简单。
|
1
2 3 4 5 |
-
(IBAction
)startWalkthrough
:
(
id
)sender
{
PageContentViewController *startingViewController = [self viewControllerAtIndex : 0 ]; NSArray *viewControllers = @ [startingViewController ]; [self.pageViewController setViewControllers :viewControllers direction :UIPageViewControllerNavigationDirectionReverse animated : NO completion : nil ]; } |
Run the app again. The app will bring you back to the first page when tapping the “Start again” button.
好了下面贴上完整的代码:
AppDelegate.m:
- (BOOL)application:(UIApplication *)application didFinishLaunchingWithOptions:(NSDictionary *)launchOptions
{
    // Override point for customization after application launch.
    UIPageControl *pageControl = [UIPageControl appearance];
    pageControl.pageIndicatorTintColor = [UIColor lightGrayColor];
    pageControl.currentPageIndicatorTintColor = [UIColor blackColor];
    pageControl.backgroundColor = [UIColor whiteColor];
    return YES;

}
ViewController.h
#import <UIKit/UIKit.h>
#import "PageViewContentViewController.h"

@interface ViewController : UIViewController <UIPageViewControllerDataSource>

@property (strong, nonatomic)UIPageViewController *pageViewController;
@property (strong, nonatomic)NSArray *pageTitles;
@property (strong, nonatomic)NSArray *pageImages;

@end
ViewController.m
#import "ViewController.h"

@interface ViewController ()

@end

@implementation ViewController

- (void)viewDidLoad
{
    [super viewDidLoad];
	// Do any additional setup after loading the view, typically from a nib.
    _pageTitles = @[@"Over 200 Tips and Tricks", @"Discover Hidden Features", @"Bookmark Favorite Tip", @"Free Regular Update"];
    _pageImages = @[@"001.jpg", @"002.jpg", @"003.jpg", @"004.jpg"];

    //create the page view controller
    self.pageViewController = [self.storyboard instantiateViewControllerWithIdentifier:@"PageViewController"];
    self.pageViewController.dataSource = self;

    PageViewContentViewController *startingViewController = [self viewControllerAtIndex:0];
    NSArray *viewControllers = @[startingViewController];
    [self.pageViewController setViewControllers:viewControllers direction:UIPageViewControllerNavigationDirectionForward animated:YES completion:nil];

    //change the size of the page view controller
    self.pageViewController.view.frame = CGRectMake(0, 0, self.view.frame.size.width, self.view.frame.size.height-30);
    [self addChildViewController:_pageViewController];
    [self.view addSubview:_pageViewController.view];
    [self.pageViewController didMoveToParentViewController:self];

}

- (PageViewContentViewController *)viewControllerAtIndex:(NSUInteger) index{
    if (([self.pageTitles count] ==0 )|| (index >= [self.pageTitles count])) {
        return  nil;
    }

    PageViewContentViewController *pageContentViewController = [self.storyboard instantiateViewControllerWithIdentifier:@"PageContentController"];
    pageContentViewController.imageFile = self.pageImages[index];
    pageContentViewController.titleText = self.pageTitles[index];
    pageContentViewController.pageIndex = index;

    return pageContentViewController;
}

- (UIViewController *)pageViewController:(UIPageViewController *)pageViewController viewControllerBeforeViewController:(UIViewController *)viewController{
    NSUInteger index = ((PageViewContentViewController*) viewController).pageIndex;

    if ((index == 0)||(index == NSNotFound)) {
        return nil;
    }
    index--;
    return [self viewControllerAtIndex:index];
}

- (UIViewController *)pageViewController:(UIPageViewController *)pageViewController viewControllerAfterViewController:(UIViewController *)viewController{
    NSUInteger index = ((PageViewContentViewController*) viewController).pageIndex;

    if (index == NSNotFound) {
        return nil;
    }
    index++;
    if (index == [self.pageTitles count]) {
        return  nil;
    }
    return [self viewControllerAtIndex:index];
}

- (NSInteger)presentationCountForPageViewController:(UIPageViewController *)pageViewController{
    return [self.pageTitles count];
}

- (NSInteger)presentationIndexForPageViewController:(UIPageViewController *)pageViewController{
    return 0;
}

- (void)didReceiveMemoryWarning
{
    [super didReceiveMemoryWarning];
    // Dispose of any resources that can be recreated.
}

@end
PageViewContentViewController.h 注意我这里写的时PageViewContentViewController其实就是PageContentViewController
#import <UIKit/UIKit.h>

@interface PageViewContentViewController : UIViewController

@property (weak, nonatomic) IBOutlet UIImageView *backgroundImageView;
@property (weak, nonatomic) IBOutlet UILabel *titleLable;

@property NSUInteger pageIndex;
@property NSString* titleText;
@property NSString* imageFile;

@end
PageViewContentViewController.m
#import "PageViewContentViewController.h"

@interface PageViewContentViewController ()

@end

@implementation PageViewContentViewController

- (id)initWithNibName:(NSString *)nibNameOrNil bundle:(NSBundle *)nibBundleOrNil
{
    self = [super initWithNibName:nibNameOrNil bundle:nibBundleOrNil];
    if (self) {
        // Custom initialization
    }
    return self;
}

- (void)viewDidLoad
{
    [super viewDidLoad];
    // Do any additional setup after loading the view.
    self.backgroundImageView.image = [UIImage imageNamed:self.imageFile];
    self.titleLable.text = self.titleText;
}

- (void)didReceiveMemoryWarning
{
    [super didReceiveMemoryWarning];
    // Dispose of any resources that can be recreated.
}

/*
#pragma mark - Navigation

// In a storyboard-based application, you will often want to do a little preparation before navigation
- (void)prepareForSegue:(UIStoryboardSegue *)segue sender:(id)sender
{
    // Get the new view controller using [segue destinationViewController].
    // Pass the selected object to the new view controller.
}
*/

@end