
一、Springboot集成easy-kaptcha
1.1、效果展示
使用PostMan来进行测试:

下面是我将获取到的base64编码的验证码进行还原展示,这里提供一个Base64编码还原/转换网站:base64图片在线转换工具
1、算数验证码

2、Gif类型
3、png类型

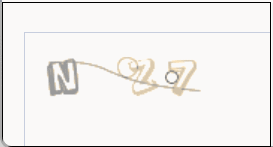
4、chinese

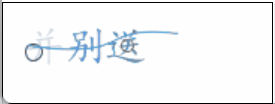
5、chinese gif
1.2、快速集成
参考资料:验证码生成 EasyCaptcha、EL-ADMIN开源项目
对应demo项目源码:Gitee仓库地址、Github地址

Captcha captcha = xxx;  //获取对应类型的captcha对象
//在easy-captcha中需要关注的比较重要的就是下面三个方法
String value = captcha.text();  //获取验证码的结果内容
String captchaBase64 captcha.toBase64();  //获取验证码图片的base64编码
captcha.out(response.getOutputStream());  //前后端不分离,直接将图片以流的形式返回
正文开始:Springboot版本依赖为2.6.6,步骤1-4你不用额外关注,关注service封装方法即可
1、导入依赖
<!-- 1、easy-captcha  -->
<dependency>
    <groupId>com.github.whvcse</groupId>
    <artifactId>easy-captcha</artifactId>
    <version>1.6.2</version>
</dependency>
2、编写配置类:EasyCaptchaConfig.java
import com.changlu.springbootcaptcha.easycaptcha.enums.CodeTypeEnum;
import lombok.Data;
import org.springframework.boot.context.properties.ConfigurationProperties;
import org.springframework.context.annotation.Configuration;
/**
 * @ClassName EasyCaptchaConfig
 * @Author ChangLu
 * @Date 4/12/2022 5:28 PM
 * @Description 验证码控制器
 */
@Data
@ConfigurationProperties(prefix = "easycaptcha")
@Configuration
public class EasyCaptchaConfig {
    /**
     * 验证码配置
     */
    private CodeTypeEnum codeType;
    /**
     * 验证码内容长度
     */
    private int length = 4;
    /**
     * 验证码宽度
     */
    private int width = 111;
    /**
     * 验证码高度
     */
    private int height = 36;
    /**
     * 验证码字体
     */
    private String fontName;
    /**
     * 字体大小
     */
    private int fontSize = 25;
}
对应的yml配置文件:
# easy-captcha配置,有需要的可以自己加,直接默认的也ok
easycaptcha:
  #  验证码类型配置 查看 LoginProperties 类
  code-type: arithmetic
3、定义枚举类,用于创建验证码的类型:CodeTypeEnum.java
/**
 * @ClassName CodeTypeEnum
 * @Author ChangLu
 * @Date 4/12/2022 5:29 PM
 * @Description 验证码类型枚举类
 */
public enum CodeTypeEnum {
    /**
     * 算数
     */
    ARITHMETIC,
    /**
     * 中文
     */
    CHINESE,
    /**
     * 中文闪图
     */
    CHINESE_GIF,
    /**
     * 闪图
     */
    GIF,
    SPEC
}
4、编写验证码生产器:EasyCaptchaProducer.java
import com.changlu.springbootcaptcha.easycaptcha.config.EasyCaptchaConfig;
import com.changlu.springbootcaptcha.easycaptcha.enums.CodeTypeEnum;
import com.wf.captcha.*;
import com.wf.captcha.base.Captcha;
import org.springframework.beans.factory.annotation.Autowired;
import org.springframework.stereotype.Component;
/**
 * @ClassName EasyCaptchaProducer
 * @Author ChangLu
 * @Date 4/12/2022 5:35 PM
 * @Description 验证码生成器
 */
@Component
public class EasyCaptchaProducer {
    @Autowired
    private EasyCaptchaConfig easyCaptchaConfig;
    /**
     * 自定义选择类型
     */
    public Captcha getCaptcha(CodeTypeEnum codeType){
        easyCaptchaConfig.setCodeType(codeType);
        return switchCaptcha(easyCaptchaConfig);
    }
    /**
     * 获取默认配置captcha
     */
    public Captcha getCaptcha(){
        return switchCaptcha(easyCaptchaConfig);
    }
    private Captcha switchCaptcha(EasyCaptchaConfig config) {
        Captcha captcha;
        switch (config.getCodeType()) {
            case ARITHMETIC:
                // 算术类型 https://gitee.com/whvse/EasyCaptcha
                captcha = new FixedArithmeticCaptcha(config.getWidth(), config.getHeight());
                //固定设置为两位,图片为算数运算表达式
                captcha.setLen(2);
                break;
            case CHINESE:
                captcha = new ChineseCaptcha(config.getWidth(), config.getHeight());
                captcha.setLen(config.getLength());
                break;
            case CHINESE_GIF:
                captcha = new ChineseGifCaptcha(config.getWidth(), config.getHeight());
                captcha.setLen(config.getLength());
                break;
            case GIF:
                captcha = new GifCaptcha(config.getWidth(), config.getHeight());//最后一位是位数
                captcha.setLen(config.getLength());
                break;
            case SPEC:
                captcha = new SpecCaptcha(config.getWidth(), config.getHeight());
                captcha.setLen(config.getLength());
                break;
            default:
                throw new RuntimeException("验证码配置信息错误!正确配置查看 LoginCodeEnum ");
        }
        return captcha;
    }
    static class FixedArithmeticCaptcha extends ArithmeticCaptcha {
        public FixedArithmeticCaptcha(int width, int height) {
            super(width, height);
        }
        @Override
        protected char[] alphas() {
            // 生成随机数字和运算符
            int n1 = num(1, 10), n2 = num(1, 10);
            int opt = num(3);
            // 计算结果
            int res = new int[]{n1 + n2, n1 - n2, n1 * n2}[opt];
            // 转换为字符运算符
            char optChar = "+-x".charAt(opt);
            this.setArithmeticString(String.format("%s%c%s=?", n1, optChar, n2));
            this.chars = String.valueOf(res);
            return chars.toCharArray();
        }
    }
}
5、编写验证码结果集业务层:EasyCaptchaService.java,我已经将你每次要获取的验证码值以及Base64编码封装到一个Map中返回,你可以拿到之后进行自己相应的业务操作。
import com.changlu.springbootcaptcha.easycaptcha.enums.CodeTypeEnum;
import com.changlu.springbootcaptcha.easycaptcha.producer.EasyCaptchaProducer;
import com.wf.captcha.base.Captcha;
import org.springframework.beans.factory.annotation.Autowired;
import org.springframework.stereotype.Service;
import java.util.HashMap;
import java.util.Map;
/**
 * @ClassName EasyCaptchaService
 * @Author ChangLu
 * @Date 4/12/2022 6:20 PM
 * @Description easy-captcha业务工具类
 */
@Service
public class EasyCaptchaService {
    @Autowired
    private EasyCaptchaProducer easyCaptchaProducer;
    /**
     * 获取指定类型的验证码结果以及Base64编码值
     * @param codeType 验证码类型
     * @return
     */
    public Map<String,String> getCaptchaValueAndBase64(CodeTypeEnum codeType){
        Captcha captcha = null;
        if (codeType == null){
            captcha = easyCaptchaProducer.getCaptcha();
        }else {
            captcha = easyCaptchaProducer.getCaptcha(codeType);
        }
        //1、获取到结果值
        String captchaValue = captcha.text();
        //对于数学类型的需要进行处理
        if (codeType == null || codeType == CodeTypeEnum.ARITHMETIC) {
            if (captcha.getCharType() - 1 == CodeTypeEnum.ARITHMETIC.ordinal() && captchaValue.contains(".")) {
                captchaValue = captchaValue.split("\\.")[0];
            }
        }
        //2、获取到Base64编码
        String captchaBase64 = captcha.toBase64();
        Map<String,String> result = new HashMap<>(2);
        result.put("code", captchaValue);
        result.put("base64", captchaBase64);
        return result;
    }
}
6、控制器测试类:(若是你要集成到自己项目,只需要关注调用captcha的service方法即可)
import com.changlu.springbootcaptcha.easycaptcha.enums.CodeTypeEnum;
import com.changlu.springbootcaptcha.easycaptcha.service.EasyCaptchaService;
import org.springframework.beans.factory.annotation.Autowired;
import org.springframework.stereotype.Controller;
import org.springframework.web.bind.annotation.GetMapping;
import org.springframework.web.bind.annotation.RestController;
import java.util.Map;
/**
 * @ClassName CaptchaController
 * @Author ChangLu
 * @Date 4/12/2022 5:44 PM
 * @Description Easy-captcha控制器
 */
@Controller
@RestController
public class EasyCaptchaController {
    @Autowired
    private EasyCaptchaService easyCaptchaService;
    //1、算术类型
    @GetMapping("/captcha1")
    public Map getGifcCaptcha1(){
        return easyCaptchaService.getCaptchaValueAndBase64(null);
    }
    //2、Gif
    @GetMapping("/captcha2")
    public Map getGifcCaptcha2(){
        return easyCaptchaService.getCaptchaValueAndBase64(CodeTypeEnum.GIF);
    }
    //3、png类型
    @GetMapping("/captcha3")
    public Map getGifcCaptcha3(){
        return easyCaptchaService.getCaptchaValueAndBase64(CodeTypeEnum.SPEC);
    }
    //4、chinese文字类型
    @GetMapping("/captcha4")
    public Map getGifcCaptcha4(){
        return easyCaptchaService.getCaptchaValueAndBase64(CodeTypeEnum.CHINESE);
    }
    //4、chinese Gif类型
    @GetMapping("/captcha5")
    public Map getGifcCaptcha5(){
        return easyCaptchaService.getCaptchaValueAndBase64(CodeTypeEnum.CHINESE_GIF);
    }
}
上面控制器是对五种类型的验证码进行测试,我将对应类型验证码获取到的验证码值和验证码Base64编码封装到了一个Map里,你集成到项目只需要调用该service获取到map从中拿值即可,取到的验证码值存在redis中,base64编码值返回给前端即可。
easy-captcha给我们获取的base64编码是自动就加上data:image/png;base64,,我们无需自己添加
最终map结果集如下:
{
    "base64": "data:image/png;base64,xxx",
    "code": "14"
}
二、Springboot集成Kaptcha
2.1、效果展示
有两个类型算数表达式以及字符类型,依旧使用PostMan来进行测试,效果如下:

1、数学算数表达式

2、字符

2.2、快速集成
说明,该Kapcha案例源自RUOYI-VUE开源项目RuoYi-Vue,这里单独建立demo来进行测试
对应demo项目源码:Gitee仓库地址、Github地址

这个配置相对来说就少多了,接下来就来快速集成吧:Springboot版本为2.6.6
1、添加kaptcha依赖
<!--  案例2:katpcha,对应kaptcha目录案例    -->
<dependency>
    <groupId>com.github.penggle</groupId>
    <artifactId>kaptcha</artifactId>
    <version>2.3.2</version>
</dependency>
2、编写验证码文本生成器:KaptchaTextCreator.java
import com.google.code.kaptcha.text.impl.DefaultTextCreator;
import java.util.Random;
/**
 * 验证码文本生成器
 *
 * @author ruoyi
 */
public class KaptchaTextCreator extends DefaultTextCreator
{
    private static final String[] CNUMBERS = "0,1,2,3,4,5,6,7,8,9,10".split(",");
    @Override
    public String getText()
    {
        Integer result = 0;
        Random random = new Random();
        int x = random.nextInt(10);
        int y = random.nextInt(10);
        StringBuilder suChinese = new StringBuilder();
        int randomoperands = (int) Math.round(Math.random() * 2);
        if (randomoperands == 0)
        {
            result = x * y;
            suChinese.append(CNUMBERS[x]);
            suChinese.append("*");
            suChinese.append(CNUMBERS[y]);
        }
        else if (randomoperands == 1)
        {
            if (!(x == 0) && y % x == 0)
            {
                result = y / x;
                suChinese.append(CNUMBERS[y]);
                suChinese.append("/");
                suChinese.append(CNUMBERS[x]);
            }
            else
            {
                result = x + y;
                suChinese.append(CNUMBERS[x]);
                suChinese.append("+");
                suChinese.append(CNUMBERS[y]);
            }
        }
        else if (randomoperands == 2)
        {
            if (x >= y)
            {
                result = x - y;
                suChinese.append(CNUMBERS[x]);
                suChinese.append("-");
                suChinese.append(CNUMBERS[y]);
            }
            else
            {
                result = y - x;
                suChinese.append(CNUMBERS[y]);
                suChinese.append("-");
                suChinese.append(CNUMBERS[x]);
            }
        }
        else
        {
            result = x + y;
            suChinese.append(CNUMBERS[x]);
            suChinese.append("+");
            suChinese.append(CNUMBERS[y]);
        }
        suChinese.append("=?@" + result);
        return suChinese.toString();
    }
}
3、编写Kaptcha配置类:KaptchaConfig.java
注意注意:该类中的生成器是通过.class的方式引入的需要注意下,每个人包不同你需要进行改正一下

import com.google.code.kaptcha.impl.DefaultKaptcha;
import com.google.code.kaptcha.util.Config;
import org.springframework.context.annotation.Bean;
import org.springframework.context.annotation.Configuration;
import java.util.Properties;
import static com.google.code.kaptcha.Constants.*;
/**
 * @ClassName KaptchaConfig
 * @Author ruoyi
 * @Date 3/24/2022 1:12 PM
 * @Description 验证码配置器
 */
@Configuration
public class KaptchaConfig {
    @Bean(name = "captchaProducer")
    public DefaultKaptcha getKaptchaBean()
    {
        DefaultKaptcha defaultKaptcha = new DefaultKaptcha();
        Properties properties = new Properties();
        // 是否有边框 默认为true 我们可以自己设置yes,no
        properties.setProperty(KAPTCHA_BORDER, "yes");
        // 验证码文本字符颜色 默认为Color.BLACK
        properties.setProperty(KAPTCHA_TEXTPRODUCER_FONT_COLOR, "black");
        // 验证码图片宽度 默认为200
        properties.setProperty(KAPTCHA_IMAGE_WIDTH, "160");
        // 验证码图片高度 默认为50
        properties.setProperty(KAPTCHA_IMAGE_HEIGHT, "60");
        // 验证码文本字符大小 默认为40
        properties.setProperty(KAPTCHA_TEXTPRODUCER_FONT_SIZE, "38");
        // KAPTCHA_SESSION_KEY
        properties.setProperty(KAPTCHA_SESSION_CONFIG_KEY, "kaptchaCode");
        // 验证码文本字符长度 默认为5
        properties.setProperty(KAPTCHA_TEXTPRODUCER_CHAR_LENGTH, "4");
        // 验证码文本字体样式 默认为new Font("Arial", 1, fontSize), new Font("Courier", 1, fontSize)
        properties.setProperty(KAPTCHA_TEXTPRODUCER_FONT_NAMES, "Arial,Courier");
        // 图片样式 水纹com.google.code.kaptcha.impl.WaterRipple 鱼眼com.google.code.kaptcha.impl.FishEyeGimpy 阴影com.google.code.kaptcha.impl.ShadowGimpy
        properties.setProperty(KAPTCHA_OBSCURIFICATOR_IMPL, "com.google.code.kaptcha.impl.ShadowGimpy");
        Config config = new Config(properties);
        defaultKaptcha.setConfig(config);
        return defaultKaptcha;
    }
    @Bean(name = "captchaProducerMath")
    public DefaultKaptcha getKaptchaBeanMath()
    {
        DefaultKaptcha defaultKaptcha = new DefaultKaptcha();
        Properties properties = new Properties();
        // 是否有边框 默认为true 我们可以自己设置yes,no
        properties.setProperty(KAPTCHA_BORDER, "yes");
        // 边框颜色 默认为Color.BLACK
        properties.setProperty(KAPTCHA_BORDER_COLOR, "105,179,90");
        // 验证码文本字符颜色 默认为Color.BLACK
        properties.setProperty(KAPTCHA_TEXTPRODUCER_FONT_COLOR, "blue");
        // 验证码图片宽度 默认为200
        properties.setProperty(KAPTCHA_IMAGE_WIDTH, "160");
        // 验证码图片高度 默认为50
        properties.setProperty(KAPTCHA_IMAGE_HEIGHT, "60");
        // 验证码文本字符大小 默认为40
        properties.setProperty(KAPTCHA_TEXTPRODUCER_FONT_SIZE, "35");
        // KAPTCHA_SESSION_KEY
        properties.setProperty(KAPTCHA_SESSION_CONFIG_KEY, "kaptchaCodeMath");
        // 验证码文本生成器
        properties.setProperty(KAPTCHA_TEXTPRODUCER_IMPL, "com.changlu.springbootcaptcha.kaptcha.config.KaptchaTextCreator");
        // 验证码文本字符间距 默认为2
        properties.setProperty(KAPTCHA_TEXTPRODUCER_CHAR_SPACE, "3");
        // 验证码文本字符长度 默认为5
        properties.setProperty(KAPTCHA_TEXTPRODUCER_CHAR_LENGTH, "6");
        // 验证码文本字体样式 默认为new Font("Arial", 1, fontSize), new Font("Courier", 1, fontSize)
        properties.setProperty(KAPTCHA_TEXTPRODUCER_FONT_NAMES, "Arial,Courier");
        // 验证码噪点颜色 默认为Color.BLACK
        properties.setProperty(KAPTCHA_NOISE_COLOR, "white");
        // 干扰实现类
        properties.setProperty(KAPTCHA_NOISE_IMPL, "com.google.code.kaptcha.impl.NoNoise");
        // 图片样式 水纹com.google.code.kaptcha.impl.WaterRipple 鱼眼com.google.code.kaptcha.impl.FishEyeGimpy 阴影com.google.code.kaptcha.impl.ShadowGimpy
        properties.setProperty(KAPTCHA_OBSCURIFICATOR_IMPL, "com.google.code.kaptcha.impl.ShadowGimpy");
        Config config = new Config(properties);
        defaultKaptcha.setConfig(config);
        return defaultKaptcha;
    }
}
4、编写控制器,KaptchaController.java:来进行两个样式的测试,两个样式在创建时稍微有些不一样,最终都是获取的Base64编码
import com.google.code.kaptcha.Producer;
import org.apache.tomcat.util.codec.binary.Base64;
import org.springframework.util.FastByteArrayOutputStream;
import org.springframework.web.bind.annotation.GetMapping;
import org.springframework.web.bind.annotation.RequestMapping;
import org.springframework.web.bind.annotation.RestController;
import javax.annotation.Resource;
import javax.imageio.ImageIO;
import java.awt.image.BufferedImage;
import java.util.HashMap;
import java.util.Map;
/**
 * @ClassName KaptchaController
 * @Author ChangLu
 * @Date 4/12/2022 7:13 PM
 * @Description Kaptcha控制器
 */
@RestController
@RequestMapping("/kaptcha")
public class KaptchaController {
    @Resource(name = "captchaProducerMath")
    private Producer captchaProducerMath;
    /**
     * 1、获取算数表达式验证码
     * @return
     * @throws Exception
     */
    @GetMapping("/captcha1")
    public Map<String,String> mathKaptcha() throws Exception{
        //1、生成验证码
        String code = captchaProducerMath.createText();
        String capStr = code.substring(0, code.lastIndexOf("@"));
        code = code.substring(code.lastIndexOf("@") + 1);
        //2、获取Base64编码
        BufferedImage bi = captchaProducerMath.createImage(capStr);
        FastByteArrayOutputStream fbaos = new FastByteArrayOutputStream();
        ImageIO.write(bi, "png", fbaos);
        String kaptchaBase64 = Base64.encodeBase64String(fbaos.toByteArray());
        //3、返回结果集
        Map<String,String> result = new HashMap<>(2);
        result.put("code", code);
        result.put("base64", "data:image/png;base64," + kaptchaBase64);
        return result;
    }
    @Resource(name = "captchaProducer")
    private Producer captchaProducer;
    /**
     * 2、获取字符验证码
     * @return
     * @throws Exception
     */
    @GetMapping("/captcha2")
    public Map<String,String> charKaptcha() throws Exception{
        //1、生成验证码(这里就简单些)
        String capStr = null, code = null;
        capStr = code = captchaProducer.createText();
        //2、获取Base64编码
        BufferedImage bi = captchaProducer.createImage(capStr);
        FastByteArrayOutputStream fbaos = new FastByteArrayOutputStream();
        ImageIO.write(bi, "png", fbaos);
        String kaptchaBase64 = Base64.encodeBase64String(fbaos.toByteArray());
        //3、返回结果集
        Map<String,String> result = new HashMap<>(2);
        result.put("code", code);
        result.put("base64", "data:image/png;base64," + kaptchaBase64);
        return result;
    }
}
现在就可以进行测试了,测试效果如2.1所示。


