本节书摘来自异步社区《微软云计算Windows Azure开发与部署权威指南》一书中的第6章,第6.7节,作者: 尹成 , 郝庭毅 , 张俊强 , 孙奉刚 , 寇睿明 更多章节内容可以访问云栖社区“异步社区”公众号查看。
6.7 AppFabric服务总线REST的服务开发
微软云计算Windows Azure开发与部署权威指南
本节介绍如何建立一个简单的服务总线主应用程序,使该程序公开一个基于REST的访问接口。任一台Web客户端,比如浏览器,都可以使用HTTP请求访问服务总线API。本示例使用的是WCF REST编程模型在服务总线上构建REST服务。
1.步骤一:注册账户
① 在Windows Azure门户创建一个服务命名空间。可参考本章6.2小节的内容。
② 在Windows Azure Management门户主窗口中单击选中创建的命名空间。
③ 在左侧的“Properties”面板中找到“Default Key”入口。
④ 在“Default Key”中单击“View”,记下或复制密钥,以在之后的操作中使用。
2.步骤二:定义一个基于REST的服务契约
① 以管理员身份运行Visual Studio 2010,选择新建工程,选择Visual C#,创建一个控制台应用程序,命名为“ImageListener”,如图6-68所示。
② 添加对System.ServiceModel.dll的引用到该工程。在解决方案资源管理器中,右键单击“引用”,选择“添加引用”,在弹出的对话框中选择“.NET”选项卡,找到System.ServiceModel.dll,选中,单击“确定”按钮。
③ 用同样的方法添加System.ServiceModel.Web.dll的引用。

④ 在Program.cs中添加如下命名空间的引用。
using System.ServiceModel;
using System.ServiceModel.Channels;
using System.ServiceModel.Web;
using System.IO;
通过System.ServiceModel命名空间可以使用WCF的基本功能,服务总线使用了很多WCF的对象和属性定义契约,所以在大多数服务总线应用程序中都用到该命名空间。System.ServiceModel.Channels命名空间帮助定义通道,通过通道与服务总线和客户的Web浏览器通信。System.ServiceModel.Web包含了建立基于Web应用程序的数据类型。
⑤ 将Visual Studio默认的命名空间改为Microsoft.ServiceBus.Samples。
⑥ 在命名空间里定义一个名为“IImageContract”的接口,在接口中声明一个名为“GetImage”的方法,作为最后要公开的接口方法。代码如下:
[ServiceContract(Name = "ImageContract",
    Namespace = "http://samples.microsoft.com/ServiceModel/Relay/RESTTutorial1")]
publicinterfaceIImageContract
{
    [OperationContract, WebGet]
Stream GetImage();
}
这样就允许服务总线将HTTP GET请求路由到GetImage方法上,并将GetImage方法的返回值转换成HTTP GETRESPONSE回复。
⑦ 在“IImageContract”接口定义的下面,声明一个继承了IImageContract和IClientChannel的通道,具体代码如下。
publicinterfaceIImageChannel : IImageContract, IClientChannel { }
channel是一个WCF对象,是服务端和客户端互相传递信息的通道。之后,主机应用程序会创建一个通道,服务总线就会通过这个通道将来自浏览器的HTTP GET请求传递给GetImage方法。服务总线也通过这个通道得到GetImage方法返回的值,并转换成要返回给浏览器的HTTP GETRESPONSE。
⑧ 按F7键生成解决方案,以确保正确。最后的代码如下:
using System;
using System.Collections.Generic;
using System.Linq;
using System.Text;
using System.ServiceModel;
using System.ServiceModel.Channels;
using System.ServiceModel.Web;
using System.IO;

namespace Microsoft.ServiceBus.Samples
{

    [ServiceContract(Name = "IImageContract",
        Namespace = "http://samples.microsoft.com/ServiceModel/Relay/")]
publicinterfaceIImageContract
    {
        [OperationContract, WebGet]
Stream GetImage();
    }
publicinterfaceIImageChannel : IImageContract, IClientChannel { }

classProgram
    {
staticvoid (string[] args)
        {
        }
    }
}
3.步骤三:实现基于REST的WCF服务契约
① 在“IImageContract”接口下面创建一个名为“ImageService”的类,该类实现“IImageContract”接口。具体代码如下:
[ServiceBehavior(Name = "ImageService",
    Namespace = "http://samples.microsoft.com/ServiceModel/Relay/")]
classImageService : IImageContract
{
}
② 向工程里添加一个JPG格式的图片。右键单击工程,选择“添加”→“现有项”,在弹出的文件选择对话框中选择本地的一张JPG图片,注意文件类型过滤条件要选择ALL Files(.)以方便选择JPG文件。本例添加图片名称为“Penguins.jpg”。
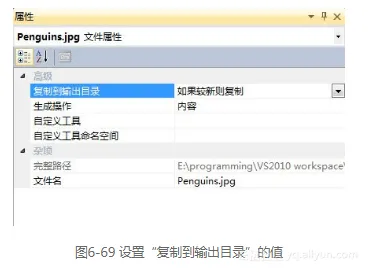
③ 为确保运行时的服务能找到图像文件,在解决方案资源管理器中右键单击添加的图片,在属性中设置“复制到输出目录”的值为“如果较新则复制”,如图6-69所示。
④ 在工程中添加对System.Drawing.dll、System. Runtime.Serialization.dll、Microsoft.ServiceBus.dll的引用,可参考步骤二的序号②。Microsoft. ServiceBus.dll可以在Windows Azure SDK目录下找到,然后在Program.cs中添加对如下命名空间的引用。
using System.Drawing;
using System.Drawing.Imaging;
using Microsoft.ServiceBus;
using Microsoft.ServiceBus.Web;
⑤ 在ImageService中添加构造方法来加载位图,以准备将图片发送至客户端浏览器。
classImageService : IImageContract
{
conststring imageFileName = "Penguins.jpg";

Image bitmap;

public ImageService()
    {
this.bitmap = Image.FromFile(imageFileName);
    }
}
⑥ 在ImageService类中添加GetImage()方法,返回值为包含了返回图片的HTTP消息。
publicStream GetImage()
{
MemoryStream stream = newMemoryStream();
this.bitmap.Save(stream, ImageFormat.Jpeg);

    stream.Position = 0;
WebOperationContext.Current.OutgoingResponse.ContentType = "image/jpeg";

return stream;
}
GetImage方法体中使用MemoryStream检索图像和准备流。
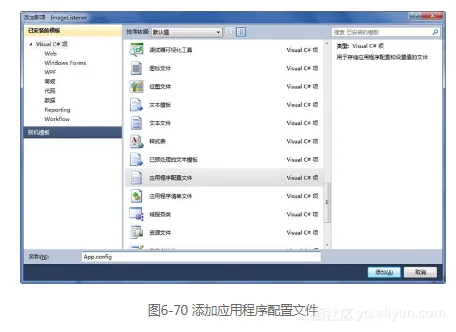
⑦ 右键单击ImageListener工程,选择“添加”→“新建项”,在添加新建项对话框中选择应用程序配置文件,单击“添加”,如图6-70所示。
⑧ 打开App.config文件,具体内容如下:
<?xml version="1.0" encoding="utf-8" ?>
<configuration>
</configuration>
⑨ 在根节点中添加名为“system.serviceModel”的子节点,这是WCF的元素,用来定义一个或者多个服务。在这里用来定义服务名称和端点。
⑩ 在“system.serviceModel”中添加名为“binding”的子节点,它用来定义程序中使用的绑定,可以定义多个,但在本例中只需要一个,具体代码如下。
<bindings>
<!-- Application Binding -->
<webHttpRelayBinding>
<bindingname="default">
<securityrelayClientAuthenticationType="None" />
</binding>
</webHttpRelayBinding>
</bindings>
该代码定义了一个relayClientAuthenticationType为None的WebHttpRelayBinding服务总线绑定,这表明使用此绑定的端点不要求客户端提供证书。
11 在“binding”元素后面再添加“services”元素,同样可以定义多个,但本例只需要一个,具体代码如下。
<services>
<!-- Application Service -->
<servicename="Microsoft.ServiceBus.Samples.ImageService"
behaviorConfiguration="default">
<endpointname="RelayEndpoint"
contract="Microsoft.ServiceBus.Samples.IImageContract"
binding="webHttpRelayBinding"
bindingConfiguration="default"
behaviorConfiguration="sharedSecretClientCredentials"
address="" />
</service>
</services>
这段代码配置了使用之前定义的webHttpRelayBinding的一个服务。它使用默认的sharedSecretCredentials,这将在下一步中定义。
12 在“services”元素后面再添加一个“behaviors”元素,代码如下,将“ISSURE_NAME”和“ISSURE_SECRET”替换为发行名字和密钥。
<behaviors>
<endpointBehaviors>
<behaviorname="sharedSecretClientCredentials">
<transportClientEndpointBehaviorcredentialType="SharedSecret">
<clientCredentials>
<sharedSecretissuerName="owner"issuerSecret="fYSDEsI2GhgaCGE6msnul9Ze2DAYvsNGcTnslROykpE=" />
</clientCredentials>
</transportClientEndpointBehavior>
</behavior>
</endpointBehaviors>
<serviceBehaviors>
<behaviorname="default">
<serviceDebughttpHelpPageEnabled="false"httpsHelpPageEnabled="false" />
</behavior>
</serviceBehaviors>
</behaviors>
sharedSecretClientCredentials行为定义了服务用来访问服务总线所使用的证书,即SharedSecret。
13 Windows Azure SDK 1.5版本不再将条目添加到Machine.config文件,故需要手动将用到的扩展名添加到项目的App.config文件中,在system.serviceModel元素里添加如下代码。注意Version的值要与读者引用的Microsoft.serviceBus.dll的版本一致。
<extensions>
<behaviorExtensions>
<addname="transportClientEndpointBehavior"
type="Microsoft.ServiceBus.Configuration.TransportClientEndpointBehaviorElement,
          Microsoft.ServiceBus, Version=.0, Culture=neutral, PublicKeyToken= 31bf3856ad364e35" />
</behaviorExtensions>

<bindingExtensions>
<addname="webHttpRelayBinding"
type="Microsoft.ServiceBus.Configuration.WebHttpRelayBindingCollectionElement,
          Microsoft.ServiceBus, Version=.0, Culture=neutral, PublicKeyToken= 31bf3856ad364e35" />
</bindingExtensions>
</extensions>
14 按F7键,生成解决方案。
最终Program.cs的代码如下:
using System;
using System.Collections.Generic;
using System.Linq;
using System.Text;
using System.ServiceModel;
using System.ServiceModel.Channels;
using System.ServiceModel.Web;
using System.IO;
using System.Drawing;
using System.Drawing.Imaging;
using Microsoft.ServiceBus;
using Microsoft.ServiceBus.Web;

namespace Microsoft.ServiceBus.Samples
{


    [ServiceContract(Name = "ImageContract",
        Namespace = "http://samples.microsoft.com/ServiceModel/Relay/")]
publicinterfaceIImageContract
    {
        [OperationContract, WebGet]
Stream GetImage();
    }

publicinterfaceIImageChannel : IImageContract, IClientChannel { }

    [ServiceBehavior(Name = "ImageService",
        Namespace = "http://samples.microsoft.com/ServiceModel/Relay/")]
classImageService : IImageContract
    {
conststring imageFileName = "image.jpg";

Image bitmap;

public ImageService()
        {
this.bitmap = Image.FromFile(imageFileName);
        }

publicStream GetImage()
        {
MemoryStream stream = newMemoryStream();
this.bitmap.Save(stream, ImageFormat.Jpeg);

            stream.Position = 0;
WebOperationContext.Current.OutgoingResponse.ContentType = "image/jpeg";

return stream;
        }
    }

classProgram
    {
staticvoid (string[] args)
        {
        }
    }
}
最终App.config的内容如下。
<?xmlversion="1.0"encoding="utf-8" ?>
<configuration>
<system.serviceModel>

<extensions>
<behaviorExtensions>
<addname="transportClientEndpointBehavior"
type="Microsoft.ServiceBus.Configuration.TransportClientEndpointBehaviorElement,
              Microsoft.ServiceBus, Version=.0, Culture=neutral,
              PublicKeyToken=31bf3856ad364e35" />
</behaviorExtensions>

<bindingExtensions>
<addname="webHttpRelayBinding"
type="Microsoft.ServiceBus.Configuration.WebHttpRelayBindingCollectionElement,
              Microsoft.ServiceBus, Version=.0, Culture=neutral,
              PublicKeyToken=31bf3856ad364e35" />
</bindingExtensions>
</extensions>

<bindings>
<!-- Application Binding -->
<webHttpRelayBinding>
<bindingname="default">
<securityrelayClientAuthenticationType="None" />
</binding>
</webHttpRelayBinding>
</bindings>

<services>
<!-- Application Service -->
<servicename="Microsoft.ServiceBus.Samples.ImageService"
behaviorConfiguration="default">
<endpointname="RelayEndpoint"
contract="Microsoft.ServiceBus.Samples.IImageContract"
binding="webHttpRelayBinding"
bindingConfiguration="default"
behaviorConfiguration="sharedSecretClientCredentials"
address="" />
</service>
</services>

<behaviors>
<endpointBehaviors>
<behaviorname="sharedSecretClientCredentials">
<transportClientEndpointBehaviorcredentialType="SharedSecret">
<clientCredentials>
<sharedSecretissuerName="owner"issuerSecret="fYSDEsI2GhgaCGE6msnul9Ze2DAYvsNGcTnslROykpE=" />
</clientCredentials>
</transportClientEndpointBehavior>
</behavior>
</endpointBehaviors>
<serviceBehaviors>
<behaviorname="default">
<serviceDebughttpHelpPageEnabled="false"httpsHelpPageEnabled="false" />
</behavior>
</serviceBehaviors>
</behaviors>

</system.serviceModel>
</configuration>
4.步骤四:将该基于REST的服务托管到服务总线
① 创建服务的基地址。在Main()方法中创建一个变量用来存放服务总线工程的服务命名空间。根据此服务命名空间生成URI。
② 创建和配置该Web服务的主机。使用生成的URI地址创建Web服务主机。
③ 运行Web服务主机。打开服务,给出提示,结束后关闭服务。最后Main()中代码如下:
staticvoid (string[] args)
{
//记录服务命名空间
string serviceNamespace = "InsertServiceNamespaceHere";
//生成URI地址
Uri address = ServiceBusEnvironment.CreateServiceUri("https", serviceNamespace, "Image");

//创建主机
WebServiceHost host = newWebServiceHost(typeof(ImageService), address);

//运行服务
    host.Open();
Console.WriteLine("Copy the following address into a browser to see the image: ");
Console.WriteLine(address + "GetImage");
Console.WriteLine();
Console.WriteLine("Press [Enter] to exit");
Console.ReadLine();
    host.Close();
}
④ 图6-71所示为运行结果。图6-72所示为最终的界面。