前言
参考资料:
《Spring Microservices in Action》
《Spring Cloud Alibaba 微服务原理与实战》
《B站 尚硅谷 SpringCloud 框架开发教程 周阳》
为方便理解与表达,这里把 Nacos 控制台和 Nacos 注册中心称为 Nacos 服务器(就是 web 界面那个),我们编写的业务服务称为 Nacso 客户端;
由于篇幅有限,这里将源码分析分为上下两篇,其中上篇讲获取配置与事件订阅机制,下篇讲长轮询定时机制;
上篇《微服务架构 | *2.3 Spring Cloud 启动及加载配置文件源码分析(以 Nacos 为例)》中提到,读取 Nacos 服务器里的配置依靠的是 NacosPropertySourceLocator.locate() 方法,我们这次的源码之旅将从这个方法开始;
1. 客户端获取 Nacos 服务器里的配置
1.1 定位 Nacos 配置源 NacosPropertySourceLocator.locate()
该方法的主要作用是:
- 初始化 ConfigService 对象,这是 Nacos 客户端提供的用于访问实现配置中心基本操作的类;
- 按照顺序分别加载共享配置、扩展配置、应用名称对应的配置;
- 方法源码如下:
@Override
public PropertySource<?> locate(Environment env) {
    //【断点步入 长轮询定时机制】获取配置服务器实例,这是 Nacos 客户端提供的用于访问实现配置中心基本操作的类
    ConfigService configService = nacosConfigProperties.configServiceInstance();
    if (null == configService) {
        log.warn("no instance of config service found, can't load config from nacos");
        return null;
    }
    long timeout = nacosConfigProperties.getTimeout();
    //Nacos 属性源生成器
    nacosPropertySourceBuilder = new NacosPropertySourceBuilder(configService, timeout);
    String name = nacosConfigProperties.getName();

    //DataId 前缀(这里是 nacos-config-client)
    String dataIdPrefix = nacosConfigProperties.getPrefix();
    if (StringUtils.isEmpty(dataIdPrefix)) {
        dataIdPrefix = name;
    }
    //没有配置 DataId 前缀则用 spring.application.name 属性的值
    if (StringUtils.isEmpty(dataIdPrefix)) {
        dataIdPrefix = env.getProperty("spring.application.name");
    }
    //创建复合属性源
    CompositePropertySource composite = new CompositePropertySource(NACOS_PROPERTY_SOURCE_NAME);

    //加载共享配置
    loadSharedConfiguration(composite);
    //加载外部配置
    loadExtConfiguration(composite);
    //【断点步入】加载 Nacos 服务器上应用程序名对应的的配置
    loadApplicationConfiguration(composite, dataIdPrefix, nacosConfigProperties, env);

    return composite;
}- 进入
NacosPropertySourceLocator.loadApplicationConfiguration()方法,根据 Data ID 加载配置;
private void loadApplicationConfiguration(CompositePropertySource compositePropertySource, String dataIdPrefix, NacosConfigProperties properties, Environment environment) {
    //获取配置格式(这里是 yaml)
    String fileExtension = properties.getFileExtension();
    //获取nacosGroup(这里是 DEFAULT_GROUP)
    String nacosGroup = properties.getGroup();
    //如果我们配置了前缀,则按前缀获取配置文件(由于我们没配置前缀,这里是 nacos-config-client.yaml 获取不到)
    loadNacosDataIfPresent(compositePropertySource, dataIdPrefix + DOT + fileExtension, nacosGroup, fileExtension, true);
    for (String profile : environment.getActiveProfiles()) {
        //这里是 nacos-config-client-dev.yaml 可以获取
        String dataId = dataIdPrefix + SEP1 + profile + DOT + fileExtension;
        //【断点步入】加载配置
        loadNacosDataIfPresent(compositePropertySource, dataId, nacosGroup, fileExtension, true);
    }
}- 进入
NacosPropertySourceLocator.loadNacosDataIfPresent()方法,判断是否更新情况;
private void loadNacosDataIfPresent(final CompositePropertySource composite, final String dataId, final String group, String fileExtension, boolean isRefreshable) {
    //获取更新的配置,需要注意,NacosContextRefresher 类与事件订阅机制相关,本篇第2点将重点讨论
    if (NacosContextRefresher.getRefreshCount() != 0) {
        NacosPropertySource ps;
        if (!isRefreshable) {
            ps = NacosPropertySourceRepository.getNacosPropertySource(dataId);
        }
        else {
            ps = nacosPropertySourceBuilder.build(dataId, group, fileExtension, true);
        }

        composite.addFirstPropertySource(ps);
    }
    else {
        //【断点步入】如果我们没有更新配置,则走下面代码
        NacosPropertySource ps = nacosPropertySourceBuilder.build(dataId, group,fileExtension, isRefreshable);
        composite.addFirstPropertySource(ps);
    }
}- 进入
NacosPropertySourceBuilder.build()方法,加载并封装配置;
NacosPropertySource build(String dataId, String group, String fileExtension, boolean isRefreshable) {
    //【断点步入】加载 Nacos
    Properties p = loadNacosData(dataId, group, fileExtension);
    //将获取到的配置封装到 NacosPropertySource
    NacosPropertySource nacosPropertySource = new NacosPropertySource(group, dataId, propertiesToMap(p), new Date(), isRefreshable);
    NacosPropertySourceRepository.collectNacosPropertySources(nacosPropertySource);
    return nacosPropertySource;
}- 进入
NacosPropertySourceBuilder.loadNacosData()方法,
private Properties loadNacosData(String dataId, String group, String fileExtension) {

    //省略其他代码

    try {
        //【断点步入】根据 dataId、group 等信息获取配置
        data = configService.getConfig(dataId, group, timeout);

    }
    catch (NacosException e) {
        log.error("get data from Nacos error,dataId:{}, ", dataId, e);
    }
    return EMPTY_PROPERTIES;
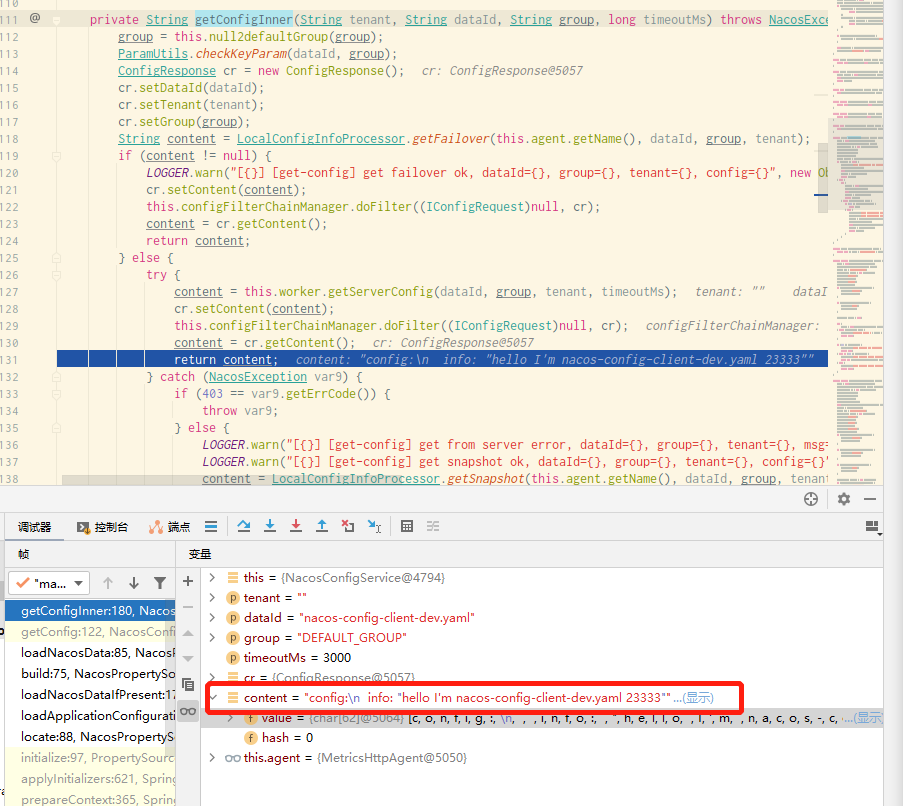
}- 一直追下去发现在
NacosConfigService.getConfigInner()方法里成功获取到配置;
2. Nacos 配置的事件订阅机制
2.1 监听 ApplicationReadyEvent 事件,注册监听器 NacosContextRefresher.onApplicationEvent()
- 上下文准备完毕后,程序运行,EventPublishingRunListener 发布 ApplicationReadyEvent 事件,详情请见《微服务架构 | *2.3 Spring Cloud 启动及加载配置文件源码分析(以 Nacos 为例)》中的《4. 程序运行事件》;
- 上面 1.1 提到,事件订阅机制与 NacosContextRefresher(Nacos上下文更新器) 相关,这是因为里面有个
NacosContextRefresher.onApplicationEvent()方法实现了对事件 ApplicationReadyEvent(上下文准备完毕事件) 的监听,源码如下:
//监听 ApplicationReadyEvent 事件
@Override
public void onApplicationEvent(ApplicationReadyEvent event) {
    if (this.ready.compareAndSet(false, true)) {
        //【断点步入】为应用程序注册 Nacos 监听器
        this.registerNacosListenersForApplications();
    }
}
2.2 注册 Nacos 监听器,监听配置变更 NacosContextRefresher.registerNacosListener()
- 当监听到 ApplicationReadyEvent 事件后,最终会调用
NacosContextRefresher.registerNacosListener()方法来实现 Nacos 监听器的注册,源码如下:
private void registerNacosListener(final String group, final String dataId) {

    Listener listener = listenerMap.computeIfAbsent(dataId, i -> new Listener() {
        //接受配置变更的回调
        @Override
        public void receiveConfigInfo(String configInfo) {
            refreshCountIncrement();
            String md5 = "";
            if (!StringUtils.isEmpty(configInfo)) {
                try {
                    MessageDigest md = MessageDigest.getInstance("MD5");
                    md5 = new BigInteger(1, md.digest(configInfo.getBytes("UTF-8"))).toString(16);
                }
                catch (NoSuchAlgorithmException | UnsupportedEncodingException e) {
                    log.warn("[Nacos] unable to get md5 for dataId: " + dataId, e);
                }
            }
            refreshHistory.add(dataId, md5);
            //发布 RefreshEvent 配置变更事件
            applicationContext.publishEvent(new RefreshEvent(this, null, "Refresh Nacos config"));
            if (log.isDebugEnabled()) {
                log.debug("Refresh Nacos config group " + group + ",dataId" + dataId);
            }
        }

        @Override
        public Executor getExecutor() {
            return null;
        }
    });

    try {
        //监听配置
        configService.addListener(dataId, group, listener);
    }
    catch (NacosException e) {
        e.printStackTrace();
    }
}- 当收到配置变更的回调时,会通过
applicationContext.publishEvent()发布一个 RefreshEvent 事件; - 该事件又会被 RefreshEventListener(事件更新监听器) 监听,源码如下:
public void onApplicationEvent(ApplicationEvent event){
    if (event instanceof ApplicationReadyEvent) {
        //监听 ApplicationReadyEvent 事件
        this.handle((ApplicationReadyEvent)event);
    } else if (event instanceof RefreshEvent) {
        //【断点步入 2.3】监听 RefreshEvent 事件
        this.handle((RefreshEvent)event);
    }
}
2.3 监听配置变更,实施变更 RefreshEventListener.handle()
- RefreshEventListener(事件更新监听器) 类使用
RefreshEventListener.handle()方法变更配置,源码如下:
public void handle(RefreshEvent event) {
    if (this.ready.get()) {
        log.debug("Event received " + event.getEventDesc());
        Set<String> keys = this.refresh.refresh();
        log.info("Refresh keys changed: " + keys);
    }
}
3. 源码结构图小结
3.1 客户端获取 Nacos 服务器上的配置源码结构图
NacosPropertySourceLocator.locate():初始化 ConfigService 对象,定位配置;
NacosPropertySourceLocator.loadApplicationConfiguration():根据 Data ID 加载配置;
NacosPropertySourceLocator.loadNacosDataIfPresent():判断是否更新配置;
NacosPropertySourceBuilder.build():加载并封装配置;
NacosPropertySourceBuilder.loadNacosData():加载配置;
NacosConfigService.getConfig():使用配置服务获取配置;
- NacosConfigService.getConfigInner():最终在这里获取到配置;
3.2 Nacos 配置的事件订阅机制
- 上下文准备完毕,程序运行,EventPublishingRunListener 发布
ApplicationReadyEvent事件; NacosContextRefresher.onApplicationEvent():监听 ApplicationReadyEvent 事件;
- NacosContextRefresher.registerNacosListener():注册 Nacos 监听器,监听配置变更;
- 变更发生时,NacosContextRefresher 发布一个
RefreshEvent事件; RefreshEventListener.onApplicationEvent():同时监听 ApplicationReadyEvent 和 RefreshEvent 事件;
- RefreshEventListener.handle():实施变更方法;