啥是LiveData?
public abstract class LiveData {
    /***/
}复制代码
这个类就是LiveData 本文完!!!
hhh皮一下很开心
简单的介绍一下:
LiveData is a data holder class that can be observed within a given lifecycle.
官方类上面的介绍 简单的说就是可以
在生命周期内感知到数据变化的一个东东 通过Lifecycle感知当前页面的生命周期 来决定是否要发送数据
复制代码
如果你还不知道LiveData如何使用 那么建议看一下官方文档
大召唤法:developer.android.com/topic/libra…
看完上面两个东西 我觉得应该会有两个疑问
1:怎么发送数据?
2:怎么感知生命周期?
ok 我们来一一解答:
question one:LiveData 是怎么做到发送数据的?
ok 用过的小伙伴都知道 使用setValue 和 postValue方法 那么 这两个方法做了啥?
一起来看看
SetValue
/**
 * Sets the value. If there are active observers, the value will be dispatched to them.
 * <p>
 * This method must be called from the main thread. If you need set a value from a background
 * thread, you can use {@link #postValue(Object)}
 *
 * @param value The new value
 */
@MainThread //注解1
protected void setValue(T value) {
    assertMainThread("setValue");//注解2
    mVersion++;
    mData = value;
    dispatchingValue(null);//注解3
}复制代码
注解1:MainThread 该注意代表着被标注的方法 和 类 只能在主线程中进行 如果在类上 整个类的方法都只能在主线程
注解2:assertMainThread 进行线程检查
注解1+注解2 = 我们知道了setValue 只能在主线程中运行 ///Nice 脑壳又进了一点知识复制代码
注解3:从名字看 是给我们观察者派发更新事件的 等下说
PostValue
既然setValue 只能在主线程发送 那么Android中的惯例 就有一个可以在异步线程分派事件的方法
so 决定就是你 皮卡丘(postValue)
/**
 * Posts a task to a main thread to set the given value. So if you have a following code
 * executed in the main thread:
 * <pre class="prettyprint">
 * liveData.postValue("a");
 * liveData.setValue("b");
 * </pre>
 * The value "b" would be set at first and later the main thread would override it with
 * the value "a".
 * <p>
 * If you called this method multiple times before a main thread executed a posted task, only
 * the last value would be dispatched.//如果你多次调用这个方法 那么只使用最后一个值
 *
 * @param value The new value
 */
protected void postValue(T value) {
    boolean postTask;
    synchronized (mDataLock) {
        postTask = mPendingData == NOT_SET;
        mPendingData = value;
    }
    if (!postTask) {
        return;
    }
    ArchTaskExecutor.getInstance().postToMainThread(mPostValueRunnable);///注释1
}
注释1:ArchTaskExecutor调用获取实例方法  然后将任务发送至主线程中/**
 * Returns an instance of the task executor.
 *
 * @return The singleton ArchTaskExecutor.
 */
@NonNull
public static ArchTaskExecutor getInstance() {///一个单利实例获取写法
    if (sInstance != null) {
        return sInstance;
    }
    synchronized (ArchTaskExecutor.class) {
        if (sInstance == null) {
            sInstance = new ArchTaskExecutor();
        }
    }
    return sInstance;
}
///私有构造
private ArchTaskExecutor() {
    mDefaultTaskExecutor = new DefaultTaskExecutor();
    mDelegate = mDefaultTaskExecutor;
}
@Override
public void postToMainThread(Runnable runnable) {
    mDelegate.postToMainThread(runnable);注解1
}复制代码
注解1:这个mDelegate 其实是上面私有构造器的DefaultTaskExecutor()的代理;所以它的postToMainThread方法的具体实现应该如下:
@Override
public void postToMainThread(Runnable runnable) {
    if (mMainHandler == null) {
        synchronized (mLock) {
            if (mMainHandler == null) {
                mMainHandler = createAsync(Looper.getMainLooper());
            }
        }
    }
    //noinspection ConstantConditions
    mMainHandler.post(runnable);///看到MAinHandler 原来是这样跑到主线程去得
}复制代码
然后 就是问题来了 上面一系列的操作只是把任务切换到主线程运行 那任务呢?任务是啥?
ok 这个时候 我们在看LiveData.postValue 方法中 提交任务的那一块代码
ArchTaskExecutor.getInstance().postToMainThread(mPostValueRunnable);
哈哈哈找到了 mPostValueRunnable 是你  那这个mPostValueRunnable是什么东西  跟着去看看复制代码
private final Runnable mPostValueRunnable = new Runnable() {
    @Override
    public void run() {
        Object newValue;
        synchronized (mDataLock) {
            newValue = mPendingData;
            mPendingData = NOT_SET;
        }
        //noinspection unchecked
        setValue((T) newValue);///注释1
    }
};复制代码
注释1:好了 原来postValue只是切换线程后 最后还是调用setValue 方法
既然如此让我们再看看 刚刚的setValue中 还未说明的注释3吧
go dispatchingValue(null);//注解3
 @SuppressWarnings("WeakerAccess") /* synthetic access */
void dispatchingValue(@Nullable ObserverWrapper initiator) {
    if (mDispatchingValue) {///注解1:首先先判断是否是正在发送中
        mDispatchInvalidated = true;///是的话 return
        return;
    }
    mDispatchingValue = true;///标记为发送中
    ///一个do whild循环 :dowhile  至少执行一次
    do {
        mDispatchInvalidated = false;
        if (initiator != null) {///判断该initiator  是否为空 setValue传进来的都是null
            considerNotify(initiator);///只更改当前ObserverWrapper
            initiator = null;
        } else {
            ///否者分发所有地方
            for (Iterator<Map.Entry<Observer<? super T>, ObserverWrapper>> iterator =
                    mObservers.iteratorWithAdditions(); iterator.hasNext(); ) {
                considerNotify(iterator.next().getValue());
                if (mDispatchInvalidated) {
                    break;
                }
            }
        }
    } while (mDispatchInvalidated);
    mDispatchingValue = false;///取消标记为分发中的状态
}复制代码
从上面的代码 以及注释可以知道 正在改变数据的地方 是considerNotify 方法 gogogo 感觉要探宝成功了
private void considerNotify(ObserverWrapper observer) {
    if (!observer.mActive) {///如果不是活越状态 就不继续发送事件   注解1
        return;
    }
    // Check latest state b4 dispatch. Maybe it changed state but we didn't get the event yet.
    //
    // we still first check observer.active to keep it as the entrance for events. So even if
    // the observer moved to an active state, if we've not received that event, we better not
    // notify for a more predictable notification order.
    ///简单理解上面的话 就是有可能我们还没有收到改变状态的通知
    if (!observer.shouldBeActive()) {
        observer.activeStateChanged(false);
        //传入false  内部会进行判断是否需要再次判断是否执行onActive方法和onInactive方法回调。如果判断条件都满足会调用Observer的onChanged方法
        return;
    }
    if (observer.mLastVersion >= mVersion) {
        return;
    }
    observer.mLastVersion = mVersion;
    //noinspection unchecked
    observer.mObserver.onChanged((T) mData);
    ///哦豁 实现了数据通知
}复制代码
Question two:如何实现感知生命周期?
我们通常在Fragment 或者 Activity中注册监听方法会这样写到
//数据监听
        viewModel.getLiveData().observe(getViewLifecycleOwner(), data-> {
            /***/
        });
复制代码
来看看observe做了啥
@MainThread ///主线程
public void observe(@NonNull LifecycleOwner owner, @NonNull Observer observer) {
    assertMainThread("observe");///标准检查线程
    if (owner.getLifecycle().getCurrentState() == DESTROYED) {///如果是监听的生命周期是销毁状态
        // ignore ///忽略
        return;
    }
    ///创建一个与生命周期绑定的观察者
    LifecycleBoundObserver wrapper = new LifecycleBoundObserver(owner, observer);
    ObserverWrapper existing = mObservers.putIfAbsent(observer, wrapper);///这个方法做啥了  让我们看看注解1
    if (existing != null && !existing.isAttachedTo(owner)) {///如果existing   就是我们putIfAbsent 返回值 如果不为空 就说明已经绑定过了
        throw new IllegalArgumentException("Cannot add the same observer"
                + " with different lifecycles");
    }
    if (existing != null) {
        return;
    }
    owner.getLifecycle().addObserver(wrapper);///这个时候 就会真的添加进入观察
    Livedata就能够感知生命周期了
    }复制代码
注解1:putIfAbsent
* If the specified key is not already associated
 * with a value, associates it with the given value.
 *
 * @param key key with which the specified value is to be associated
 * @param v   value to be associated with the specified key
 * @return the previous value associated with the specified key,
 * or {@code null} if there was no mapping for the key
 */
public V putIfAbsent(@NonNull K key, @NonNull V v) {
    Entry<K, V> entry = get(key);///具体实现看下面get方法
    if (entry != null) {///如果当前节点不为空 就返回value
        return entry.mValue;
    }
    put(key, v);///否则存储 返回null
    return null;
}
////get方法
protected Entry<K, V> get(K k) {
    Entry<K, V> currentNode = mStart;///Entry 是一个双向链表
    while (currentNode != null) {///一个whild 循环
        if (currentNode.mKey.equals(k)) {
            ///判断当前链表的k 是否和当前k相等  相等则跳出循环
            break;
        }
        currentNode = currentNode.mNext;///否则等于下个next
    }
    return currentNode;///最后 如果当前链表中有k则返回当前节点  否则返回的是null
}
复制代码
到此 两个问题 都解答完了啦
总结:
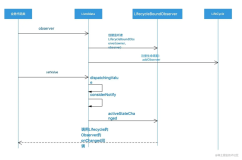
问题1:postValue 会把LiveData中已经定义好的 mPostValueRunnable 通过一个单利ArchTaskExecutor中postToMainThread方法 将任务提交给 DefaultTaskExecutor 发送至主线程执行runnable方法 而runnable中 会调用setValue setValue会调用分派数据方法(dispatchingValue) 该方法中进行一系列检测 最终considerNotify啊 然后再检查是否满足发送条件 满足则发送
问题2:调用observe 检查生命周期状态是否是销毁的 不是销毁的话 创建一个与生命周期进行绑定的 观察者 LifecycleBoundObserver 然后再进行一系列检查是否满足条件 满足就执行
owner.getLifecycle().addObserver(wrapper); 添加观察
作者:FeanCheng
链接:https://juejin.cn/post/6844904088241455112
来源:掘金
著作权归作者所有。商业转载请联系作者获得授权,非商业转载请注明出处。