1)操作步骤(基本参照官方文档https://about.gitlab.com/downloads/#centos7)
|
1
2
3
4
5
6
7
8
9
10
11
12
13
14
15
16
17
18
19
20
21
22
23
24
25
26
27
28
29
30
31
32
33
34
35
36
37
38
39
40
41
42
43
44
45
46
47
48
49
50
51
52
53
54
55
56
57
58
59
60
61
62
63
64
65
66
67
68
69
70
71
72
73
74
75
76
77
|
[root@localhost ~]
# sudo yum install curl policycoreutils openssh-server openssh-client
s -y
[root@localhost ~]
# sudo systemctl enable sshd
[root@localhost ~]
# sudo systemctl start sshd
[root@localhost ~]
# sudo yum install postfix
[root@localhost ~]
# sudo systemctl enable postfix
[root@localhost ~]
# sudo systemctl start postfix
[root@localhost ~]
# sudo firewall-cmd --permanent --add-service=http
success
[root@localhost ~]
# sudo systemctl reload firewalld
[root@localhost ~]
# curl -sS https://packages.gitlab.com/install/repositories/gitlab/gi
tlab-ce
/script
.rpm.sh |
sudo
bash
[root@localhost ~]
# sudo yum install gitlab-ce
[root@localhost ~]
# gitlab-ctl status
run: gitlab-workhorse: (pid 15903) 159s; run: log: (pid 15726) 198s
run: logrotate: (pid 15822) 186s; run: log: (pid 15821) 186s
run: nginx: (pid 15774) 192s; run: log: (pid 15773) 192s
run: postgresql: (pid 15435) 327s; run: log: (pid 15434) 327s
run: redis: (pid 15298) 339s; run: log: (pid 15297) 339s
run: sidekiq: (pid 15681) 204s; run: log: (pid 15680) 204s
run: unicorn: (pid 15625) 210s; run: log: (pid 15624) 210s
[root@localhost ~]
# gitlab-ctl --help
Usage: omnibus-ctl [options]
-t, --tmp-
dir
=DIR Storage location
for
temporary data
[root@localhost ~]
# gitlab-ctl restart
ok: run: gitlab-workhorse: (pid 16146) 0s
ok: run: logrotate: (pid 16156) 0s
ok: run: nginx: (pid 16162) 1s
ok: run: postgresql: (pid 16173) 0s
ok: run: redis: (pid 16175) 1s
ok: run: sidekiq: (pid 16187) 0s
ok: run: unicorn: (pid 16193) 0s
[root@localhost ~]
# gitlab-ctl tail nginx
==>
/var/log/gitlab/nginx/current
<==
==>
/var/log/gitlab/nginx/error
.log <==
==>
/var/log/gitlab/nginx/gitlab_access
.log <==
ri
/537
.36"
.2743.116 Safari
/537
.36"
ppleWebKit
/537
.36 (KHTML, like Gecko) Chrome
/52
.0.2743.116 Safari
/537
.36"
537.36"
37.36"
.0; WOW64) AppleWebKit
/537
.36 (KHTML, like Gecko) Chrome
/52
.0.2743.116 Safari
/537
.36"
like Gecko) Chrome
/52
.0.2743.116 Safari
/537
.36"
, like Gecko) Chrome
/52
.0.2743.116 Safari
/537
.36"
"
==>
/var/log/gitlab/nginx/gitlab_error
.log <==
==>
/var/log/gitlab/nginx/access
.log <==
5:
in
`
tail
': Interrupt
s-ctl.rb:575:
in
`run'
s-ctl:31:
in
`<
top
(required)>'
from
/opt/gitlab/embedded/bin/omnibus-ctl
:22:
in
`load'
from
/opt/gitlab/embedded/bin/omnibus-ctl
:22:
in
`<main>'
[root@localhost ~]
# cd /opt
[root@localhost opt]
# ls
gitlab rh
[root@localhost opt]
# cd gitlab/
[root@localhost gitlab]
# ls
bin etc LICENSE service var version-manifest.txt
embedded init LICENSES sv version-manifest.json
[root@localhost gitlab]
# cd etc/
[root@localhost etc]
# ll
总用量 52
-rw-r--r--. 1 root root 80 11月 28 13:42 gitlab-psql-rc
drwx------. 3 git root 38 11月 28 13:40 gitlab-rails
-rw-r--r--. 1 root root 47471 11月 23 02:51 gitlab.rb.template
drwx------. 3 git root 16 11月 28 13:44 gitlab-workhorse
[root@localhost etc]
# cp gitlab.rb.template gitlab.rb.template.20161128
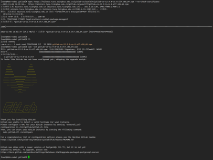
部署完后,查看gitlab的状态:
[root@localhost code]
# gitlab-ctl status
run: gitlab-workhorse: (pid 845) 20880s; run: log: (pid 843) 20880s
run: logrotate: (pid 28207) 2879s; run: log: (pid 849) 20880s
run: nginx: (pid 847) 20880s; run: log: (pid 846) 20880s
run: postgresql: (pid 854) 20880s; run: log: (pid 853) 20880s
run: redis: (pid 852) 20880s; run: log: (pid 851) 20880s
run: sidekiq: (pid 856) 20880s; run: log: (pid 855) 20880s
run: unicorn: (pid 842) 20880s; run: log: (pid 841) 20880s
如上我们可以看到,部署涉及到的软件比较多,建议用一个比较干净的系统来进行部署
|
2) 查看初始化界面

如上图所示,我们需要配置我们的初始密码

配置完后,我们使用用户名root,以及已经设定的密码进行登录
3)在gitlab中添加公开密钥,这样就可以用私有密钥进行认证了
|
1
2
3
4
5
6
7
8
|
[root@localhost code]
# ssh-keygen -t rsa
Generating public
/private
rsa key pair.
Enter
file
in
which
to save the key (
/root/
.
ssh
/id_rsa
):
/root/
.
ssh
/id_rsa
already exists.
Overwrite (y
/n
)?
[root@localhost code]
# cd /root/.ssh/
[root@localhost .
ssh
]
# cat id_rsa.pub
ssh
-rsa AAAAB3NzaC1yc2EAAAADAQABAAABAQDgA
/RQdMLqmR3TxZdoMJoSr0fZYZaynK0ueaN0fRzEPn87AH7qV6X3dCc18BCxOtsD
+o8qfdp8zVYfYbxdL+P1r53Qq278BLXov+ATWCl++Ly62oLYuGTZAAdm
/cBYGTTxyqLp83wLutvbmsf3vlD3owbmZyfV/UEjon
+j
/T6ZVMC2JYcYHDu17HwlsXHZpOpm3g1FimmzMlaf12Hd76bPfC1blE6gcEKMJVJ6qTzK4ksL2DwqaaLpTnw/hLBA0QGM4
+s74Q5WoyTSVMqoz+1H3NaXJYquRm5xFf+fZX8sg7SkYJX
/7AfkxvuwzYPW
+pPzpNtW1KikUgq9aq+rgMt/ root@localhost.localdomain
|

将id_ras.pub的内容拷贝到指定的区域,并做好保存:
|
1
2
3
4
5
6
7
8
9
10
|
为git配置好颜色:
[root@localhost code]
# git config --global color.ui true
[root@localhost code]
# git config --list
user.name=Administrator
user.email=admin@example.com
color.ui=
true
core.repositoryformatversion=0
core.filemode=
true
core.bare=
false
core.logallrefupdates=
true
|


|
1
2
3
4
5
6
7
8
9
10
11
12
13
14
15
16
17
18
19
20
21
22
23
24
25
26
27
|
[root@localhost code]
# git clone git@localhost:root/cslc.git
Cloning into
'cslc'
...
warning: You appear to have cloned an empty repository.
[root@localhost code]
# ls
cslc freemind-mmx
[root@localhost code]
# cd cslc
[root@localhost cslc]
# cp /etc/passwd .
[root@localhost cslc]
# git add passwd
[root@localhost cslc]
# git commit -m "add passwd"
[master (root-commit) 8c26f36] add
passwd
1
file
changed, 43 insertions(+)
create mode 100644
passwd
[root@localhost cslc]
# ll -la
total 8
drwxr-xr-x. 3 root root 30 Nov 29 16:41 .
drwxr-xr-x. 5 root root 47 Nov 29 16:40 ..
drwxr-xr-x. 8 root root 4096 Nov 29 16:41 .git
-rw-r--r--. 1 root root 2213 Nov 29 16:41
passwd
[root@localhost cslc]
# git push -u origin master
Counting objects: 3,
done
.
Delta compression using up to 4 threads.
Compressing objects: 100% (2
/2
),
done
.
Writing objects: 100% (3
/3
), 1.04 KiB | 0 bytes
/s
,
done
.
Total 3 (delta 0), reused 0 (delta 0)
To git@localhost:root
/cslc
.git
* [new branch] master -> master
Branch master
set
up to track remote branch master from origin.
|

4)添加一个README
|
1
2
3
4
5
6
7
8
9
10
11
12
13
14
15
16
17
|
[root@localhost cslc]
# echo "欢迎来到中体彩武汉的gitlab站">>README.MD
[root@localhost cslc]
# ls
README.md
passwd
[root@localhost cslc]
# git add README.md
[root@localhost cslc]
# git commit -m "add README"
[master fbe1bfb] add README
1
file
changed, 1 insertion(+)
create mode 100644 README.md
[root@localhost cslc]
# git push -u origin master
Counting objects: 4,
done
.
Delta compression using up to 4 threads.
Compressing objects: 100% (2
/2
),
done
.
Writing objects: 100% (3
/3
), 320 bytes | 0 bytes
/s
,
done
.
Total 3 (delta 0), reused 0 (delta 0)
To git@localhost:root
/cslc
.git
8c26f36..fbe1bfb master -> master
Branch master
set
up to track remote branch master from origin.
|

到此,gitlab的本地安装基本也就完成了
本文转自 冰冻vs西瓜 51CTO博客,原文链接:http://blog.51cto.com/molewan/1877804,如需转载请自行联系原作者