《基于注释的Spring Security实战指南》
版权声明:本文属于原创,版权归作者chszs所有,使用源码无任何限制,但转载文章需经作者同意。
一、准备工作
预准备的工具及软件有:
1. Eclipse IDE:我使用Eclipse JEE 3.7版,即eclipse-jee-indigo-SR2-win32-x86_64.zip
2. JDK 7:我使用JDK 7u4版,即jdk-7u4-windows-x64.exe
3. Spring Framework:我使用Spring Framework 3.1.2版,即spring-framework-3.1.2.RELEASE-with-docs.zip
4. Spring Security:我使用Spring Security 3.1.2版,即spring-security-3.1.2.RELEASE-dist
5. 其它JAR包:jstl-1.2.jar,commons-logging-1.1.1.jar,cglib-nodep-2.2.jar
6. Tomcat应用服务器:我使用Tomcat 7.0.29版,即apache-tomcat-7.0.29-windows-x64.zip
说明:
1. Eclipse IDE和JDK 7的版本可以更高一些,不影响开发和调试。
2. Eclipse一定要下载JEE版。
3. Eclipse、JDK和Tomcat的安装过程省略。
4. 我的操作系统是64位版本,故开发环境对应的工具都是下载64位的安装包。
二、新建项目
在Eclipse环境下新建Dynamic Web Project。
项目名为:SpringSecurityDemo,
Target runtime选择New Runtime,然后选择Apache Tomcat v7.0,并设置好Tomcat的安装目录。

连续点击两次Next,在“Generate web.xml deployment descriptor”处打勾选择,并点击Finish。

三、添加库文件
把下列JAR文件添加到项目的WebContent\WEB-INF\lib目录下。

四、业务层开发
1. 在项目src处,新建com.ch.configuration包,并新建WebConfig.java类,内容如下:
- package com.ch.configuration;
- import org.springframework.context.annotation.Bean;
- import org.springframework.context.annotation.ComponentScan;
- import org.springframework.context.annotation.Configuration;
- import org.springframework.context.annotation.ImportResource;
- import org.springframework.web.servlet.ViewResolver;
- import org.springframework.web.servlet.config.annotation.EnableWebMvc;
- import org.springframework.web.servlet.config.annotation.WebMvcConfigurerAdapter;
- import org.springframework.web.servlet.view.InternalResourceViewResolver;
- @EnableWebMvc
- @Configuration
- @ComponentScan(basePackages = "com.jverstry")
- @ImportResource("/WEB-INF/MyServlet-security.xml")
- public class WebConfig extends WebMvcConfigurerAdapter {
- @Bean
- public ViewResolver getViewResolver() {
- InternalResourceViewResolver resolver = new InternalResourceViewResolver();
- resolver.setPrefix("WEB-INF/pages/");
- resolver.setSuffix(".jsp");
- return resolver;
- }
- }
2. 新建com.ch.configuration.controller包,并新建MyController.java类,内容如下:
- package com.ch.configuration.controller;
- import com.ch.configuration.service.MyService;
- import org.springframework.beans.factory.annotation.Autowired;
- import org.springframework.stereotype.Controller;
- import org.springframework.ui.Model;
- import org.springframework.web.bind.annotation.RequestMapping;
- @Controller
- public class MyController {
- private MyService myService;
- @Autowired
- public void setMyService(MyService myService) {
- this.myService = myService;
- }
- @RequestMapping(value = "/")
- public String home() {
- return "index";
- }
- @RequestMapping(value = "/getTime")
- public String helloWorld(Model model) {
- model.addAttribute("TimeIs", myService.getCurrentTimeInMilliseconds());
- return "getTime";
- }
- }
3. 新建com.ch.configuration.service包,并新建MyService.java接口类,内容如下:
- package com.ch.configuration.service;
- public interface MyService {
- long getCurrentTimeInMilliseconds();
- }
4. 在com.ch.configuration.service包新建MyServiceImpl.java类,内容如下:
- package com.ch.configuration.service;
- public class MyServiceImpl implements MyService {
- @Override
- public long getCurrentTimeInMilliseconds() {
- return System.currentTimeMillis();
- }
- }
5. 在com.ch.configuration.service包新建MyServicesConfiguration.java类,内容如下:
- package com.ch.configuration.service;
- import org.springframework.context.annotation.Bean;
- import org.springframework.context.annotation.Configuration;
- @Configuration
- public class MyServicesConfiguration {
- private MyService myService = new MyServiceImpl();
- @Bean
- public MyService getMyService() {
- return myService;
- }
- }
五、前台页面层开发
1. 在WebContent\WEB-INF目录新建pages文件夹,接着在pages目录下新建getTime.jsp文件,内容如下:
- %@ page language="java" contentType="text/html; charset=UTF-8"
- pageEncoding="UTF-8"%>
- %@ taglib prefix="c" uri="http://java.sun.com/jsp/jstl/core" %>
- nbsp;html PUBLIC "-//W3C//DTD HTML 4.01 Transitional//EN" "http://www.w3.org/TR/html4/loose.dtd">
- html>
- head>
- meta http-equiv="Content-Type" content="text/html; charset=UTF-8">
- title>Get Time !!!title>
- head>
- body>
- The time in milliseconds is:
- c:out value="${TimeIs}" />
- !
- body>
- html>
2. 在pages目录下新建index.jsp文件,内容如下:
- %@ page language="java" contentType="text/html; charset=UTF-8"
- pageEncoding="UTF-8"%>
- nbsp;html PUBLIC "-//W3C//DTD HTML 4.01 Transitional//EN" "http://www.w3.org/TR/html4/loose.dtd">
- html>
- head>
- meta http-equiv="Content-Type" content="text/html; charset=UTF-8">
- title>Welcome !!!title>
- head>
- body>
- h1>Welcome To Spring MVC With Annotations !!!h1>
- h1>(with login...)h1>
- body>
- html>
3. 修改WEB-INF下的web.xml文件,内容如下:
- xml version="1.0" encoding="UTF-8"?>
- web-app xmlns:xsi="http://www.w3.org/2001/XMLSchema-instance"
- xmlns="http://java.sun.com/xml/ns/javaee" xmlns:web="http://java.sun.com/xml/ns/javaee/web-app_2_5.xsd"
- xsi:schemaLocation="http://java.sun.com/xml/ns/javaee http://java.sun.com/xml/ns/javaee/web-app_3_0.xsd"
- id="WebApp_ID" version="3.0">
- display-name>SpringSecurityDemodisplay-name>
- context-param>
- param-name>contextClassparam-name>
- param-value>org.springframework.web.context.support.AnnotationConfigWebApplicationContextparam-value>
- context-param>
- context-param>
- param-name>contextConfigLocationparam-name>
- param-value>com.ch.configurationparam-value>
- context-param>
- filter>
- filter-name>springSecurityFilterChainfilter-name>
- filter-class>org.springframework.web.filter.DelegatingFilterProxyfilter-class>
- filter>
- filter-mapping>
- filter-name>springSecurityFilterChainfilter-name>
- url-pattern>/*url-pattern>
- filter-mapping>
- listener>
- listener-class>org.springframework.web.context.ContextLoaderListenerlistener-class>
- listener>
- servlet>
- servlet-name>MyServletservlet-name>
- servlet-class>org.springframework.web.servlet.DispatcherServletservlet-class>
- init-param>
- param-name>contextConfigLocationparam-name>
- param-value>param-value>
- init-param>
- load-on-startup>1load-on-startup>
- servlet>
- servlet-mapping>
- servlet-name>MyServletservlet-name>
- url-pattern>/url-pattern>
- servlet-mapping>
- welcome-file-list>
- welcome-file>welcome-file>
- welcome-file-list>
- web-app>
4. 在WEB-INF下新建MyServlet-security.xml文件,内容如下:
- beans:beans xmlns="http://www.springframework.org/schema/security"
- xmlns:beans="http://www.springframework.org/schema/beans" xmlns:xsi="http://www.w3.org/2001/XMLSchema-instance"
- xsi:schemaLocation="http://www.springframework.org/schema/beans
- http://www.springframework.org/schema/beans/spring-beans-3.0.xsd
- http://www.springframework.org/schema/security
- http://www.springframework.org/schema/security/spring-security-3.1.xsd">
- http auto-config="true">
- intercept-url pattern="/*" access="ROLE_USER" />
- http>
- authentication-manager alias="authenticationManager">
- authentication-provider>
- user-service>
- user authorities="ROLE_USER" name="guest" password="guest" />
- user-service>
- authentication-provider>
- authentication-manager>
- beans:beans>
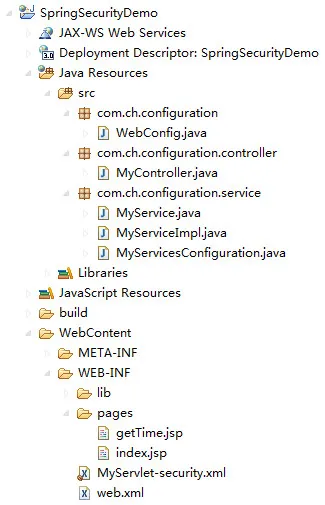
至此,Demo项目的开发已经完成。项目的整体结构图如图所示:
六、部署和运行
1. 在Eclipse选择项目SpringSecurityDemo,右键选择“Run As”,再选择“Run on Server”,选择Apache Tomcat v7.0,Eclipse IDE自动完成部署并运行。
在浏览器上输入地址:http://localhost:8080/SpringSecurityDemo/
显示如下:

注:地址自动被重定向到http://localhost:8080/SpringSecurityDemo/spring_security_login
User/Password输入guest/guest,显示:

如果输入错误,显示:

OK!本文就到这里,对于Spring的注释,可以参考官方文档加以理解。