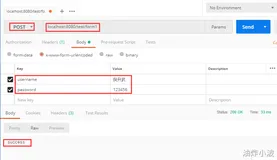
文件上传是Web开发中的一个重要的功能点。同样,SpringMVC也可以通过简单的配置就可以实现文件的上传以及对上传的文件的处理。具体步骤如下:
一 新建测试项目以及导入jar包
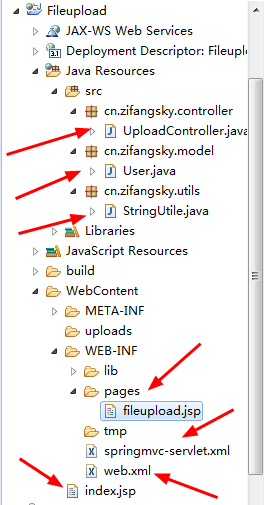
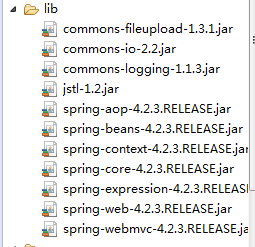
详细过程不用多说,项目结构和需要的jar包如下:
二 项目的常规配置以及实现上传需要的配置
(1)web.xml:
在这里只用了简单的常规配置,不用多说:
|
1
2
3
4
5
6
7
8
9
10
11
12
13
14
15
16
17
18
19
20
21
22
23
24
25
26
27
28
29
30
31
|
<
web-app
xmlns
=
"http://xmlns.jcp.org/xml/ns/javaee"
xmlns:xsi
=
"http://www.w3.org/2001/XMLSchema-instance"
xsi:schemaLocation="http://xmlns.jcp.org/xml/ns/javaee
http://xmlns.jcp.org/xml/ns/javaee/web-app_3_1.xsd"
version
=
"3.1"
>
<
servlet
>
<
servlet-name
>springmvc</
servlet-name
>
<
servlet-class
>org.springframework.web.servlet.DispatcherServlet</
servlet-class
>
<
load-on-startup
>1</
load-on-startup
>
</
servlet
>
<
servlet-mapping
>
<
servlet-name
>springmvc</
servlet-name
>
<
url-pattern
>*.html</
url-pattern
>
</
servlet-mapping
>
<
filter
>
<
filter-name
>characterEncodingFilter</
filter-name
>
<
filter-class
>org.springframework.web.filter.CharacterEncodingFilter</
filter-class
>
<
init-param
>
<
param-name
>encoding</
param-name
>
<
param-value
>UTF-8</
param-value
>
</
init-param
>
</
filter
>
<
filter-mapping
>
<
filter-name
>characterEncodingFilter</
filter-name
>
<
url-pattern
>/*</
url-pattern
>
</
filter-mapping
>
</
web-app
>
|
(2)springmvc-servlet.xml:
|
1
2
3
4
5
6
7
8
9
10
11
12
13
14
15
16
17
18
19
20
21
22
23
24
25
26
27
28
|
<?
xml
version
=
"1.0"
encoding
=
"UTF-8"
?>
<
beans
xmlns
=
"http://www.springframework.org/schema/beans"
xmlns:xsi
=
"http://www.w3.org/2001/XMLSchema-instance"
xmlns:context
=
"http://www.springframework.org/schema/context"
xmlns:mvc
=
"http://www.springframework.org/schema/mvc"
xsi:schemaLocation="http://www.springframework.org/schema/beans
http://www.springframework.org/schema/beans/spring-beans-4.0.xsd
http://www.springframework.org/schema/context
http://www.springframework.org/schema/context/spring-context-4.0.xsd
http://www.springframework.org/schema/mvc
http://www.springframework.org/schema/mvc/spring-mvc-4.0.xsd">
<
context:component-scan
base-package
=
"cn.zifangsky.* *.controller"
/>
<
context:annotation-config
/>
<!-- 激活Bean中定义的注解 -->
<
mvc:annotation-driven
/>
<!-- 视图相关配置 -->
<
bean
class
=
"org.springframework.web.servlet.view.InternalResourceViewResolver"
>
<
property
name
=
"prefix"
value
=
"/WEB-INF/pages/"
/>
<!-- 视图前缀 -->
<
property
name
=
"suffix"
value
=
".jsp"
/>
<!-- 视图后缀 -->
</
bean
>
<
bean
id
=
"multipartResolver"
class
=
"org.springframework.web.multipart.commons.CommonsMultipartResolver"
>
<
property
name
=
"uploadTempDir"
value
=
"/tmp"
/>
<!-- 临时目录 -->
<
property
name
=
"maxUploadSize"
value
=
"10485760"
/>
<!-- 10M -->
</
bean
>
</
beans
>
|
在上面的代码中的最后一段,配置了一个名为”multipartResolver“的bean,这里就是配置了Commons FileUpload来处理文件上传
三 文件上传处理流程
(1)首页index.jsp:
|
1
|
<% response.sendRedirect("form.html"); %>
|
(2)模型类User.java:
|
1
2
3
4
5
6
7
8
9
10
11
12
13
14
15
16
17
18
19
20
21
22
23
|
package
cn.zifangsky.model;
public
class
User {
private
String userName;
// 用户名
private
String logoSrc;
// 头像地址
public
String getUserName() {
return
userName;
}
public
void
setUserName(String userName) {
this
.userName = userName;
}
public
String getLogoSrc() {
return
logoSrc;
}
public
void
setLogoSrc(String logoSrc) {
this
.logoSrc = logoSrc;
}
}
|
(3)文件上传表单和结果展示页fileupload.jsp:
|
1
2
3
4
5
6
7
8
9
10
11
12
13
14
15
16
17
18
19
20
21
22
23
24
25
26
27
28
29
30
31
32
33
34
35
36
37
38
39
40
41
42
43
44
45
46
47
48
49
|
<%@ page language="java" contentType="text/html; charset=UTF-8"
pageEncoding="UTF-8"%>
<%@taglib prefix="mvc" uri="http://www.springframework.org/tags/form"%>
<%@taglib prefix="c" uri="http://java.sun.com/jsp/jstl/core"%>
<
html
>
<
head
>
<
title
>Spring MVC文件上传</
title
>
</
head
>
<
body
>
<
h2
>图片文件上传</
h2
>
<
mvc:form
modelAttribute
=
"user"
action
=
"upload.html"
enctype
=
"multipart/form-data"
>
<
table
>
<
tr
>
<
td
>用户名:</
td
>
<
td
><
mvc:input
path
=
"userName"
/></
td
>
</
tr
>
<
tr
>
<
td
>选择头像:</
td
>
<
td
><
input
type
=
"file"
name
=
"file"
/></
td
>
</
tr
>
<
tr
>
<
td
colspan
=
"2"
><
input
type
=
"submit"
value
=
"Submit"
/></
td
>
</
tr
>
</
table
>
</
mvc:form
>
<
br
><
br
>
<
c:if
test
=
"${u !=null }"
>
<
h2
>上传结果</
h2
>
<
table
>
<
c:if
test
=
"${u.userName != null }"
>
<
tr
>
<
td
>用户名:</
td
>
<
td
>${u.userName}</
td
>
</
tr
>
</
c:if
>
<
c:if
test
=
"${u.logoSrc != null }"
>
<
tr
>
<
td
>头像:</
td
>
<
td
><
img
src
=
"${u.logoSrc}"
width
=
"100px"
height
=
"100px"
></
td
>
</
tr
>
</
c:if
>
</
table
>
</
c:if
>
</
body
>
</
html
>
|
可以看出,在上面的form表单中定义的是文件上传表单,同时为了能够上传文件,添加了一个enctype=”multipart/form-data”属性。后面就是结果展示页了,使用JSTL标签来判断是否有结果,有的话就显示出来
(4)后台处理UploadController.java:
|
1
2
3
4
5
6
7
8
9
10
11
12
13
14
15
16
17
18
19
20
21
22
23
24
25
26
27
28
29
30
31
32
33
34
35
36
37
38
39
40
41
42
43
44
45
46
47
48
49
50
51
52
53
54
55
56
57
58
59
60
61
62
63
64
65
66
67
68
69
|
package
cn.zifangsky.controller;
import
java.io.File;
import
java.io.IOException;
import
javax.servlet.http.HttpServletRequest;
import
org.apache.commons.io.FileUtils;
import
org.springframework.stereotype.Controller;
import
org.springframework.web.bind.annotation.RequestMapping;
import
org.springframework.web.bind.annotation.RequestMethod;
import
org.springframework.web.bind.annotation.RequestParam;
import
org.springframework.web.multipart.MultipartFile;
import
org.springframework.web.servlet.ModelAndView;
import
cn.zifangsky.model.User;
import
cn.zifangsky.utils.StringUtile;
@Controller
public
class
UploadController {
@RequestMapping
(value =
"/form"
)
public
ModelAndView form() {
ModelAndView modelAndView =
new
ModelAndView(
"fileupload"
,
"user"
,
new
User());
return
modelAndView;
}
@RequestMapping
(value =
"/upload"
, method = RequestMethod.POST)
public
ModelAndView upload(User user,
@RequestParam
(
"file"
) MultipartFile tmpFile, HttpServletRequest request) {
ModelAndView modelAndView =
new
ModelAndView(
"fileupload"
);
if
(tmpFile !=
null
) {
// 获取物理路径
String targetDirectory = request.getSession().getServletContext().getRealPath(
"/uploads"
);
String tmpFileName = tmpFile.getOriginalFilename();
// 上传的文件名
int
dot = tmpFileName.lastIndexOf(
'.'
);
String ext =
""
;
//文件后缀名
if
((dot > -
1
) && (dot < (tmpFileName.length() -
1
))) {
ext = tmpFileName.substring(dot +
1
);
}
// 其他文件格式不处理
if
(
"png"
.equalsIgnoreCase(ext) ||
"jpg"
.equalsIgnoreCase(ext) ||
"gif"
.equalsIgnoreCase(ext)) {
// 重命名上传的文件名
String targetFileName = StringUtile.renameFileName(tmpFileName);
// 保存的新文件
File target =
new
File(targetDirectory, targetFileName);
try
{
// 保存文件
FileUtils.copyInputStreamToFile(tmpFile.getInputStream(), target);
}
catch
(IOException e) {
e.printStackTrace();
}
User u =
new
User();
u.setUserName(user.getUserName());
u.setLogoSrc(request.getContextPath() +
"/uploads/"
+ targetFileName);
modelAndView.addObject(
"u"
, u);
}
return
modelAndView;
}
return
modelAndView;
}
}
|
在上面的upload方法中,为了接收上传的文件,因此使用了一个MultipartFile类型的变量来接收上传的临时文件,同时为了给文件进行重命名,我调用了一个renameFileName方法,这个方法的具体内容如下:
|
1
2
3
4
5
6
7
8
9
10
|
/**
* 文件重命名
*/
public
static
String renameFileName(String fileName) {
String formatDate =
new
SimpleDateFormat(
"yyMMddHHmmss"
).format(
new
Date());
// 当前时间字符串
int
random =
new
Random().nextInt(
10000
);
String extension = fileName.substring(fileName.lastIndexOf(
"."
));
// 文件后缀
return
formatDate + random + extension;
}
|
至此,全部处理逻辑已经完成。
四 效果测试
(1)文件上传表单:

(2)上传结果:
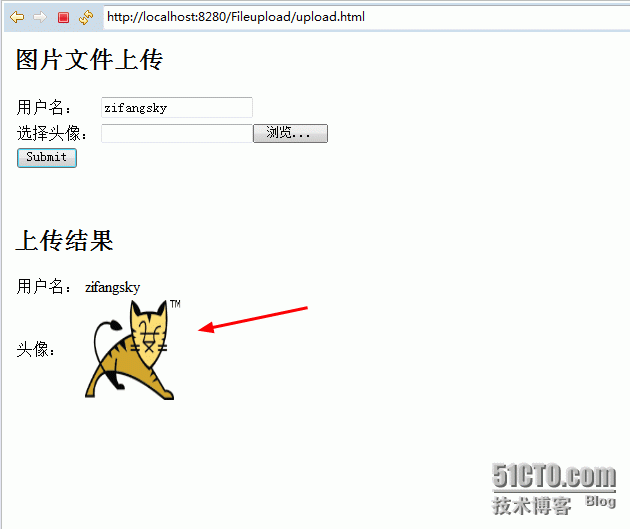
本文转自 pangfc 51CTO博客,原文链接:http://blog.51cto.com/983836259/1772440,如需转载请自行联系原作者