项目环境:
JDK1.5
ActiveMQ5.2
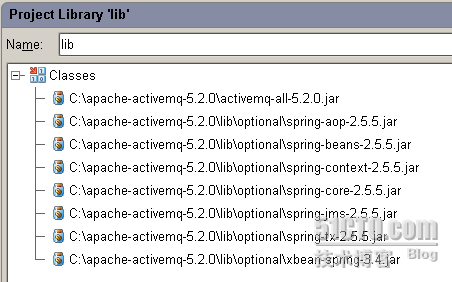
所用的包都是ActiveMQ自带的。引用的包如下图:
package stujms.p2ptxt;
import org.springframework.context.ApplicationContext;
import org.springframework.context.support.ClassPathXmlApplicationContext;
import org.springframework.jms.core.JmsTemplate;
import org.springframework.jms.core.MessageCreator;
import javax.jms.Destination;
import javax.jms.JMSException;
import javax.jms.Message;
import javax.jms.Session;
/**
* 消息发送者
*
* @author leizhimin 2009-8-13 17:01:48
*/
public class MySender {
public static void main(String[] args) {
ApplicationContext ctx = new ClassPathXmlApplicationContext( "/applicationContext.xml");
JmsTemplate template = (JmsTemplate) ctx.getBean( "jmsTemplate");
Destination destination = (Destination) ctx.getBean( "destination");
template.send(destination, new MessageCreator() {
public Message createMessage(Session session) throws JMSException {
return session.createTextMessage( "发送消息:Hello ActiveMQ Text Message!");
}
});
System.out.println( "成功发送了一条JMS消息");
}
}
package stujms.p2ptxt;
import org.springframework.context.ApplicationContext;
import org.springframework.context.support.ClassPathXmlApplicationContext;
import org.springframework.jms.core.JmsTemplate;
import javax.jms.Destination;
import javax.jms.JMSException;
import javax.jms.TextMessage;
/**
* 消息接收者
*
* @author leizhimin 2009-8-13 17:02:04
*/
public class MyReceiver {
public static void main(String[] args) throws JMSException {
ApplicationContext ctx = new ClassPathXmlApplicationContext( "/applicationContext.xml");
JmsTemplate template = (JmsTemplate) ctx.getBean( "jmsTemplate");
Destination destination = (Destination) ctx.getBean( "destination");
while ( true) {
TextMessage txtmsg = (TextMessage) template.receive(destination);
if ( null != txtmsg)
System.out.println( "收到消息内容为: " + txtmsg.getText());
else
break;
}
}
}
<?
xml
version
="1.0"
encoding
="UTF-8"
?>
< beans xmlns ="http://www.springframework.org/schema/beans" xmlns:xsi ="http://www.w3.org/2001/XMLSchema-instance"
xmlns:context ="http://www.springframework.org/schema/context"
xsi:schemaLocation="http://www.springframework.org/schema/beans
http://www.springframework.org/schema/beans/spring-beans-2.5.xsd
http://www.springframework.org/schema/context
http://www.springframework.org/schema/context/spring-context-2.5.xsd" >
<!-- 配置JMS连接工厂 -->
< bean id ="connectionFactory" class ="org.apache.activemq.spring.ActiveMQConnectionFactory" >
< property name ="brokerURL" value ="tcp://localhost:61616" />
</ bean >
<!-- 配置JMS模版 -->
< bean id ="jmsTemplate" class ="org.springframework.jms.core.JmsTemplate" >
< property name ="connectionFactory" ref ="connectionFactory" />
</ bean >
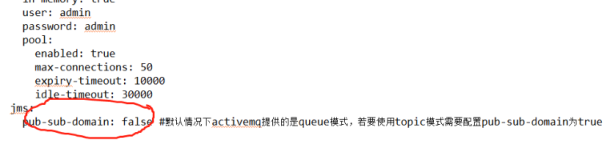
<!-- 发送消息的目的地(一个队列) -->
< bean id ="destination" class ="org.apache.activemq.command.ActiveMQQueue" >
<!-- 设置消息队列的名字 -->
< constructor-arg index ="0" value ="HelloWorldQueue" />
</ bean >
</ beans >
< beans xmlns ="http://www.springframework.org/schema/beans" xmlns:xsi ="http://www.w3.org/2001/XMLSchema-instance"
xmlns:context ="http://www.springframework.org/schema/context"
xsi:schemaLocation="http://www.springframework.org/schema/beans
http://www.springframework.org/schema/beans/spring-beans-2.5.xsd
http://www.springframework.org/schema/context
http://www.springframework.org/schema/context/spring-context-2.5.xsd" >
<!-- 配置JMS连接工厂 -->
< bean id ="connectionFactory" class ="org.apache.activemq.spring.ActiveMQConnectionFactory" >
< property name ="brokerURL" value ="tcp://localhost:61616" />
</ bean >
<!-- 配置JMS模版 -->
< bean id ="jmsTemplate" class ="org.springframework.jms.core.JmsTemplate" >
< property name ="connectionFactory" ref ="connectionFactory" />
</ bean >
<!-- 发送消息的目的地(一个队列) -->
< bean id ="destination" class ="org.apache.activemq.command.ActiveMQQueue" >
<!-- 设置消息队列的名字 -->
< constructor-arg index ="0" value ="HelloWorldQueue" />
</ bean >
</ beans >
运行发送端三次:
成功发送了一条JMS消息
Process finished with exit code 0
Process finished with exit code 0
然后再运行接收端一次:
收到消息内容为: 发送消息:Hello ActiveMQ Text Message!
收到消息内容为: 发送消息:Hello ActiveMQ Text Message!
收到消息内容为: 发送消息:Hello ActiveMQ Text Message!
收到消息内容为: 发送消息:Hello ActiveMQ Text Message!
收到消息内容为: 发送消息:Hello ActiveMQ Text Message!
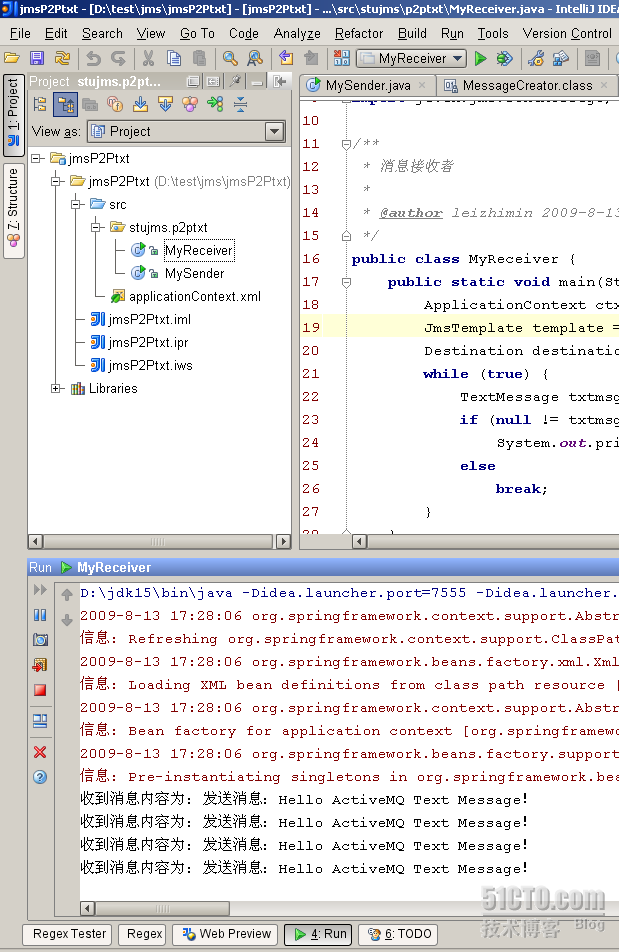
继续测试发现,接收端接收一条消息后不退出程序,而是继续等待,一旦有消息发送过来,就获取到,然后输出!
发一张图看看:
-----------------------------------------------------------------------------------------------------------------
1、ActiveMQ检查哪些客户端连接IP地址?
步骤:jconsole -> “ip:1099” -> Mbean -> org.apache.activemq -> localhost -> Connection -> openwire -> "具体的messageId" -> 属性 -> ‘RemoteAddress’即可看到IP地址
"具体的messageId“来源:
jconsole -> “ip:1099” -> Mbean -> org.apache.activemq -> localhost -> "Subscription" -> "Non-Durable" -> "Queue" -> "具体的Queue名" -> 查看其下面的queue的messageId即可
2、干掉queue
通过activemq后台,
http://ip:8161/admin/queues.jsp, purege或delete直接干掉
3、干掉堆积的一大堆消息
方法1:在activemq直接用delete,则会删除索引, 内容会保存在磁盘上; 同时在activemq的配置文件中,设置存活的时间, 查过时间则会自动删除磁盘上的内容。
方法2: 停掉activemq,在apache-activemq-5.2.0/data下面的内容再启动即可, 则全部的堆积消息将彻底完蛋
4、napoli从1.4.0升级到1.4.2
(1)依赖修改
- <dependency> <groupId>com.alibaba.shared</groupId>
- <artifactId>alibaba.platform.napoli</artifactId>
- <version>1.4.0</version> </dependency>
修改为
- <dependency>
- <groupId>com.alibaba.platform.shared</groupId>
- <artifactId>napoli</artifactId>
- <version>1.4.2</version>
- <type>libd</type>
- </dependency>
并且增加:
- <dependency>
- <groupId>com.alibaba.external</groupId>
- <artifactId>java.j2ee</artifactId>
- <version>1.4</version>
- </dependency>
(2)接收端代码修改
receiver.setWorker(worker);修改为 receiver.setExWorker(worker);
5、Napoli1.4.2 truck环境调试(2010-11-16)
(1)日志太大,磁盘满了, 本次干掉了部分过期的日志。将来修改为循环写的方式。
(2)activemq中存在2000多个线程,使用jstat pid > a.txt可以查看其中大量线程处于waiting状态
本文转自 tianya23 51CTO博客,原文链接:http://blog.51cto.com/tianya23/384110,如需转载请自行联系原作者