onvif-go 是 MiBee 相机接入链路里管「连相机」的库:你的程序要用 ONVIF 去发现、认证、取流、控制一台摄像机,或者反过来把一个进程装成摄像机让 NVR 来连,都用它。它同时提供客户端和虚拟相机 server 两套角色,MiBeeNvr 的 ONVIF 接入就跑在这上面,兼容性矩阵(海康、Axis、大华、Bosch、Amcrest、HiSilicon OEM、ESP32 最小实现)是真机抓包喂出来的。
这篇按「能直接抄去用」的标准写:每个功能一节,节里是完整可运行的程序加逐段讲解,读完就能在自己的项目里落地把对应部分。代码来自仓库 README 和 examples,接口签名与仓库当前发布版核对过。
安装与工程准备
库本体零第三方依赖,Module 路径带 /v2 后缀,要求 Go 1.26 以上:
mkdir my-nvr && cd my-nvr
go mod init example.com/my-nvr
go get github.com/mickeyzzc/onvif-go/v2
工程里通常只需要 import "github.com/mickeyzzc/onvif-go/v2/onvif" 一个包——客户端门面、发现、错误哨兵都从它出发;发现和虚拟相机 server 分别在 discovery/ 和 server/ 子包,用到再引。
仓库还带四个命令行工具,发版时提供 linux/macOS/Windows 预编译二进制,写代码前先用它们探一探相机很省事:
go install github.com/mickeyzzc/onvif-go/v2/cmd/onvif-diagnostics@v2.2.0
onvif-diagnostics -host 192.168.1.100 -user admin -pass camera-password
discover:全网段 ONVIF 发现;onvif-quick:一台相机的主要动作一次跑完;onvif-diagnostics:一次扫十一个主要操作出 JSON 报告,README 明说「提 issue 前先跑这个」;onvif-server:起一台虚拟相机。
五分钟跑通第一台相机
前置条件:一台开着 ONVIF 的相机。到相机 Web 管理界面把 ONVIF 服务打开,设一个独立密码(别用管理员密码);海康系相机还要留意系统时间对不对,认证一节会讲为什么。
完整程序:
package main

import (
    "context"
    "fmt"
    "log"

    "github.com/mickeyzzc/onvif-go/v2/onvif"
)

func main() {

    client, err := onvif.NewClient("192.168.1.100",
        onvif.WithCredentials("admin", "camera-password"),
        onvif.WithAutoClockSkew())
    if err != nil {

        log.Fatal(err)
    }
    if err := client.Initialize(context.Background()); err != nil {

        log.Fatal(err)
    }

    info, err := client.Device().GetDeviceInformation(context.Background())
    if err != nil {

        log.Fatal(err)
    }
    fmt.Printf("%s %s (fw %s)\n", info.Manufacturer, info.Model, info.FirmwareVersion)

    profiles, err := client.Media().GetProfiles(context.Background())
    if err != nil {

        log.Fatal(err)
    }
    mainToken := onvif.SelectMainProfile(profiles)
    uri, err := client.Media().GetStreamURI(context.Background(), mainToken)
    if err != nil {

        log.Fatal(err)
    }
    fmt.Println("主码流:", uri.URI)
}
跑起来(输出随相机型号不同):
Hikvision DS-2CD3T46 (fw 5.5.53)
主码流: rtsp://192.168.1.100:554/Streaming/Channels/101
逐段说:
NewClient的第一个参数接受三种写法:完整 URL、IP:端口、裸 IP——后两种自动补成/onvif/device_service。WithCredentials给出凭据,WithAutoClockSkew让客户端先无认证读一次设备时间、算出偏差再参与后续签名,海康系的 401 十有八九是它治的。Initialize做三件事:测时钟偏差、取 capabilities、解析各服务的 XAddr。第三件事很有用——不少相机在 capabilities 里报的是过期 IP,库会把错误地址修掉再存下来。client.Device()、client.Media()是 service facade:每个 ONVIF 服务一个长生命周期入口,还有PTZ()、Imaging()、Events()、Media2()、Analytics()、DeviceIO()、Security()。SelectMainProfile不等于profiles[0]:它按分辨率挑主码流,命名提示(main/主流/sub/辅流)做决胜,全都没分辨率信息时才回退第一个。这行的存在就是因为大量相机把子码流排在 profiles[0]。uri.URI是个 RTSP 地址。拿 VLC 或 ffplay 立刻验证:ffplay -rtsp_transport tcp "rtsp://192.168.1.100:554/Streaming/Channels/101"。
库在链路里的位置
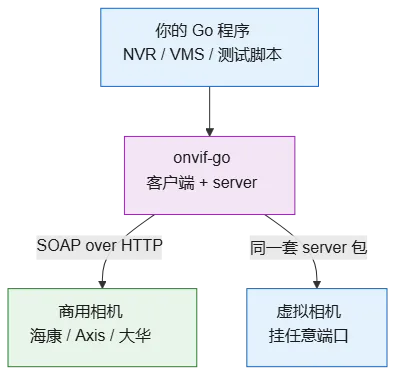
左边是你写的程序,onvif-go 往下分两个角色:作为客户端向右连真相机;作为 server 向下当一台虚拟相机——测试 NVR 的发现、取流、PTZ 逻辑时不用插真机。两个角色共享同一套线格式代码,互为对方的第一批测试用例。
发现相机:主动、被动与定向
主动组播发现,同网段一发一收:
package main

import (
    "context"
    "fmt"
    "log"
    "time"

    "github.com/mickeyzzc/onvif-go/v2/discovery"
)

func main() {

    ctx, cancel := context.WithTimeout(context.Background(), 6*time.Second)
    defer cancel()

    devices, err := discovery.Discover(ctx, 5*time.Second)
    if err != nil {

        log.Fatal(err)
    }
    for _, d := range discovery.FilterONVIFDevices(devices) {

        fmt.Printf("%-14s %-20s %s\n", d.GetName(), d.Hardware, d.GetDeviceEndpoint())
    }
}
FilterONVIFDevices 把 Synology、Windows、打印机这类「什么 Probe 都应答」的幽灵设备滤掉,实际网段里这一步基本必需。发现结果要补齐设备名、位置、序列号时,接一步并行补全:
enriched, err := discovery.EnrichDevices(ctx, filtered) // 默认并发 8
Device 的字段值得认识全:
| 字段 | 含义 |
|---|---|
EndpointRef |
WS-Discovery 的 urn:uuid 形式端点标识,传输层稳定 ID |
Name / Hardware / Location |
从 scopes 解析出的友好名、硬件型号、位置,没广告就为空 |
XAddrs |
设备服务地址列表,连它 |
Types / Scopes / MetadataVersion |
设备类型、原始 scopes、元数据版本 |
一个容易踩的坑写在字段注释里:EndpointRef 不是序列号。跨协议关联同一台相机(ONVIF 这边、GB28181 那边)要用 d.Info.SerialNumber,拿 EndpointRef 对序列号永远对不上。
被动监听是另一种思路——相机上电会发 Hello,别的 NVR 探测时也有应答可听,程序开着就能攒设备清单:
listener, err := discovery.NewListener("eth0", func(d *discovery.Device) {

    fmt.Println("上线:", d.GetName(), d.GetDeviceEndpoint())
})
if err != nil {

    log.Fatal(err)
}
if err := listener.Start(ctx); err != nil {

    log.Fatal(err)
}
<-listener.Done() // Stop() 后关闭
定向 HTTP 探测处理组播到不了的场景(路由器隔离、AP 隔离):已知 IP 直接问它的 ONVIF 端口,
if d := discovery.ProbeEndpoint(ctx, "192.168.1.64", 80, 2*time.Second); d != nil {

    fmt.Println("是一台 ONVIF 设备:", d.GetDeviceEndpoint())
}
serial, ok := discovery.ProbeSerial(ctx, "192.168.1.64", nil) // nil 用默认端口集
认证与时钟偏差
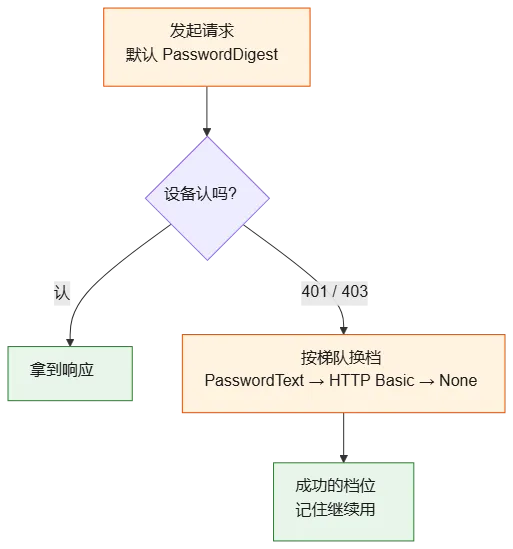
库支持四档认证:
| 档位 | 线上行为 | 适用 |
|---|---|---|
AuthDigest |
WS-Security UsernameToken,PasswordDigest(默认) | 绝大多数相机 |
AuthPasswordText |
UsernameToken,密码明文进报文 | 老固件只认这个 |
AuthHTTPBasic |
HTTP Basic 头 | 个别 HTTP 层认证的设备 |
AuthNone |
不带凭据 | 免认证设备、ESP32 最小实现 |
真实世界的相机什么怪癖都有,所以有认证梯队——主模式失败且错误属于认证类(HTTP 401/403、NotAuthorized fault、带 fault 的 200)时按序换档,第一个成功的档位会粘住记住:
client, err := onvif.NewClient(endpoint,
    onvif.WithCredentials("admin", "camera-password"),
    onvif.WithAuthFallback(onvif.AuthPasswordText, onvif.AuthHTTPBasic, onvif.AuthNone))
梯队耗尽返回 onvif.ErrUnauthorized,errors.Is 可靠判定。
时钟偏差为什么能打死 digest:PasswordDigest 的签名串里有 Created 时间戳,设备拿它算有效期,偏差超过窗口(各家几十秒到几分钟)直接判无效——表现为怎么改密码都 401。WithAutoClockSkew 在 Initialize 时先无认证调一次 GetSystemDateAndTime,算出偏差参与后续签名。
排错不要猜,用诊断接口:
diag, err := client.DiagnoseAuth(context.Background())
fmt.Println(diag.Status, diag.ClockSkew, diag.Detail)
Status 三态对应的处理:AuthStatusOK 什么都不用做;AuthStatusClockSkew 修相机 NTP(短期让 WithAutoClockSkew 顶着);AuthStatusBadCredentials 才是真改密码。凭据也可以运行时换:client.SetCredentials(user, pass),怀疑梯队粘住了旧档位就 client.ResetAuthLadder(),怀疑 capabilities 缓存过期(相机换过 IP)就 client.InvalidateCapabilitiesCache() 后重跑 Initialize。
取流与抓图
取流的正确姿势永远是先选 profile 再拿地址:
profiles, err := client.Media().GetProfiles(ctx)
if err != nil {

    log.Fatal(err)
}
for _, p := range profiles {

    fmt.Printf("profile %-10s %dx%d\n", p.Token, p.VideoEncoderConfiguration.Resolution.Width, p.VideoEncoderConfiguration.Resolution.Height)
}

mainToken := onvif.SelectMainProfile(profiles)
subToken := onvif.SelectSubProfile(profiles, mainToken)

uri, err := client.Media().GetStreamURI(ctx, mainToken)
snap, _ := client.Media().GetSnapshotURI(ctx, mainToken)
fmt.Println(uri.URI, "|", snap.URI)
两个选择函数各管一件事:SelectMainProfile 挑分辨率最高的;SelectSubProfile 在主流之下挑严格更小的最大者——同分辨率的第二个 profile 不算子流,Amcrest 有机型双 token 指向同一路流,这个函数就是为它写的。
GetStreamURI 默认要 RTP-Unicast/RTSP;要走 HTTP 隧道或组播用 GetStreamURIWithOptions 传 StreamSetup。拿到地址后 SetSynchronizationPoint 让相机立刻出 I 帧,多路轮显时很省等待;组播场景还有 StartMulticastStreaming/StopMulticastStreaming。
拿到的 uri.URI 直接喂给任何 RTSP 播放器验证:
ffplay -rtsp_transport tcp "rtsp://192.168.1.100:554/Streaming/Channels/101"
媒体面的收发(比如接 pion 做录制或转发)在自己的程序里做——这个库负责把地址、profile、编码参数这些「问相机」的事全部办妥。
PTZ 与预置位
ptz := client.PTZ()

// 向右匀速转 3 秒再停
err := ptz.ContinuousMove(ctx, mainToken, &onvif.PTZSpeed{

    PanTilt: &onvif.Vector2D{
   X: 0.5, Y: 0},
    Zoom:    &onvif.Vector1D{
   X: 0},
}, nil)
if err != nil {

    log.Fatal(err)
}
time.Sleep(3 * time.Second)
_ = ptz.Stop(ctx, mainToken, true, true) // 同时停云台和变焦

// 预置位:设、走、删
presetToken, err := ptz.SetPreset(ctx, mainToken, "大门口", "")
if err != nil {

    log.Fatal(err)
}
_ = ptz.GotoPreset(ctx, mainToken, presetToken)
presets, _ := ptz.GetPresets(ctx, mainToken)
for _, p := range presets {

    fmt.Println(p.Token, p.Name)
}

// 限位与状态
cfgs, _ := ptz.GetConfigurations(ctx, mainToken) // pan/tilt/zoom 空间限位
status, _ := ptz.GetStatus(ctx, mainToken)
PTZSpeed 的 X/Y 取值 -1 到 1,是归一化速度,相机自己换算成实际角速度;绝对定位走 AbsoluteMove(传 PTZVector 目标位置),相对微调走 RelativeMove。回家位(GotoHomePosition/SetHomePosition)覆盖「看完门口回原位」这类需求。聚焦在 client.Imaging():Move/StopFocus 配合自动对焦模式,GetImagingSettings/SetImagingSettings 读写亮度、对比度、曝光。
事件订阅
托管订阅把长轮询、续订、断线这些全包了:
package main

import (
    "context"
    "errors"
    "fmt"
    "log"
    "os"
    "os/signal"
    "syscall"
    "time"

    "github.com/mickeyzzc/onvif-go/v2/onvif"
)

func main() {

    client, err := onvif.NewClient("192.168.1.100",
        onvif.WithCredentials("admin", "camera-password"),
        onvif.WithAutoClockSkew())
    if err != nil {

        log.Fatal(err)
    }
    if err := client.Initialize(context.Background()); err != nil {

        log.Fatal(err)
    }

    ctx, stop := signal.NotifyContext(context.Background(), os.Interrupt, syscall.SIGTERM)
    defer stop()

    stream, err := client.Events().SubscribeEvents(ctx, func(msg onvif.NotificationMessage) {

        fmt.Printf("[%s] %s %s\n",
            msg.Message.UtcTime.Format("15:04:05"),
            msg.Topic, msg.Message.PropertyOperation)
        for _, item := range msg.Message.Data {

            fmt.Printf("    %s = %s\n", item.Name, item.Value)
        }
    }, &onvif.SubscribeEventsOptions{
   SubscriptionDuration: time.Hour})
    if errors.Is(err, onvif.ErrEventsNotSupported) {

        log.Fatal("这台相机没有事件服务")
    } else if err != nil {

        log.Fatal(err)
    }

    <-ctx.Done()
    _ = stream.Unsubscribe(context.Background())
}
跑起来后,触发一次移动侦测会看到:
[14:32:07] tns1:VideoSource/MotionAlarm Changed
    State = true
    Score = 87
SubscribeEventsOptions 的可调项:
| 字段 | 默认 | 含义 |
|---|---|---|
SubscriptionDuration |
1h | 订阅总时长,到期前自动续 |
RenewMargin |
5m | 提前多久续订 |
PullTimeout |
30s | 单次长轮询等待 |
MessageLimit |
10 | 单次拉取条数上限 |
Filter |
空 | 订阅主题过滤 |
收到的事件结构是 NotificationMessage{Topic, Message(EventMessage), ProducerAddress, SubscriptionID},EventMessage 里 PropertyOperation(Created/Changed/Deleted)、UtcTime 和三组 SimpleItem(Source/Key/Data,每项 Name+Value)。一条线格式细节值得知道:合规相机把 tt:Message 包在 wsnt:Message 里,穿透这层包装才能拿到 MotionAlarm 的 State 和 Score——托管订阅已处理;绕过它直接调 CreatePullPointSubscription/PullMessages/RenewSubscription/Unsubscribe 原语时得自己拆这两层,原语留给需要精细控制轮询节奏的场景。
把一个进程装成相机
server 角色的完整程序——一台有凭据、会报移动事件的虚拟相机:
package main

import (
    "context"
    "log"
    "time"

    "github.com/mickeyzzc/onvif-go/v2/server"
)

func main() {

    config := server.DefaultConfig()
    config.Port = 8081
    config.Username = "admin"
    config.Password = "nvr-test"
    config.SupportEvents = true

    srv, err := server.New(config)
    if err != nil {

        log.Fatal(err)
    }
    ctx := context.Background()
    if err := srv.Start(ctx); err != nil {

        log.Fatal(err)
    }
    log.Printf("虚拟相机: %s", srv.ListenAddr())

    // 每 30 秒推一条移动事件给在订的 NVR
    for range time.Tick(30 * time.Second) {

        srv.PublishEvent(server.Event{

            Topic: "tns1:VideoSource/MotionAlarm",
            Data: []server.SimpleItem{

                {
   Name: "State", Value: "true"},
                {
   Name: "Score", Value: "87"},
            },
        })
    }
}
NVR 那边手动添加 http://<你的IP>:8081 这台「相机」,就能发现它、读设备信息、拿到流地址、收到事件。PublishEvent 扇出到所有在订的 PullPoint 订阅,没有订阅者时是安全的空操作;PropertyOperation 留空默认 Changed,UtcTime 发布时自动盖。
开发 NVR 时它就是测试桩——不用插真机就能测发现、取流、PTZ、事件的全部逻辑。几个进阶开关:
config.Profiles = []server.ProfileConfig{
    /* 多镜头:Token/Name/VideoSource/VideoEncoder... */ }
config.AdvertiseHostProvider = func() string {
    return detectOutboundIP() } // DHCP 换 IP 后 XAddr 跟着走
config.AuthProtectedActions = []string{
   "SystemReboot"}                     // 额外保护的写动作
config.TLSCertFile, config.TLSKeyFile = "cert.pem", "key.pem"              // HTTPS(Profile T 传输基线)
流地址运行时会变(比如转码后换端口)用 srv.UpdateStreamURI(profileToken, "rtsp://127.0.0.1:8554/live");要按请求上下文自定义某个动作的应答,srv.RegisterContextHandler(action, func(rc *soap.RequestContext, body []byte)) 挂进去。server 的认证策略是「配了凭据只保护写型动作」(Set*/Remove*/Create*/Go* 加 SystemReboot),读操作开放。
最省事的验证方式是自测闭环:拿这个库的客户端连自己的 server,发现、认证、取流、事件全链路一遍过——examples/ 里的 conformance 回环测试干的就是这件事。
生产项目里的用法
生态里 ONVIF 客户端的大户是各类 NVR/VMS——海康、Axis 这些厂商的录像机互相都靠它对接,ONVIF Device Manager 则是大家常用的手动探查工具;onvif-go 的兼容矩阵(海康、Axis、大华、Bosch、Amcrest、HiSilicon OEM、ESP32 最小实现)就是对着这些真机抓包喂出来的。抓包的来源,是下面这些在生产里每天跑的项目:
| 功能 | 生产项目 | 用法 |
|---|---|---|
| 发现(主动 / 被动 / 定向) | MiBeeNvr | 相机接入的发现层:扫网段列设备、常驻监听攒清单、跨网段定向探测 |
| 认证 + 时钟偏差 | MiBeeNvr | 连商用相机的第一道关卡,WithAutoClockSkew 是对海康系 401 的默认防线 |
| 取流 / 抓图 / 主辅码流 | MiBeeNvr | ONVIF 信令拿到 RTSP 地址与编码参数,接它自己的录像、直播与回放管线 |
| 虚拟相机 server | mibee-eye-go | 把 Linux 板子的 UVC 相机变成一台 ONVIF Profile S 相机;RTSP gateway 模式把已有 RTSP 流包装成相机挂进商用 NVR |
看完整实现有两个入口。NVR 侧(客户端怎么连真相机)看 MiBeeNvr——自托管录像机,单二进制跑在低功耗 ARM 上,ONVIF 接入就是这个库,兼容矩阵里每个机型背后都有它的联调记录。设备侧(server 怎么当相机)看 mibee-eye-go——纯 Go 零 CGO,USB/UVC 采集直出,onvif-go server 的每个接缝在真实产品里的样子,那里都有现成答案。
排错清单
| 现象 | 原因 | 处理 |
|---|---|---|
| 海康相机恒 401,报 "sender not authorized" | 设备时钟偏差超出签名窗口 | WithAutoClockSkew 顶着,DiagnoseAuth 确认,根治是修相机 NTP |
| 请求返回 200 但设备什么都不做 | 旧版请求载荷命名空间错位,严格设备解析出空载荷 | 升级到 v2.1.0 以上(这版起线格式以官方 WSDL 为准) |
GetStreamURI 返回错误 |
相机响应里没有 Uri 元素 | 错误为 ErrEmptyMediaURI,消息里带 512 字节响应摘要;换 profile 再试 |
| 发现列表里设备名是空的 | 相机没在 scopes 里广告名字 | 用 EnrichDevices 补全,或读 GetDeviceInformation |
| 跨协议关联不上同一台设备 | 拿 EndpointRef 对了序列号 |
用 d.Info.SerialNumber 关联,EndpointRef 只是发现层标识 |
| 换了密码还是旧认证在跑 | 认证梯队粘住了成功档 | client.ResetAuthLadder() |
| 相机换 IP 后连不上 | capabilities 缓存里的旧地址 | 重跑 Initialize 或 InvalidateCapabilitiesCache() |
| use-go/onvif 的老代码编译不过 | 上游停更,新 Go 版本语法冲突 | 迁移到 v2:import 路径换 github.com/mickeyzzc/onvif-go/v2/onvif,多数代码原样可编 |
API 速查表
| 需求 | 入口 | 说明 |
|---|---|---|
| 建客户端 | onvif.NewClient(endpoint, opts...) |
URL/IP:port/裸 IP 均可 |
| 初始化 | client.Initialize(ctx) |
测偏差、取 capabilities、修 XAddr |
| 认证 | WithCredentials + WithAuthFallback |
四档梯队,成功档粘住 |
| 时钟偏差 | WithAutoClockSkew / DiagnoseAuth |
前者自动容偏差,后者出诊断报告 |
| 运行时调整 | SetCredentials / ResetAuthLadder / InvalidateCapabilitiesCache |
换凭据、重置梯队、清缓存 |
| 发现 | discovery.Discover / NewListener / ProbeEndpoint |
主动 / 被动 / 跨网段定向 |
| 过滤补全 | FilterONVIFDevices / EnrichDevices |
滤幽灵设备、并发补全信息 |
| 选码流 | onvif.SelectMainProfile / SelectSubProfile |
分辨率优先,防双 token 同流陷阱 |
| 取流/抓图 | Media().GetStreamURI / GetSnapshotURI |
返回 URI,媒体面自己做 |
| 强制 I 帧 | Media().SetSynchronizationPoint |
多路轮显省等待 |
| 云台 | PTZ().ContinuousMove / GotoPreset 等 |
速度 -1..1;限位在 GetConfigurations |
| 事件 | Events().SubscribeEvents |
托管订阅,自动续订 |
| H.265/Profile M | Media2() / Analytics() / metadata.Parse |
编码配置面 + 元数据流解析 |
| 当相机 | server.New(server.DefaultConfig()) |
PublishEvent 注入事件,TLS 成对配置 |
| 动态流地址 | server.UpdateStreamURI |
转码、端口变化场景 |
| 自定义动作 | server.RegisterContextHandler |
按请求上下文应答 |
相关链接
- 仓库:mickeyzzc/onvif-go · 文档中心:MiBee 协议库手册