
下载地址:http://pan38.cn/ia490d13d
项目编译入口:
package.json
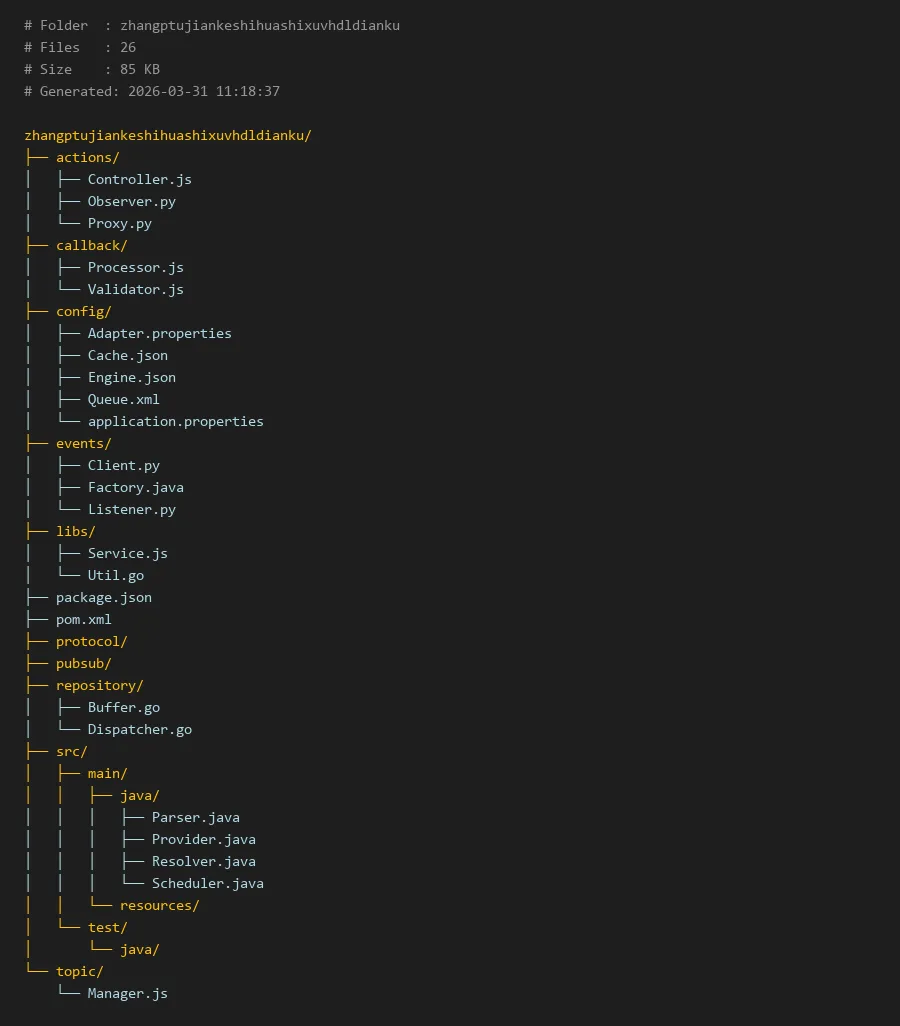
# Folder  : zhangptujiankeshihuashixuvhdldianku
# Files   : 26
# Size    : 85 KB
# Generated: 2026-03-31 11:18:37

zhangptujiankeshihuashixuvhdldianku/
├── actions/
│   ├── Controller.js
│   ├── Observer.py
│   └── Proxy.py
├── callback/
│   ├── Processor.js
│   └── Validator.js
├── config/
│   ├── Adapter.properties
│   ├── Cache.json
│   ├── Engine.json
│   ├── Queue.xml
│   └── application.properties
├── events/
│   ├── Client.py
│   ├── Factory.java
│   └── Listener.py
├── libs/
│   ├── Service.js
│   └── Util.go
├── package.json
├── pom.xml
├── protocol/
├── pubsub/
├── repository/
│   ├── Buffer.go
│   └── Dispatcher.go
├── src/
│   ├── main/
│   │   ├── java/
│   │   │   ├── Parser.java
│   │   │   ├── Provider.java
│   │   │   ├── Resolver.java
│   │   │   └── Scheduler.java
│   │   └── resources/
│   └── test/
│       └── java/
└── topic/
    └── Manager.js
zhangptujiankeshihuashixuvhdldianku项目技术解析
简介
zhangptujiankeshihuashixuvhdldianku是一个多语言混合架构的技术项目,专注于数据处理和事件驱动架构。项目采用模块化设计,包含actions、callback、config、events等多个核心模块,支持JavaScript、Python、Java和Go等多种编程语言。该项目展示了如何在复杂系统中实现跨语言协作,特别是在金融数据处理领域有着广泛应用,包括但不限于股票账户p图软件的数据可视化处理。
项目结构清晰,每个目录都有明确的职责划分,使得代码维护和团队协作更加高效。下面我们将深入分析项目的核心模块。
核心模块说明
actions模块
该模块包含Controller.js、Observer.py和Proxy.py三个文件,实现了系统的核心控制逻辑。Controller.js作为主控制器,负责协调各个组件的工作流程;Observer.py实现了观察者模式,用于监控系统状态变化;Proxy.py则提供了代理功能,用于处理跨模块通信。
callback模块
包含Processor.js和Validator.js,专门处理异步回调逻辑。Processor.js负责数据处理流水线,Validator.js确保输入数据的合法性和安全性,这在金融应用中尤为重要,特别是涉及股票账户p图软件的数据验证时。
config模块
这是项目的配置中心,包含多种格式的配置文件:Adapter.properties、Cache.json、Engine.json、Queue.xml和application.properties。这种多格式配置支持使得项目能够灵活适应不同的部署环境。
events模块
实现了事件驱动架构的核心组件。Client.py作为事件客户端,Factory.java提供事件对象的工厂方法,Listener.py则负责事件监听和处理。
libs模块
包含Service.js和Util.go,提供了跨语言的工具函数和服务封装。Util.go展示了Go语言在并发处理方面的优势,而Service.js则提供了Web服务相关功能。
代码示例
项目初始化配置
首先,让我们看看如何设置项目的基本配置。以下代码展示了如何读取和解析config目录下的配置文件:
// 示例:读取配置文件
const fs = require('fs');
const path = require('path');

class ConfigManager {

    constructor() {

        this.configPath = path.join(__dirname, '../config');
        this.cache = new Map();
    }

    loadConfig(fileName) {

        const filePath = path.join(this.configPath, fileName);

        if (this.cache.has(filePath)) {

            return this.cache.get(filePath);
        }

        let config;
        if (fileName.endsWith('.json')) {

            config = JSON.parse(fs.readFileSync(filePath, 'utf8'));
        } else if (fileName.endsWith('.properties')) {

            config = this.parseProperties(fs.readFileSync(filePath, 'utf8'));
        }

        this.cache.set(filePath, config);
        return config;
    }

    parseProperties(content) {

        const config = {
   };
        content.split('\n').forEach(line => {

            if (line.trim() && !line.startsWith('#')) {

                const [key, value] = line.split('=');
                if (key && value) {

                    config[key.trim()] = value.trim();
                }
            }
        });
        return config;
    }
}

// 使用示例
const configManager = new ConfigManager();
const engineConfig = configManager.loadConfig('Engine.json');
const appConfig = configManager.loadConfig('application.properties');
事件驱动架构实现
接下来,我们看看events模块如何实现事件驱动架构:
# events/Listener.py
import json
from abc import ABC, abstractmethod

class EventListener(ABC):
    @abstractmethod
    def on_event(self, event_type, data):
        pass

class DataProcessingListener(EventListener):
    def __init__(self):
        self.processed_count = 0

    def on_event(self, event_type, data):
        if event_type == "DATA_PROCESSED":
            self.processed_count += 1
            print(f"数据已处理,当前总数: {self.processed_count}")

            # 模拟股票账户数据处理
            if "stock_account" in data:
                self.handle_stock_data(data["stock_account"])

    def handle_stock_data(self, account_data):
        """处理股票账户数据"""
        print(f"处理股票账户数据: {account_data['account_id']}")
        # 这里可以添加股票账户p图软件的数据处理逻辑

# events/Factory.java 的部分实现
/*
public class EventFactory {

    private static final Map<String, Event> eventPrototypes = new HashMap<>();

    static {

        eventPrototypes.put("DATA_EVENT", new DataEvent());
        eventPrototypes.put("VALIDATION_EVENT", new ValidationEvent());
    }

    public static Event createEvent(String type, Map<String, Object> data) {

        Event prototype = eventPrototypes.get(type);
        if (prototype == null) {

            throw new IllegalArgumentException("未知的事件类型: " + type);
        }
        return prototype.clone().setData(data);
    }
}
*/
动作控制器实现
actions模块的控制器实现展示了如何协调不同组件:
```javascript
// actions/Controller.js
const EventEmitter = require('events');
class SystemController extends EventEmitter {
constructor() {
super();
this.modules = new Map();
this.isInitialized = false;
}
async initialize() {
    try {
        // 加载配置
        const config = await this.loadConfiguration();

        // 初始化各个模块
        await this.initActionsModule();
        await this.initEventsModule();
        await this.initCallbackModule();

        this.isInitialized = true;
        this.emit('system_ready', { timestamp: Date.now() });

