
下载地址:http://pan38.cn/i44a1efeb
项目编译入口:
package.json
# Folder : shengchengqigoujianqjiagouyinqing
# Files : 26
# Size : 84.8 KB
# Generated: 2026-03-31 03:08:15
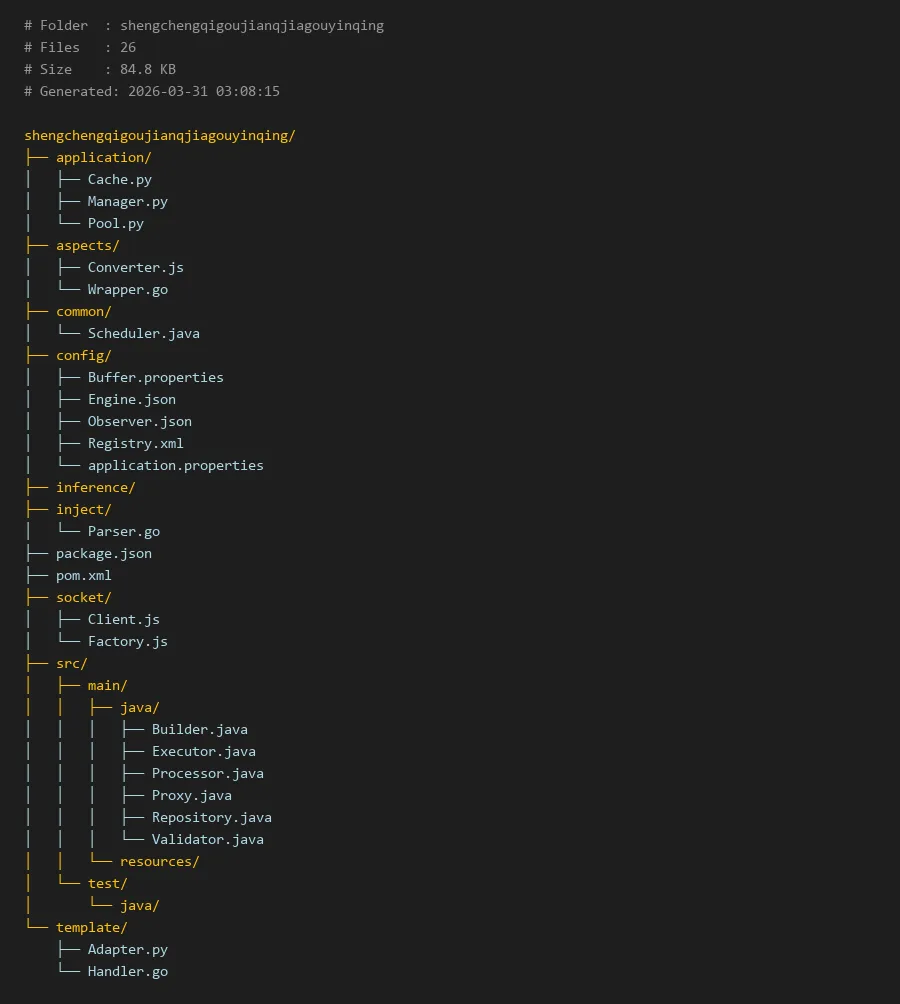
shengchengqigoujianqjiagouyinqing/
├── application/
│ ├── Cache.py
│ ├── Manager.py
│ └── Pool.py
├── aspects/
│ ├── Converter.js
│ └── Wrapper.go
├── common/
│ └── Scheduler.java
├── config/
│ ├── Buffer.properties
│ ├── Engine.json
│ ├── Observer.json
│ ├── Registry.xml
│ └── application.properties
├── inference/
├── inject/
│ └── Parser.go
├── package.json
├── pom.xml
├── socket/
│ ├── Client.js
│ └── Factory.js
├── src/
│ ├── main/
│ │ ├── java/
│ │ │ ├── Builder.java
│ │ │ ├── Executor.java
│ │ │ ├── Processor.java
│ │ │ ├── Proxy.java
│ │ │ ├── Repository.java
│ │ │ └── Validator.java
│ │ └── resources/
│ └── test/
│ └── java/
└── template/
├── Adapter.py
└── Handler.go
生成器构件架构引擎
简介
在当今快速发展的软件开发领域,自动化代码生成和架构管理已成为提高开发效率的关键技术。生成器构件架构引擎(shengchengqigoujianqjiagouyinqing)正是为解决这一问题而设计的综合解决方案。该系统通过模块化设计和多语言支持,为开发者提供了一个灵活、可扩展的代码生成平台。
该引擎的核心思想是将复杂的架构生成任务分解为可重用的构件,通过配置驱动的方式组合这些构件,最终生成符合特定需求的代码结构。这种设计模式不仅提高了代码的复用性,还使得架构调整变得更加简单高效。作为一款先进的格局生成器,它能够根据不同的业务场景和技术栈,自动生成最优的代码组织结构。
核心模块说明
配置管理模块 (config/)
配置模块是整个引擎的神经中枢,负责管理各种运行时参数和生成规则。Engine.json定义了引擎的核心行为,Registry.xml记录了所有可用构件的注册信息,而application.properties则提供了全局的应用程序设置。
应用层模块 (application/)
应用层模块实现了引擎的核心业务逻辑。Manager.py作为总控制器,协调各个构件的执行流程;Cache.py提供缓存机制,加速重复生成任务;Pool.py管理构件实例池,优化资源利用率。
切面处理模块 (aspects/)
切面模块实现了横切关注点的处理,如数据转换、包装等。Converter.js负责不同数据格式之间的转换,Wrapper.go则为生成的代码添加必要的包装层。
依赖注入模块 (inject/)
Parser.go实现了依赖注入解析器,能够自动解析构件之间的依赖关系,并注入相应的实例。
通信模块 (socket/)
该模块提供了进程间通信能力,Client.js和Factory.js协同工作,支持分布式部署下的构件协作。
调度模块 (common/)
Scheduler.java实现了任务调度算法,确保构件按照正确的顺序执行,避免循环依赖等问题。
代码示例
1. 引擎配置示例
首先,让我们看看如何配置引擎的核心参数。以下是一个典型的Engine.json配置:
{

  "engine": {

    "name": "格局生成器核心引擎",
    "version": "2.1.0",
    "mode": "hybrid",
    "parallelism": 4,
    "cacheEnabled": true,
    "defaultLanguage": "java"
  },
  "generators": {

    "spring-boot": {

      "templatePath": "/templates/spring",
      "outputDir": "./generated/spring",
      "dependencies": ["web", "data-jpa", "security"]
    },
    "react-app": {

      "templatePath": "/templates/react",
      "outputDir": "./generated/react",
      "components": ["router", "state-management", "ui-library"]
    }
  },
  "validation": {

    "strictMode": false,
    "autoFix": true,
    "rules": ["naming-convention", "dependency-cycle", "interface-segregation"]
  }
}
2. 构件管理器实现
接下来,我们看看Manager.py如何协调构件的执行:
```python
application/Manager.py
import json
import threading
from typing import Dict, List, Any
from .Cache import GenerationCache
from .Pool import ComponentPool
class ArchitectureManager:
def init(self, config_path: str):
with open(config_path, 'r') as f:
self.config = json.load(f)
    self.cache = GenerationCache(
        max_size=self.config['engine'].get('cacheSize', 100),
        ttl=self.config['engine'].get('cacheTTL', 3600)
    )

    self.pool = ComponentPool(
        max_instances=self.config['engine'].get('maxInstances', 10)
    )

    self.components = {}
    self.load_components()

def load_components(self):
    """动态加载所有注册的构件"""
    registry_path = 'config/Registry.xml'
    # 解析XML注册表,加载构件类
    # 这里简化处理,实际会从注册表加载
    self.components = {
        'controller': ControllerGenerator(),
        'service': ServiceGenerator(),
        'repository': RepositoryGenerator(),
        'model': ModelGenerator()
    }

def generate_architecture(self, blueprint: Dict[str, Any]) -> Dict[str, List[str]]:
    """根据蓝图生成完整架构"""
    cache_key = self._create_cache_key(blueprint)

    # 检查缓存
    cached_result = self.cache.get(cache_key)
    if cached_result:
        print("使用缓存结果")
        return cached_result

    # 验证蓝图
    if not self._validate_blueprint(blueprint):
        raise ValueError("无效的架构蓝图")

    # 执行生成任务
    results = {}
    tasks = self._create_generation_tasks(blueprint)

    # 并行执行构件生成
    with ThreadPoolExecutor(max_workers=self.config['engine']['parallelism']) as executor:
        future_to_component = {
            executor.submit(self._execute_component, task): task['component']
            for task in tasks
        }

        for future in as_completed(future_to_component):
            component_name = future_to_component[future]
            try:
                result = future.result()
                results[component_name] = result
            except Exception as e:
                print(f"构件 {component_name} 执行失败: {e}")

    # 缓存

