参考文档
效果如图
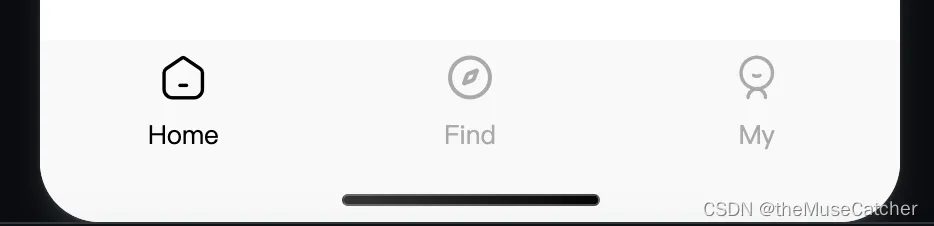
使用自定义tabBar
- 在
src/app.config.ts中的 tabBar 项指定custom: true字段,同时其余tabBar相关配置也补充完整。
export default defineAppConfig({
  tabBar: {
    custom: true,
    color: '#AAAAAA',
    selectedColor: '#000000',
    borderStyle: 'black',
    backgroundColor: '#ffffff',
    list: [
      {
        pagePath: 'pages/index/index',
        iconPath: 'images/home_unactive.png',
        selectedIconPath: 'images/home_active.png',
        text: 'Home'
      },
      {
        pagePath: 'pages/find/index',
        iconPath: 'images/home_unactive.png',
        selectedIconPath: 'images/home_active.png',
        text: 'Find'
      },
      {
        pagePath: 'pages/my/index',
        iconPath: 'images/home_unactive.png',
        selectedIconPath: 'images/home_active.png',
        text: 'My'
      }
    ]
  }
})
- 在
src/下创建custom-tab-bar文件夹:
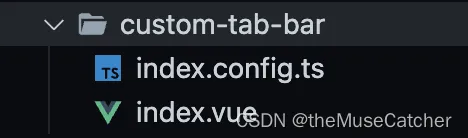
index.config.ts 配置如下:
export default {
  component: true
}
安装 @nutui/icons-vue-taro 图标组件包
pnpm add @nutui/icons-vue-taro
在 config/index.ts 中加入以下配置(解决引入@nutui/icons-vue-taro后使用webpack5编辑报错):
/*

    app.js错误:
    Error: module 'prebundle/vendors-node_modules_taro_weapp_prebundle_nutui_icons-vue-taro_js.wxss.js' is not defined,
      require args is './prebundle/vendors-node_modules_taro_weapp_prebundle_nutui_icons-vue-taro_js.wxss'
    */
    compiler: {
      type: 'webpack5',
      prebundle: { // 是否开启依赖预编译功能
        enable: false
      }
    }
index.vue 文件如下:
- 自定义
tabBar组件:
<script lang="ts">
  export default {
    options: {
      addGlobalClass: true // 解决tabbar样式隔离导致的<IconFont />图标无法显示问题
    }
  }
</script>
<script setup lang="ts">
import Taro from '@tarojs/taro'
import { IconFont } from '@nutui/icons-vue-taro'
import { storeToRefs } from 'pinia'
import { useSelectedStore } from '@/stores/selected'

const store = useSelectedStore()
const { selected } = storeToRefs(store)

const systemInfo = Taro.getSystemInfoSync() // 获取系统信息
const theme:'light'|'dark' = systemInfo.theme || 'light'
console.log('systemInfo', systemInfo)
console.log('theme', theme)

const themeStyle = {
  light: {
    color: '#AAAAAA',
    activeColor: '#000000',
    backgroundColor: '#F9F9F9'
  },
  dark: {
    color: '#AAAAAA',
    activeColor: '#F5F5F5',
    backgroundColor: 'rgba(0, 0, 0, .65)'
  }
}
const tabBarList = [
  {
    title: 'Home',
    icon: 'home',
    url: '/pages/index/index'
  },
  {
    title: 'Find',
    icon: 'find',
    url: '/pages/find/index'
  },
  {
    title: 'My',
    icon: 'my',
    url: '/pages/my/index'
  }
]
function switchTab (index: number, url: string) {
  const isAuthorized = Taro.getStorageSync('isAuthorized') || false
  const authorizeInterception = ['/pages/my/index']
  if (!isAuthorized && authorizeInterception.includes(url)) {
    Taro.navigateTo({
      url: `/subpackages/login/index?redirect=${encodeURIComponent(url)}&index=${index}`
    })
  } else {
    store.setSelected(index)
    Taro.switchTab({ url })
  }
}
</script>
<template>
  <view class="m-tab-bar" :style="`background-color: ${themeStyle[theme].backgroundColor};`">
    <view
      class="m-tab-bar-item"
      v-for="(tabBar, index) in tabBarList" :key="index"
      @tap="switchTab(index, tabBar.url)">
      <IconFont class="u-icon" :name="tabBar.icon" v-show="selected === index" :color="themeStyle[theme].activeColor" />
      <IconFont class="u-icon" :name="tabBar.icon" v-show="selected !== index" :color="themeStyle[theme].color" />
      <text class="u-view" :style="{ color: selected === index ? themeStyle[theme].activeColor : themeStyle[theme].color }">{

  { tabBar.title }}</text>
    </view>
  </view>
</template>
<style lang="less">
.m-tab-bar {
  position: fixed;
  bottom: 0;
  left: 0;
  right: 0;
  height: calc(100px + env(safe-area-inset-bottom));
  background: #FFFFFF;
  display: flex;
  z-index: 999;
  .m-tab-bar-item {
    flex: 1;
    text-align: center;
    display: flex;
    align-items: center;
    flex-direction: column;
    .u-icon {
      font-size: 40px;
      width: 68px;
      height: 68px;
    }
    .u-view {
      font-weight: 400;
      font-size: 24px;
      line-height: 32px;
    }
  }
}
</style>
- 使用
<nut-tabbar/>组件
<script lang="ts">
  export default {
    options: {
      addGlobalClass: true // 解决tabbar样式隔离导致的<IconFont />图标无法显示问题
    }
  }
</script>
<script setup lang="ts">
import { h } from 'vue'
import { storeToRefs } from 'pinia'
import Taro from '@tarojs/taro'
import { useSelectedStore } from '@/stores/selected'
import { Home, Find, My } from '@nutui/icons-vue-taro'

const store = useSelectedStore()
const { selected } = storeToRefs(store)

const systemInfo = Taro.getSystemInfoSync() // 获取系统信息
const theme:'light'|'dark' = systemInfo.theme || 'light'
console.log('theme', theme)

const themeStyle = {
  light: {
    color: '#AAAAAA',
    activeColor: '#000000',
    backgroundColor: '#FFFFFF'
  },
  dark: {
    color: '#AAAAAA',
    activeColor: '#F5F5F5',
    backgroundColor: 'rgba(0, 0, 0, .65)'
  }
}
const tabBarList = [
  {
    title: 'Home',
    icon: h(Home),
    url: '/pages/index/index'
  },
  {
    title: 'Find',
    icon: h(Find),
    url: '/pages/find/index'
  },
  {
    title: 'My',
    icon: h(My),
    url: '/pages/my/index'
  }
]
function switchTab (index: number, url: string) {
  const isAuthorized = Taro.getStorageSync('isAuthorized') || false
  const authorizeInterception = ['/pages/my/index']
  if (!isAuthorized && authorizeInterception.includes(url)) {
    Taro.navigateTo({
      url: `/subpackages/login/index?redirect=${encodeURIComponent(url)}&index=${index}`
    })
  } else {
    store.setSelected(index)
    Taro.switchTab({ url })
  }
}
</script>
<template>
  <nut-tabbar
    :style="`--backgroundColor: ${themeStyle[theme].backgroundColor};`"
    :unactive-color="themeStyle[theme].color"
    :active-color="themeStyle[theme].activeColor"
    bottom
    safe-area-inset-bottom
    placeholder
    v-model="selected">
    <nut-tabbar-item
      v-for="(tabBar, index) in tabBarList" :key="index"
      :tab-title="tabBar.title"
      :icon="tabBar.icon"
      @tap="switchTab(index, tabBar.url)">
    </nut-tabbar-item>
  </nut-tabbar>
</template>
<style lang="less">
.nut-tabbar {
  background-color: var(--backgroundColor);
}
</style>
- 使用
pinia进行全局selected状态管理,在src/stores/下创建selected.ts文件:
安装 pinia
pnpm add pinia
import { defineStore } from 'pinia'
import { ref } from 'vue'

// 你可以任意命名 `defineStore()` 的返回值,但最好使用 store 的名字,同时以 `use` 开头且以 `Store` 结尾。
// (比如 `useUserStore`,`useCartStore`,`useProductStore`)
// 第一个参数是你的应用中 Store 的唯一 ID。

// Setup Store
export const useSelectedStore = defineStore('selected', () => {
  const selected = ref<number>(0)
  function setSelected (value: number) {
    selected.value = value
  }
  return { selected, setSelected }
})