Spring6(二):IoC容器(1)+https://developer.aliyun.com/article/1556688
3.2.5 为对象类型属性赋值
①创建班级类Clazz
怕和关键字class冲突,这里取名为Clazz
package com.atguigu.spring6.bean

public class Clazz {
    private Integer clazzId;
    private String clazzName;
    public Integer getClazzId() {
        return clazzId;
    }
    public void setClazzId(Integer clazzId) {
        this.clazzId = clazzId;
    }
    public String getClazzName() {
        return clazzName;
    }
    public void setClazzName(String clazzName) {
        this.clazzName = clazzName;
    }
    @Override
    public String toString() {
        return "Clazz{" +
                "clazzId=" + clazzId +
                ", clazzName='" + clazzName + '\'' +
                '}';
    }
    public Clazz() {
    }
    public Clazz(Integer clazzId, String clazzName) {
        this.clazzId = clazzId;
        this.clazzName = clazzName;
    }
}
②修改Student类
在Student类中添加以下代码:
//在Student类中添加了对象类型属性
private Clazz clazz;
public Clazz getClazz() {
  return clazz;
}
public void setClazz(Clazz clazz) {
  this.clazz = clazz;
}
方式一:引用外部bean
bean.xml
配置Clazz类型的bean:
<bean id="clazzOne" class="com.atguigu.spring6.bean.Clazz">
    <property name="clazzId" value="1111"></property>
    <property name="clazzName" value="财源滚滚班"></property>
</bean>
为Student中的clazz属性赋值:
<bean id="studentFour" class="com.atguigu.spring6.bean.Student">
    <property name="id" value="1004"></property>
    <property name="name" value="赵六"></property>
    <property name="age" value="26"></property>
    <property name="sex" value="女"></property>
    <!-- ref属性:引用IOC容器中某个bean的id,将所对应的bean为属性赋值 -->
    <property name="clazz" ref="clazzOne"></property>
</bean>
错误演示:
<bean id="studentFour" class="com.atguigu.spring6.bean.Student">
    <property name="id" value="1004"></property>
    <property name="name" value="赵六"></property>
    <property name="age" value="26"></property>
    <property name="sex" value="女"></property>
    <!--需要用ref-->
    <property name="clazz" value="clazzOne"></property>
</bean>
如果错把ref属性写成了value属性,会抛出异常: Caused by: java.lang.IllegalStateException: Cannot convert value of type ‘java.lang.String’ to required type ‘com.atguigu.spring6.bean.Clazz’ for property ‘clazz’: no matching editors or conversion strategy found
意思是不能把String类型转换成我们要的Clazz类型,说明我们使用value属性时,Spring只把这个属性看做一个普通的字符串,不会认为这是一个bean的id,更不会根据它去找到bean来赋值
方式二:内部bean
<bean id="studentFour" class="com.atguigu.spring6.bean.Student">
    <property name="id" value="1004"></property>
    <property name="name" value="赵六"></property>
    <property name="age" value="26"></property>
    <property name="sex" value="女"></property>
    <property name="clazz">
        <!-- 在一个bean中再声明一个bean就是内部bean -->
        <!-- 内部bean只能用于给属性赋值,不能在外部通过IOC容器获取,因此可以省略id属性 -->
        <bean id="clazzInner" class="com.atguigu.spring6.bean.Clazz">
            <property name="clazzId" value="2222"></property>
            <property name="clazzName" value="远大前程班"></property>
        </bean>
    </property>
</bean>
方式三:级联属性赋值
<bean id="studentFour" class="com.atguigu.spring6.bean.Student">
    <property name="id" value="1004"></property>
    <property name="name" value="赵六"></property>
    <property name="age" value="26"></property>
    <property name="sex" value="女"></property>

    <property name="clazz" ref="clazzOne"></property>
    <property name="clazz.clazzId" value="3333"></property>
    <property name="clazz.clazzName" value="最强王者班"></property>
</bean>
3.2.6 为数组类型属性赋值
①修改Student类
在Student类中添加以下代码:
private String[] hobbies;
public String[] getHobbies() {
    return hobbies;
}
public void setHobbies(String[] hobbies) {
    this.hobbies = hobbies;
}
②配置bean
<bean id="studentFour" class="com.atguigu.spring.bean6.Student">
    <property name="id" value="1004"></property>
    <property name="name" value="赵六"></property>
    <property name="age" value="26"></property>
    <property name="sex" value="女"></property>

    <property name="hobbies">
        <array>
            <value>抽烟</value>
            <value>喝酒</value>
            <value>烫头</value>
        </array>
    </property>
</bean>
3.2.7 为集合类型属性赋值
(1)为List集合类型属性赋值
在Clazz类中添加以下代码:
private List<Student> students;
public List<Student> getStudents() {
    return students;
}
public void setStudents(List<Student> students) {
    this.students = students;
}
配置bean:
<bean id="clazzTwo" class="com.atguigu.spring6.bean.Clazz">
    <property name="clazzId" value="4444"></property>
    <property name="clazzName" value="Javaee0222"></property>

    <property name="students">
        <list>
            <ref bean="studentOne"></ref>
            <ref bean="studentTwo"></ref>
            <ref bean="studentThree"></ref>
        </list>
    </property>
</bean>
若为Set集合类型属性赋值,只需要将其中的list标签改为set标签即可
(2)为Map集合类型属性赋值
创建教师类Teacher:
package com.atguigu.spring6.bean;
public class Teacher {
    private Integer teacherId;
    private String teacherName;
  //此处省略了有参,无参构造,get、set、toString方法
}
在Student类中添加以下代码:
private Map<String, Teacher> teacherMap;
public Map<String, Teacher> getTeacherMap() {
    return teacherMap;
}
public void setTeacherMap(Map<String, Teacher> teacherMap) {
    this.teacherMap = teacherMap;
}
配置bean:
<bean id="teacherOne" class="com.atguigu.spring6.bean.Teacher">
    <property name="teacherId" value="10010"></property>
    <property name="teacherName" value="大宝"></property>
</bean>
<bean id="teacherTwo" class="com.atguigu.spring6.bean.Teacher">
    <property name="teacherId" value="10086"></property>
    <property name="teacherName" value="二宝"></property>
</bean>
<bean id="studentFour" class="com.atguigu.spring6.bean.Student">
    <property name="id" value="1004"></property>
    <property name="name" value="赵六"></property>
    <property name="age" value="26"></property>
    <property name="sex" value="女"></property>
    <!-- ref属性:引用IOC容器中某个bean的id,将所对应的bean为属性赋值 -->
    <property name="clazz" ref="clazzOne"></property>
    <property name="hobbies">
        <array>
            <value>抽烟</value>
            <value>喝酒</value>
            <value>烫头</value>
        </array>
    </property>

    <property name="teacherMap">
        <map>
            <entry>
                <key>
                    <value>10010</value>   <!--key-->
                </key>
                <ref bean="teacherOne"></ref>  <!--value-->
            </entry>
            <entry>
                <key>
                    <value>10086</value>
                </key>
                <ref bean="teacherTwo"></ref>
            </entry>
        </map>
    </property>
</bean>
(3)引用集合类型的bean
<!--list集合类型的bean-->
<util:list id="students">
    <ref bean="studentOne"></ref>
    <ref bean="studentTwo"></ref>
    <ref bean="studentThree"></ref>
</util:list>
<!--map集合类型的bean-->
<util:map id="teacherMap">
    <entry>
        <key>
            <value>10010</value>
        </key>
        <ref bean="teacherOne"></ref>
    </entry>
    <entry>
        <key>
            <value>10086</value>
        </key>
        <ref bean="teacherTwo"></ref>
    </entry>
</util:map>
<bean id="clazzTwo" class="com.atguigu.spring6.bean.Clazz">
    <property name="clazzId" value="4444"></property>
    <property name="clazzName" value="Javaee0222"></property>
    <property name="students" ref="students"></property>
</bean>
<bean id="studentFour" class="com.atguigu.spring6.bean.Student">
    <property name="id" value="1004"></property>
    <property name="name" value="赵六"></property>
    <property name="age" value="26"></property>
    <property name="sex" value="女"></property>

    <!-- ref属性:引用IOC容器中某个bean的id,将所对应的bean为属性赋值 -->
    <property name="clazz" ref="clazzOne"></property>
    <property name="hobbies">
        <array>
            <value>抽烟</value>
            <value>喝酒</value>
            <value>烫头</value>
        </array>
    </property>

    <property name="teacherMap" ref="teacherMap"></property>
</bean>
使用util:list、util:map标签必须引入相应的命名空间
<?xml version="1.0" encoding="UTF-8"?>
<beans xmlns="http://www.springframework.org/schema/beans"
    xmlns:xsi="http://www.w3.org/2001/XMLSchema-instance"
    xmlns:util="http://www.springframework.org/schema/util"
    xsi:schemaLocation="http://www.springframework.org/schema/util
    http://www.springframework.org/schema/util/spring-util.xsd
    http://www.springframework.org/schema/beans
    http://www.springframework.org/schema/beans/spring-beans.xsd">
3.2.8 p命名空间
引入p命名空间
<?xml version="1.0" encoding="UTF-8"?>
<beans xmlns="http://www.springframework.org/schema/beans"
       xmlns:xsi="http://www.w3.org/2001/XMLSchema-instance"
       xmlns:util="http://www.springframework.org/schema/util"
       xmlns:p="http://www.springframework.org/schema/p"    <!--引入p命名空间-->
       xsi:schemaLocation="http://www.springframework.org/schema/util
       http://www.springframework.org/schema/util/spring-util.xsd
       http://www.springframework.org/schema/beans
       http://www.springframework.org/schema/beans/spring-beans.xsd">
引入p命名空间后,可以通过以下方式为bean的各个属性赋值
<!--替代property-->
<bean id="studentSix" class="com.atguigu.spring6.bean.Student"
    p:id="1006" p:name="小明" p:clazz-ref="clazzOne" p:teacherMap-ref="teacherMap"></bean>
3.2.9 引入jdbc配置文件
①加入依赖
<!-- MySQL驱动 -->
<dependency>
    <groupId>mysql</groupId>
    <artifactId>mysql-connector-java</artifactId>
    <version>8.0.30</version>
</dependency>
<!-- 数据源 -->
<dependency>
    <groupId>com.alibaba</groupId>
    <artifactId>druid</artifactId>
    <version>1.2.15</version>
</dependency>
②创建外部属性文件
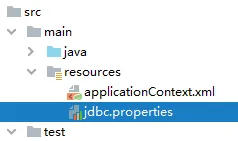
jdbc.user=root
jdbc.password=atguigu
jdbc.url=jdbc:mysql://localhost:3306/ssm?serverTimezone=UTC
jdbc.driver=com.mysql.cj.jdbc.Driver
③引入属性文件
引入context 名称空间
<?xml version="1.0" encoding="UTF-8"?>
<!--引入属性文件-->
<beans xmlns="http://www.springframework.org/schema/beans"
       xmlns:xsi="http://www.w3.org/2001/XMLSchema-instance"
       xmlns:context="http://www.springframework.org/schema/context"
       xsi:schemaLocation="http://www.springframework.org/schema/beans
       http://www.springframework.org/schema/beans/spring-beans.xsd

       http://www.springframework.org/schema/context
       http://www.springframework.org/schema/context/spring-context.xsd">
    <!-- 3. 引入外部属性文件 -->
  <context:property-placeholder location="classpath:jdbc.properties"/>

    <!--4. 配置bean-->
    <bean id="druidDataSource" class="com.alibaba.druid.pool.DruidDataSource">
        <property name="url" value="${jdbc.url}"/>
        <property name="driverClassName" value="${jdbc.driver}"/>
        <property name="username" value="${jdbc.user}"/>
        <property name="password" value="${jdbc.password}"/>
  </bean>
</beans>
注意:在使用 context:property-placeholder 元素加载外包配置文件功能前,首先需要在 XML 配置的一级标签 中添加 context 相关的约束。
⑤测试
@Test
public void testDataSource() throws SQLException {
    ApplicationContext ac = new ClassPathXmlApplicationContext("spring-datasource.xml");
    DataSource dataSource = ac.getBean(DataSource.class);
    Connection connection = dataSource.getConnection();
    System.out.println(connection);
}
3.2.10 bean的作用域
在Spring中可以通过配置bean标签的scope属性来指定bean的作用域范围,各取值含义参加下表:
| 取值 | 含义 | 创建对象的时机 |
| singleton(默认) | 在IOC容器中,这个bean的对象始终为单实例 | IOC容器初始化时 |
| prototype | 这个bean在IOC容器中有多个实例 | 获取bean时 |
如果是在WebApplicationContext环境下还会有另外几个作用域(但不常用):
| 取值 | 含义 |
| request | 在一个请求范围内有效 |
| session | 在一个会话范围内有效 |
②创建类User
package com.atguigu.spring6.bean;
public class User {
    private Integer id;
    private String username;
    private String password;
    private Integer age;
  //省略了有参、无参构造、get、set、toString()方法
}
③配置bean
<!-- scope属性:取值singleton(默认值),bean在IOC容器中只有一个实例,IOC容器初始化时创建对象 -->
<!-- scope属性:取值prototype,bean在IOC容器中可以有多个实例,getBean()时创建对象 -->
<bean class="com.atguigu.spring6.bean.User" scope="prototype"></bean>
④测试
@Test
public void testBeanScope(){
    ApplicationContext ac = new ClassPathXmlApplicationContext("spring-scope.xml");
    //可以有两个实例
    User user1 = ac.getBean(User.class);
    User user2 = ac.getBean(User.class);
    System.out.println(user1==user2);
}