二维码是用某种特定的几何图形按一定规律在平面(二维方向上)分布的黑白相间的图形记录数据符号信息的,国外对二维码技术的研究始于20世纪80年代末,在二维码符号表示技术研究方面已研制出多种码制,常见的有PDF417、QR Code、Code 49、Code 16K、Code One等。二维码技术已经被广泛应用于公安、外交、军事等部门对各类证件的管理,而且也将二维码应用于海关、税务等部门对各类报表和票据的管理,商业、交通运输等部门对商品及货物运输的管理、邮政部门对邮政包裹的管理、工业生产领域对工业生产线的自动化管理。
下面介绍一下如何用.NET生成二维码(QR Code码制),下面给出详细步骤:
1 项目结构
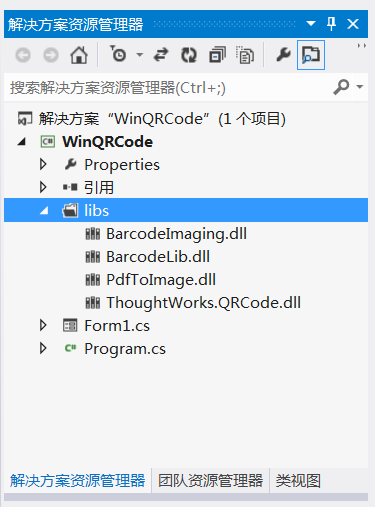
新建一个window应用程序,然后引入.NET二维码类库(开源的类库,可从网上下载):
2 代码实现
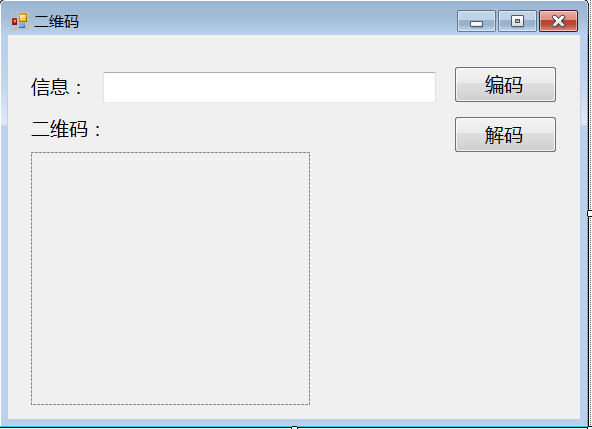
在Form1窗口上进行UI设计,可以通过拖拽方式构建UI界面,界面上有一个文本框,可以输入信息,如网址信息,右侧有一个编码按钮,用于生成二维码,下面是具体的代码:
namespaceWinQRCode{
partialclassForm1    {
/// <summary>/// 必需的设计器变量。/// </summary>privateSystem.ComponentModel.IContainercomponents=null;
/// <summary>/// 清理所有正在使用的资源。/// </summary>/// <param name="disposing">如果应释放托管资源,为 true;否则为 false。</param>protectedoverridevoidDispose(booldisposing)
        {
if (disposing&& (components!=null))
            {
components.Dispose();
            }
base.Dispose(disposing);
        }
#regionWindows窗体设计器生成的代码/// <summary>/// 设计器支持所需的方法 - 不要/// 使用代码编辑器修改此方法的内容。/// </summary>privatevoidInitializeComponent()
        {
this.button1=newSystem.Windows.Forms.Button();
this.button2=newSystem.Windows.Forms.Button();
this.pictureBox1=newSystem.Windows.Forms.PictureBox();
this.label1=newSystem.Windows.Forms.Label();
this.textBox1=newSystem.Windows.Forms.TextBox();
this.label2=newSystem.Windows.Forms.Label();
this.lbl解码信息=newSystem.Windows.Forms.Label();
            ((System.ComponentModel.ISupportInitialize)(this.pictureBox1)).BeginInit();
this.SuspendLayout();
//// button1//this.button1.Location=newSystem.Drawing.Point(446, 31);
this.button1.Margin=newSystem.Windows.Forms.Padding(4, 5, 4, 5);
this.button1.Name="button1";
this.button1.Size=newSystem.Drawing.Size(103, 37);
this.button1.TabIndex=0;
this.button1.Text="编码";
this.button1.UseVisualStyleBackColor=true;
this.button1.Click+=newSystem.EventHandler(this.button1_Click);
//// button2//this.button2.Location=newSystem.Drawing.Point(446, 81);
this.button2.Margin=newSystem.Windows.Forms.Padding(4, 5, 4, 5);
this.button2.Name="button2";
this.button2.Size=newSystem.Drawing.Size(103, 37);
this.button2.TabIndex=1;
this.button2.Text="解码";
this.button2.UseVisualStyleBackColor=true;
this.button2.Click+=newSystem.EventHandler(this.button2_Click);
//// pictureBox1//this.pictureBox1.Location=newSystem.Drawing.Point(23, 117);
this.pictureBox1.Margin=newSystem.Windows.Forms.Padding(4, 5, 4, 5);
this.pictureBox1.Name="pictureBox1";
this.pictureBox1.Size=newSystem.Drawing.Size(279, 253);
this.pictureBox1.SizeMode=System.Windows.Forms.PictureBoxSizeMode.StretchImage;
this.pictureBox1.TabIndex=2;
this.pictureBox1.TabStop=false;
//// label1//this.label1.AutoSize=true;
this.label1.Location=newSystem.Drawing.Point(18, 39);
this.label1.Margin=newSystem.Windows.Forms.Padding(4, 0, 4, 0);
this.label1.Name="label1";
this.label1.Size=newSystem.Drawing.Size(69, 25);
this.label1.TabIndex=3;
this.label1.Text="信息:";
//// textBox1//this.textBox1.Location=newSystem.Drawing.Point(95, 37);
this.textBox1.Margin=newSystem.Windows.Forms.Padding(4, 5, 4, 5);
this.textBox1.Name="textBox1";
this.textBox1.Size=newSystem.Drawing.Size(333, 31);
this.textBox1.TabIndex=4;
//// label2//this.label2.AutoSize=true;
this.label2.Location=newSystem.Drawing.Point(18, 81);
this.label2.Margin=newSystem.Windows.Forms.Padding(4, 0, 4, 0);
this.label2.Name="label2";
this.label2.Size=newSystem.Drawing.Size(88, 25);
this.label2.TabIndex=5;
this.label2.Text="二维码:";
//// lbl解码信息//this.lbl解码信息.AutoSize=true;
this.lbl解码信息.Location=newSystem.Drawing.Point(101, 81);
this.lbl解码信息.Margin=newSystem.Windows.Forms.Padding(4, 0, 4, 0);
this.lbl解码信息.Name="lbl解码信息";
this.lbl解码信息.Size=newSystem.Drawing.Size(0, 25);
this.lbl解码信息.TabIndex=6;
//// Form1//this.AutoScaleDimensions=newSystem.Drawing.SizeF(11F, 24F);
this.AutoScaleMode=System.Windows.Forms.AutoScaleMode.Font;
this.ClientSize=newSystem.Drawing.Size(572, 384);
this.Controls.Add(this.lbl解码信息);
this.Controls.Add(this.label2);
this.Controls.Add(this.textBox1);
this.Controls.Add(this.label1);
this.Controls.Add(this.pictureBox1);
this.Controls.Add(this.button2);
this.Controls.Add(this.button1);
this.Font=newSystem.Drawing.Font("微软雅黑", 10.8F, System.Drawing.FontStyle.Regular, System.Drawing.GraphicsUnit.Point, ((byte)(134)));
this.Margin=newSystem.Windows.Forms.Padding(4, 5, 4, 5);
this.Name="Form1";
this.Text="二维码";
            ((System.ComponentModel.ISupportInitialize)(this.pictureBox1)).EndInit();
this.ResumeLayout(false);
this.PerformLayout();
        }
#endregionprivateSystem.Windows.Forms.Buttonbutton1;
privateSystem.Windows.Forms.Buttonbutton2;
privateSystem.Windows.Forms.PictureBoxpictureBox1;
privateSystem.Windows.Forms.Labellabel1;
privateSystem.Windows.Forms.TextBoxtextBox1;
privateSystem.Windows.Forms.Labellabel2;
privateSystem.Windows.Forms.Labellbl解码信息;
    }
}
UI界面显示如下所示:
而UI界面上的事件代码,需要修改后台代码进行实现,其中的编码和解码按钮事件的核心代码如下:
usingSystem;
usingSystem.Collections.Generic;
usingSystem.ComponentModel;
usingSystem.Data;
usingSystem.Drawing;
usingSystem.Linq;
usingSystem.Text;
usingSystem.Windows.Forms;
namespaceWinQRCode{
usingThoughtWorks.QRCode.Codec;
usingThoughtWorks.QRCode.Codec.Data;
usingThoughtWorks.QRCode.Codec.Util;
usingSystem.IO;
usingPdfToImage;
publicpartialclassForm1 : Form    {
publicForm1()
        {
InitializeComponent();
        }
/// <summary>/// 编码/// </summary>/// <param name="sender"></param>/// <param name="e"></param>privatevoidbutton1_Click(objectsender, EventArgse)
        {
if (this.textBox1.Text!="")
            {
Cursor.Current=Cursors.WaitCursor;
if (textBox1.Text.Trim() ==String.Empty)
                {
MessageBox.Show("不能为空.");
return;
                }
QRCodeEncoderqrCodeEncoder=newQRCodeEncoder();
qrCodeEncoder.QRCodeEncodeMode=QRCodeEncoder.ENCODE_MODE.BYTE;
qrCodeEncoder.QRCodeScale=4;
qrCodeEncoder.QRCodeVersion=7;
qrCodeEncoder.QRCodeErrorCorrect=QRCodeEncoder.ERROR_CORRECTION.M;
System.Drawing.Imageimage;
Stringdata=textBox1.Text;
//编码image=qrCodeEncoder.Encode(data);
//图片显示this.pictureBox1.Image=image;
Cursor.Current=Cursors.Default;
            }
        }
/// <summary>/// 解码/// </summary>/// <param name="sender"></param>/// <param name="e"></param>privatevoidbutton2_Click(objectsender, EventArgse)
        {
Cursor.Current=Cursors.WaitCursor;
Bitmapb=this.pictureBox1.ImageasBitmap;
try            {
QRCodeDecoderdecoder=newQRCodeDecoder();
//解码StringdecodedString=decoder.decode(newQRCodeBitmapImage(b));
//显示解码信息this.lbl解码信息.Text+=decodedString ;
            }
catch (Exceptionex)
            {
MessageBox.Show(ex.Message);
            }
Cursor.Current=Cursors.Default;
        }
privatevoidForm1_Load(objectsender, EventArgse)
        {
        }
    }
}
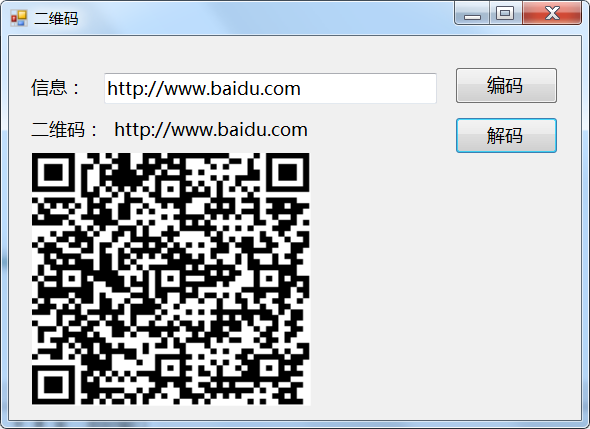
首先需要引入相关的二维码库文件中的命名空间,然后从UI上获取文本框信息,调用库文件中的编码和解码方法即可。QRCodeEncoder类中的 Encode(data)方法生成一个image对象,并赋值到pictureBox1控件上进行显示即可。
3 效果
编译运行,演示程序显示如下图所示:


